It’s been quiet in our blog last months, and for a good reason. We are currently developing Atola Insight, a data recovery solution. What’s good about it is that it covers all four phases of a data recovery process: diagnostics, firmware recovery, duplication/imaging, and file recovery.
The Fourth Element
Every data recovery specialist knows about the firmware recovery tools, disk duplication (or imaging) tools, and file recovery (data extraction) tools. But there is one more important thing that often gets overlooked: diagnostics. When a hard drive arrives to the lab, the very first thing a specialist has to do is to find out the current state of the hard drive. You cannot effectively repair a hard drive if you are not sure about what is the issue. If the diagnostics is not done properly, you risk doing more damage to the drive or rendering it irrecoverable.
I have never heard of a doctor beginning a surgery without having read the precise diagnosis first. The diagnostics is done earlier by people who had the knowledge and tools needed to perform such task. I do not see why this should be any different in the data recovery process, and I believe that currently the initial diagnostics is getting much less attention than it deserves.
There are some tools that help diagnosing surface and heads (for example MHDD); firmware can be diagnosed to some extent with the firmware recovery tools; electronics can be tested with a multimeter or oscilloscope. But there is no single tool that would allow to diagnose a hard drive and determine the exact issue.
Introducing Proper Diagnostics
For the last year we have been working on diagnostics algorithms that would allow to diagnose any hard drive and determine the exact issue, whether it is an electronic damage, mechanical damage, firmware damage, or a file system damage. We developed Atola DiskSense, a USB unit that works with IDE and SATA hard drives. One of the most important uses of Atola DiskSense is HDD diagnostics.
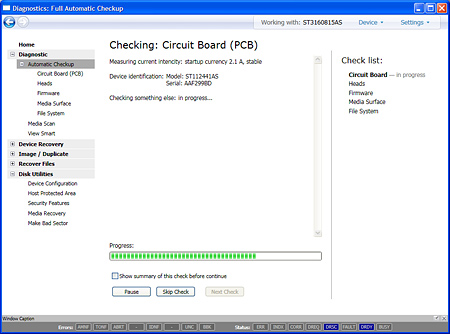
Atola Insight suite — diagnosing HDD circuit board
Atola DiskSense is a small silver box that attaches to any PC with a single USB cable. It contains:
- IDE/SATA interface that supports UDMA transfers
- 2 separate current monitors for 5V and 12V lines with short-circuit protection
- HDD power switch
- Emergency button that allows to stop the current operation immediately
- RS-232C (serial) port for Seagate hard drives
- Buzzer that informs when something is done or there is a critical error
- LEDs that indicate status (HDD power, IDE/SATA busy, Operation, Error)
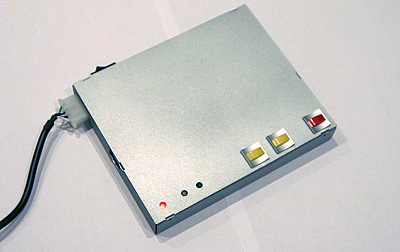
Atola DiskSense unit — working prototype
Using Atola DiskSense you can get the most precise diagnostics results. Upon completion, Atola Insight suite reports the exact problem with the hard drive; it also suggests what steps have to be done to recover the drive.
Firmware
The biggest problem with the most firmware recovery tools is that all they do is just provide access to the hard drive’s firmware (modules, ROM, configuration NVRAM, etc); therefore the firmware recovery process looks more like using a disk editor to recover a file system. To recover something with such tools, you would either need to use a 500+ page manual, or you would have to be one of those who perform the research and development (in this case you don’t really need third-party tools since you can create the best tools by yourself).
Introducing Proper Firmware Recovery
In Atola Insight, the firmware (system area) recovery algorithms are automated to the maximum possible extent. The program automatically creates full backups of the hard drive’s firmware before any recovery attempt. All controls have clear descriptions, so that there is little or no need to use the manual. Of course, old-fashioned manual recovery is still available.
We will be revealing more information about Atola Insight soon.
- We are shutting down Bandura - June 17, 2013
- Bye-bye Windows XP and Vista - April 7, 2013
- Bad Sector Recovery - January 2, 2013
1 Comment
Bronzen · May 21, 2011 at 7:36 am
I was given a harddrive which had a unaccessible partition leaving only 30 G available of an 80 G Drive. I did try the tool, but it did not work for me. However, I had installed the harddrive in my Gateway as a second harddrive. I finally decided to install Linux on it. Linux accessed the whole drive and reformatted it. I believe now that I could resinstall windows. Linux did not acknowledge the “locked” portion of the drive and just formatted the whole thing as if Windows was never there.
Linux is a free Open Source software, so if you want to give it a try, go for it. If anyone reloads windows and succeeds getting the full drive capacity under Windows (before I do), please let me know and/or post a note. Thanks