Atola Insight Forensic enables working with remote database shared between many users. Here is the scenario how to setup such a network database and connect different PCs with Atola Insight to it.
1. Pre-install SQL Server 2012 or 2014 on the network server PC
2. Launch Atola Insight Forensic on the user PC
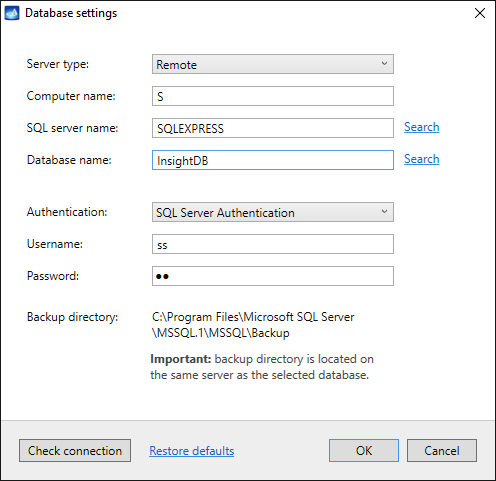
3. Navigate to Insight -> Database Connection Settings from the top menu
A. Select Server type: Remote
B. Specify network server name, select SQL server instance and database names
C. Enter SQL server login and password as shown in the picture below:
4. Click OK and re-launch Atola Insight Forensic on the user PC.
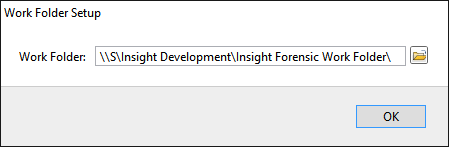
5. It will create the remote database and ask for the Work Folder name:

Hint: Work Folder is necessary to store large files that do not fit into the database: imaging maps, logs, file recovery hash lists.
6. Change the Work Folder to the shared folder on the network server PC.
Example: The network folder successfully selected
Now you have the Atola Insight network database prepared for remote use! You can connect Atola Insight Forensic software from the other PCs. Just set up the same database settings as you did in the step 3. No need to specify Work Folder anymore given Atola Insight will load it from the remote SQL server on the network server PC.
The only limitation: Two users will not be able to work on the same case simultaneously.

He believes in saving time & energy of people doing mission-critical work. Therefore, all his efforts are focused on leading R&D of innovative Atola products.
Gamification enthusiast. Agile development proponent.
- Atola TaskForce 2023.4.2 stability update - August 7, 2023
- Wipe multiple drives in Atola Insight Forensic 5.2 - May 26, 2022
- Logical imaging in TaskForce 2022.4 - April 11, 2022
Vitaliy Mokosiy
Atola CTO He believes in saving time & energy of people doing mission-critical work. Therefore, all his efforts are focused on leading R&D of innovative Atola products. Gamification enthusiast. Agile development proponent.