Atola’s high-performance TaskForce forensic imager has a well-developed imaging functionality that performs a huge variety of acquisition-related jobs. Not only does it assemble, identify RAID configuration and image RAID arrays. TaskForce also safely handles damaged evidence drives, verifies data on good and bad media, performs selective imaging, has a special zero-click imaging mode on its 17 source ports, etc.
In this blog, we will touch on all of these and other imaging options that make TaskForce an imager that exceeds your expectations.
Optimize your performance
TaskForce is equipped with a variety of time-saving features that boost your productivity, making your work with evidence drives simple and effective.
With its 18 configurable ports and uniquely capable and flexible hardware, Atola TaskForce has the fastest and most capable imaging engine in the forensic market allowing it to achieve up to 15 TB/h of imaging performance. What’s more, thanks to its web-based interface, multiple users can be imaging their devices at the same time, making this imager ideal for forensic labs with a team working on their assignments in parallel.
Express mode is a special way of using TaskForce. When in Express mode, every imaging session starts automatically the moment a drive is plugged into a source port. Express mode is preconfigured in the settings: enable source drive diagnostics, imaging to a folder on a server or a NAS, saving reports to the same folder. These and other settings help you streamline your acquisition process and waste zero clicks on each imaging session.
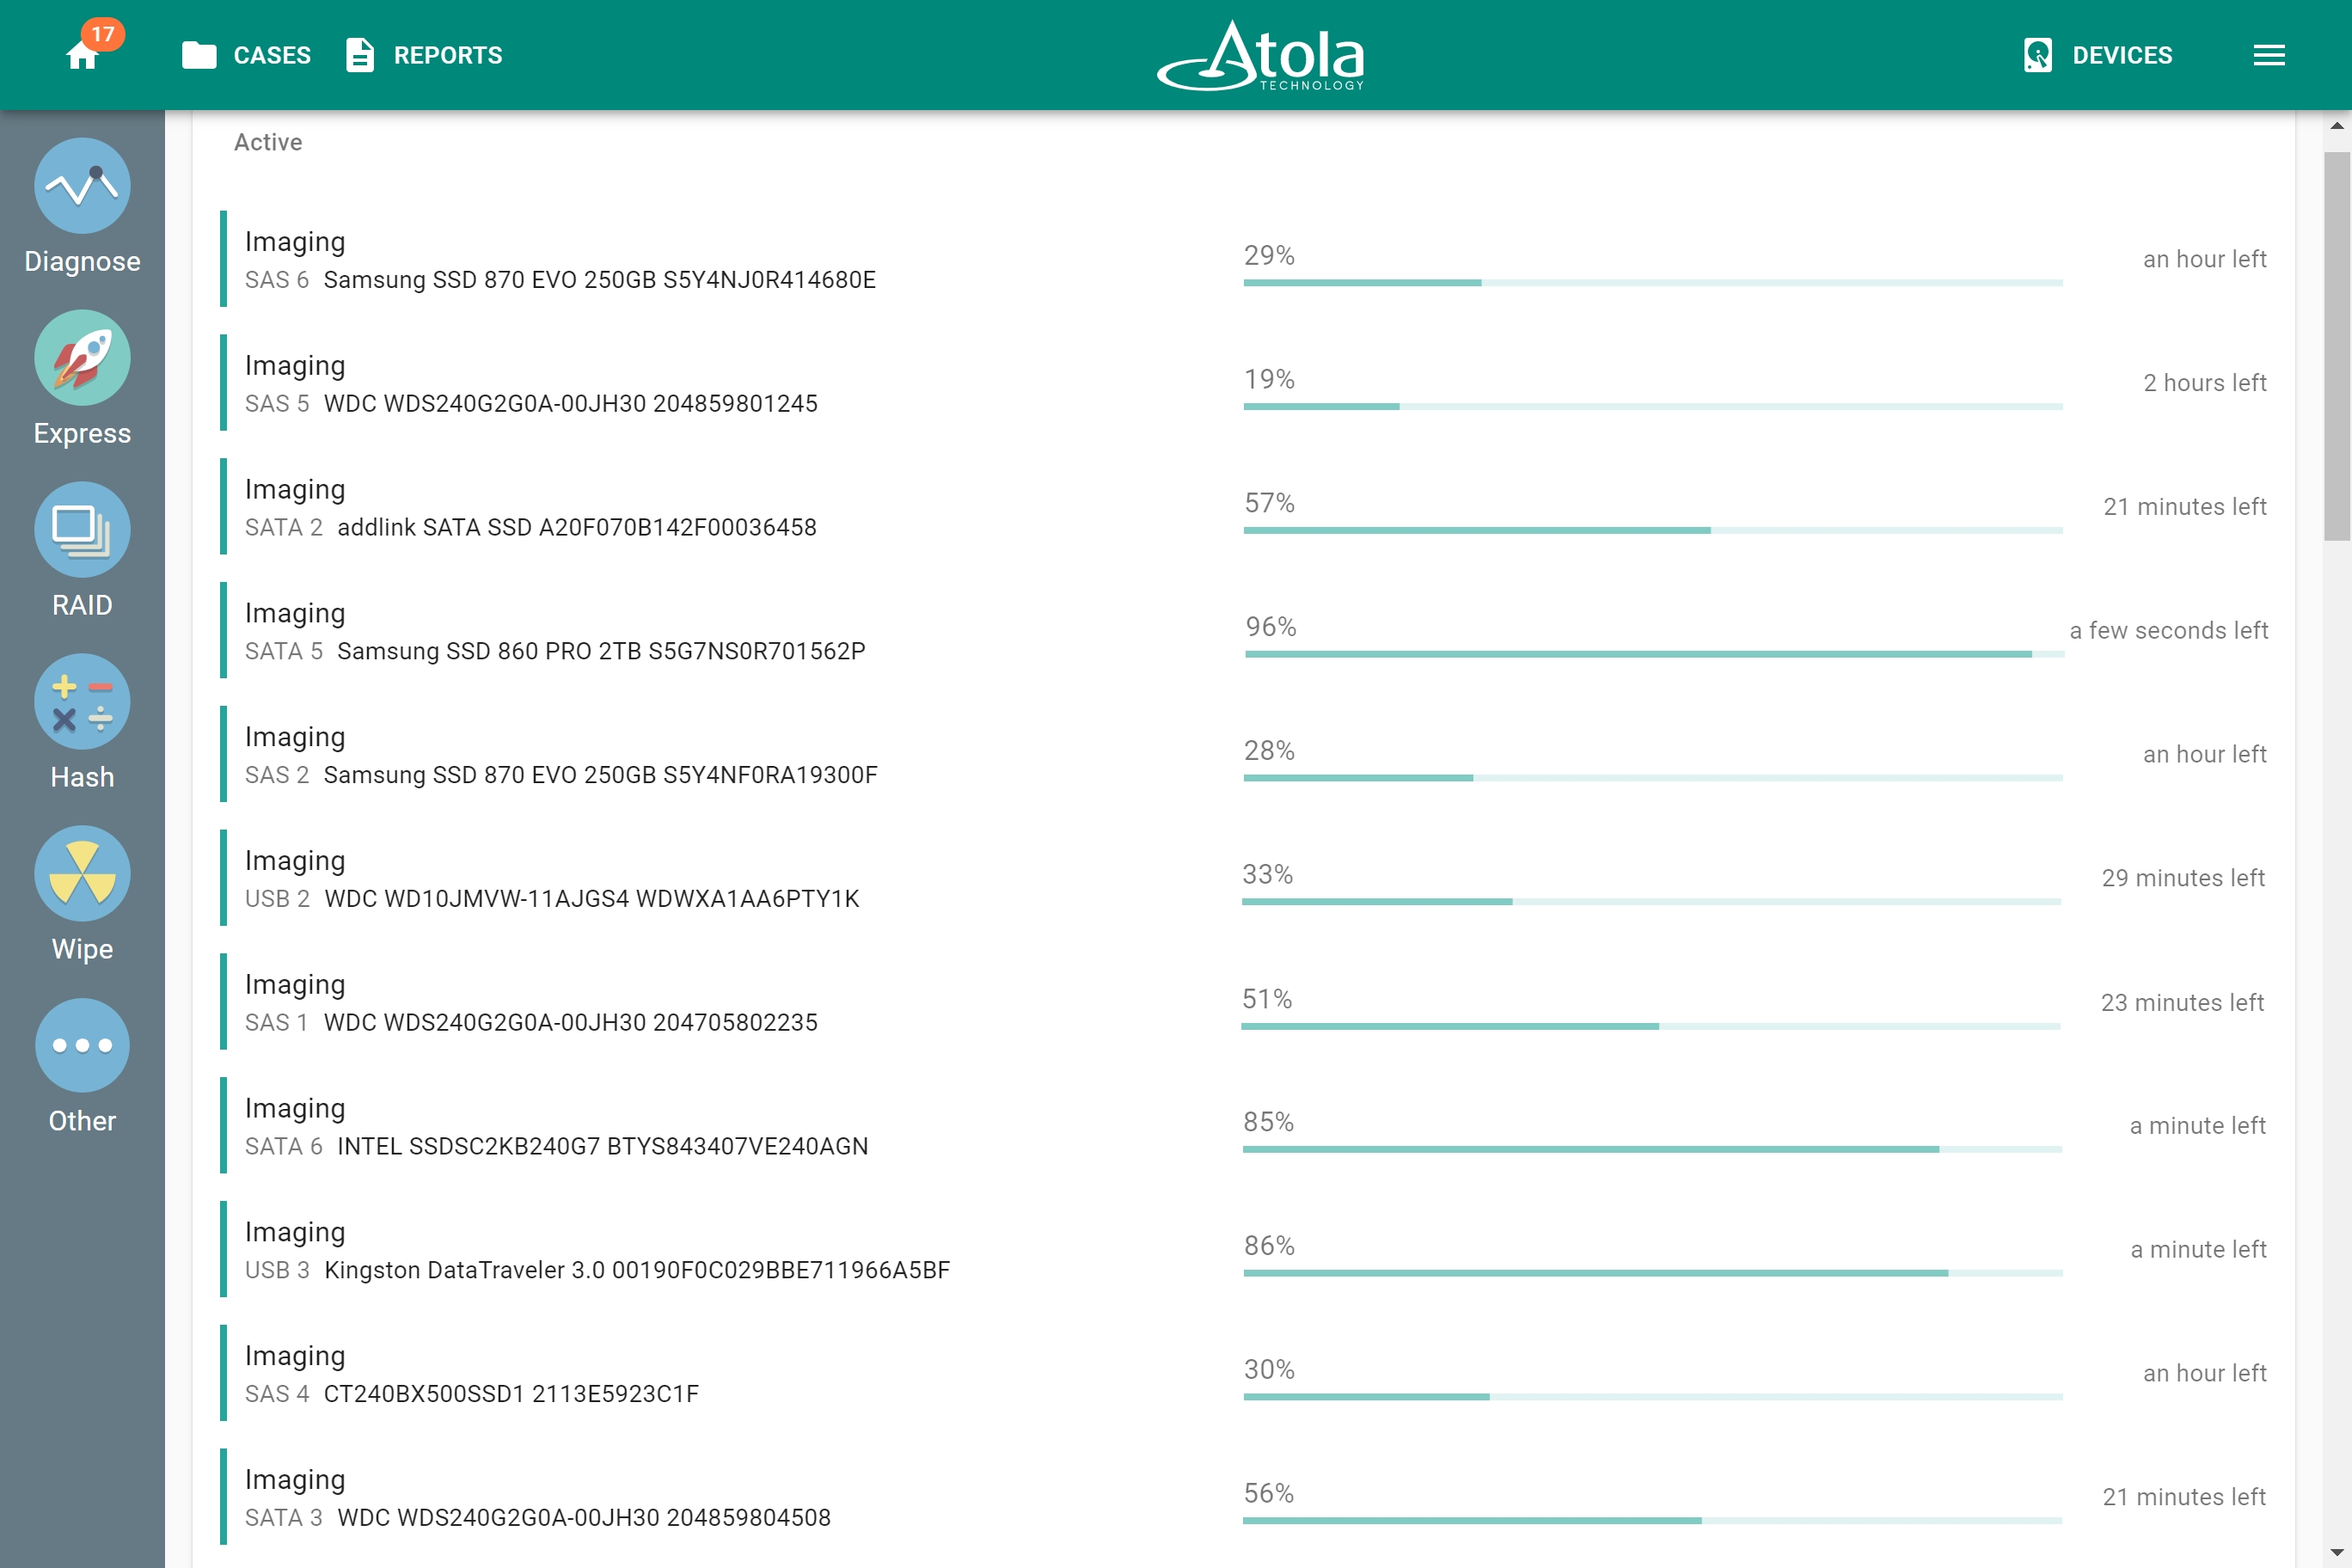
Express mode activated. 17 imaging sessions started with 0 clicks
Of TaskForce’s 18 ports, 17 can be used in Express mode (all except the Extension port). Meanwhile, all ports set to target mode are left available for other tasks.
Connect TaskForce to your workflow via Web API
TaskForce supports Web API to further optimize your work with evidence if you are using a workflow automation tool like Magnet Automate, OrcheSight platform or an in-house solution the likes of which have been developed by our customers.
The automated workflows help you avoid manual work and idle times between different stages of evidence processing. Another way to save time and focus on other tasks!
try {
    $r = Invoke-WebRequest "http://10.0.0.65/api/start-image?source=SATA4&targetFolder=\\Vitaliy\Share"
}
catch {
    Write-Output "$($_.Exception.Message)"
    exit $_.Exception.Response.StatusCode
}

$taskKey = $r.Content
do {
    $check = (Invoke-WebRequest "http://10.0.0.65/api/check-task?taskKey=$taskKey").Content | ConvertFrom-Json
    Start-Sleep -s 1
} while ($check.state -eq "progress")

$windowsPath = "C:\Share\" + ($check.target -replace '[\/]', '\' | Split-Path -leaf)
$caseName = "Case123"
$autopsyArguments = '--inputPath="' + $windowsPath + '" --caseName=' + $caseName + ' --runFromCommandLine=true'
Start-Process -FilePath "C:\Program Files\Autopsy-4.11.0\bin\autopsy64.exe" -ArgumentList $autopsyArguments
RAID recognition, reassembly and imaging
TaskForce is the only hardware RAID imager in the world. You can use TaskForce to assemble drives and/or image files into RAID arrays, automatically detect their configuration and image the arrays or their volumes in a forensically sound manner.
We continue delivering improvements into the RAID module with every new TaskForce firmware update. At the moment, it supports:
- RAID 0
- RAID 1
- RAID 5 (including those with a missing drive or even 2 damaged drives)
- RAID 10
- automatically detect configuration of software RAID created with mdadm in Linux etc.
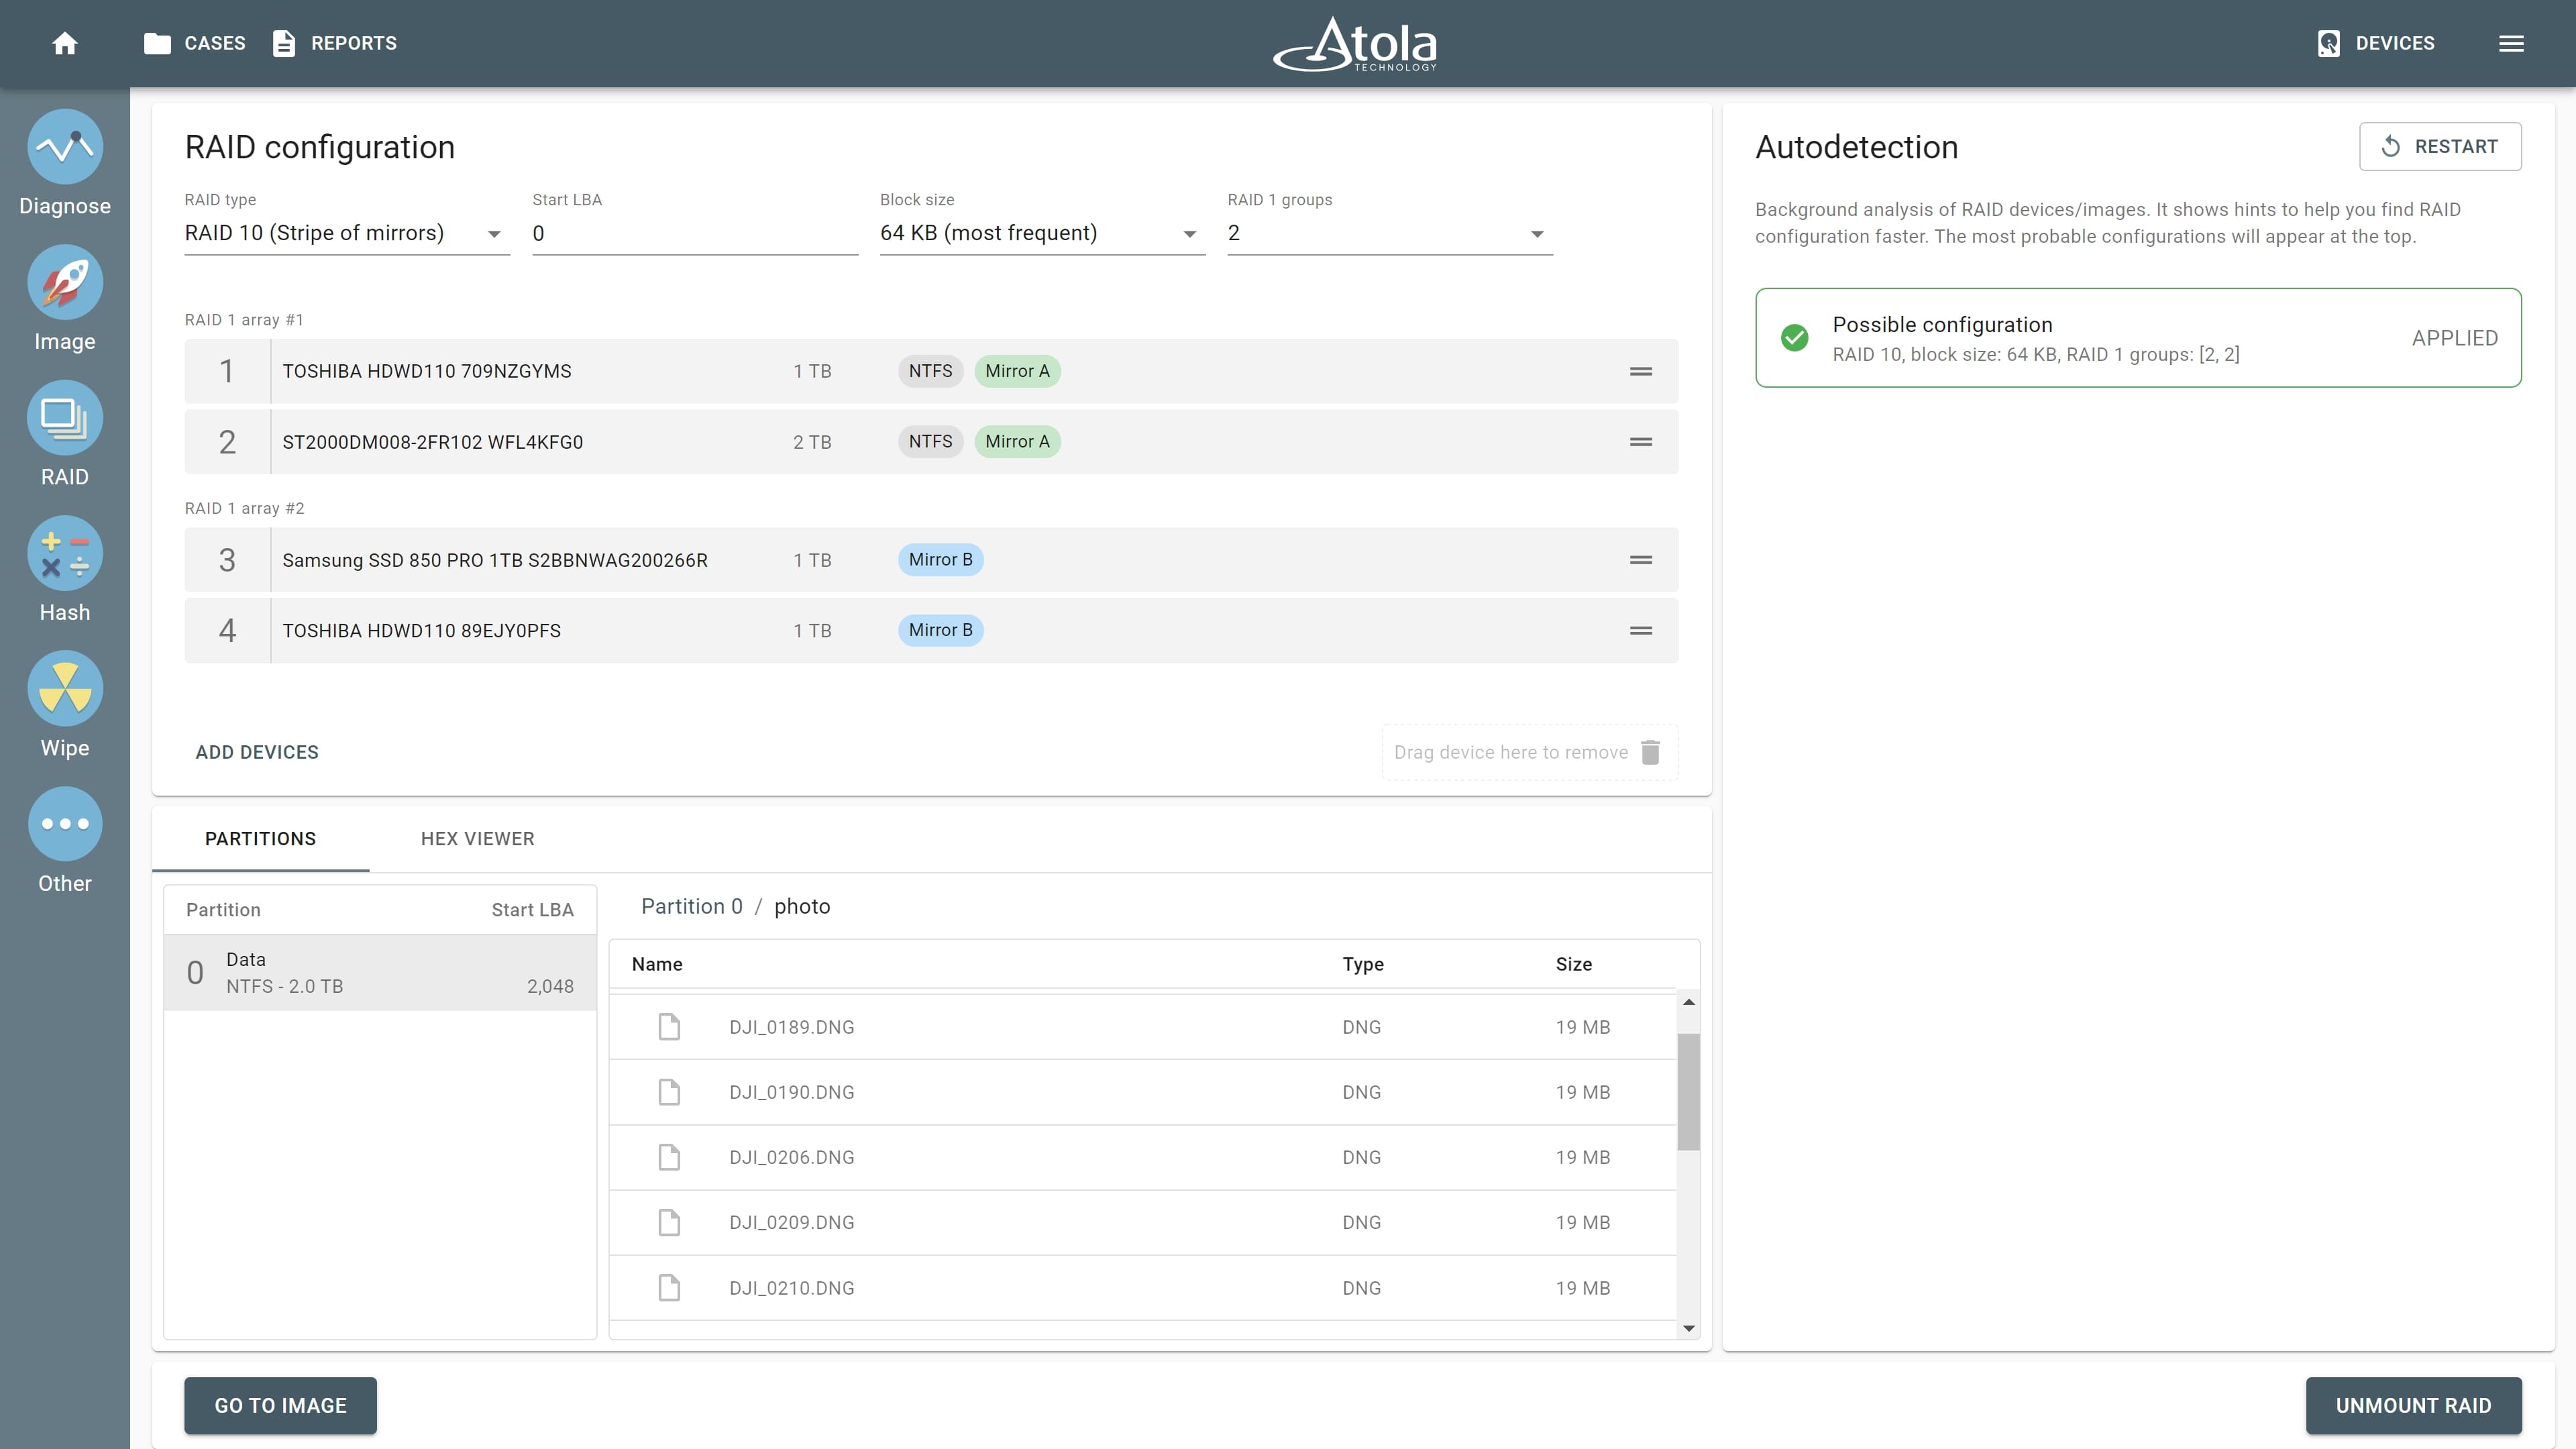
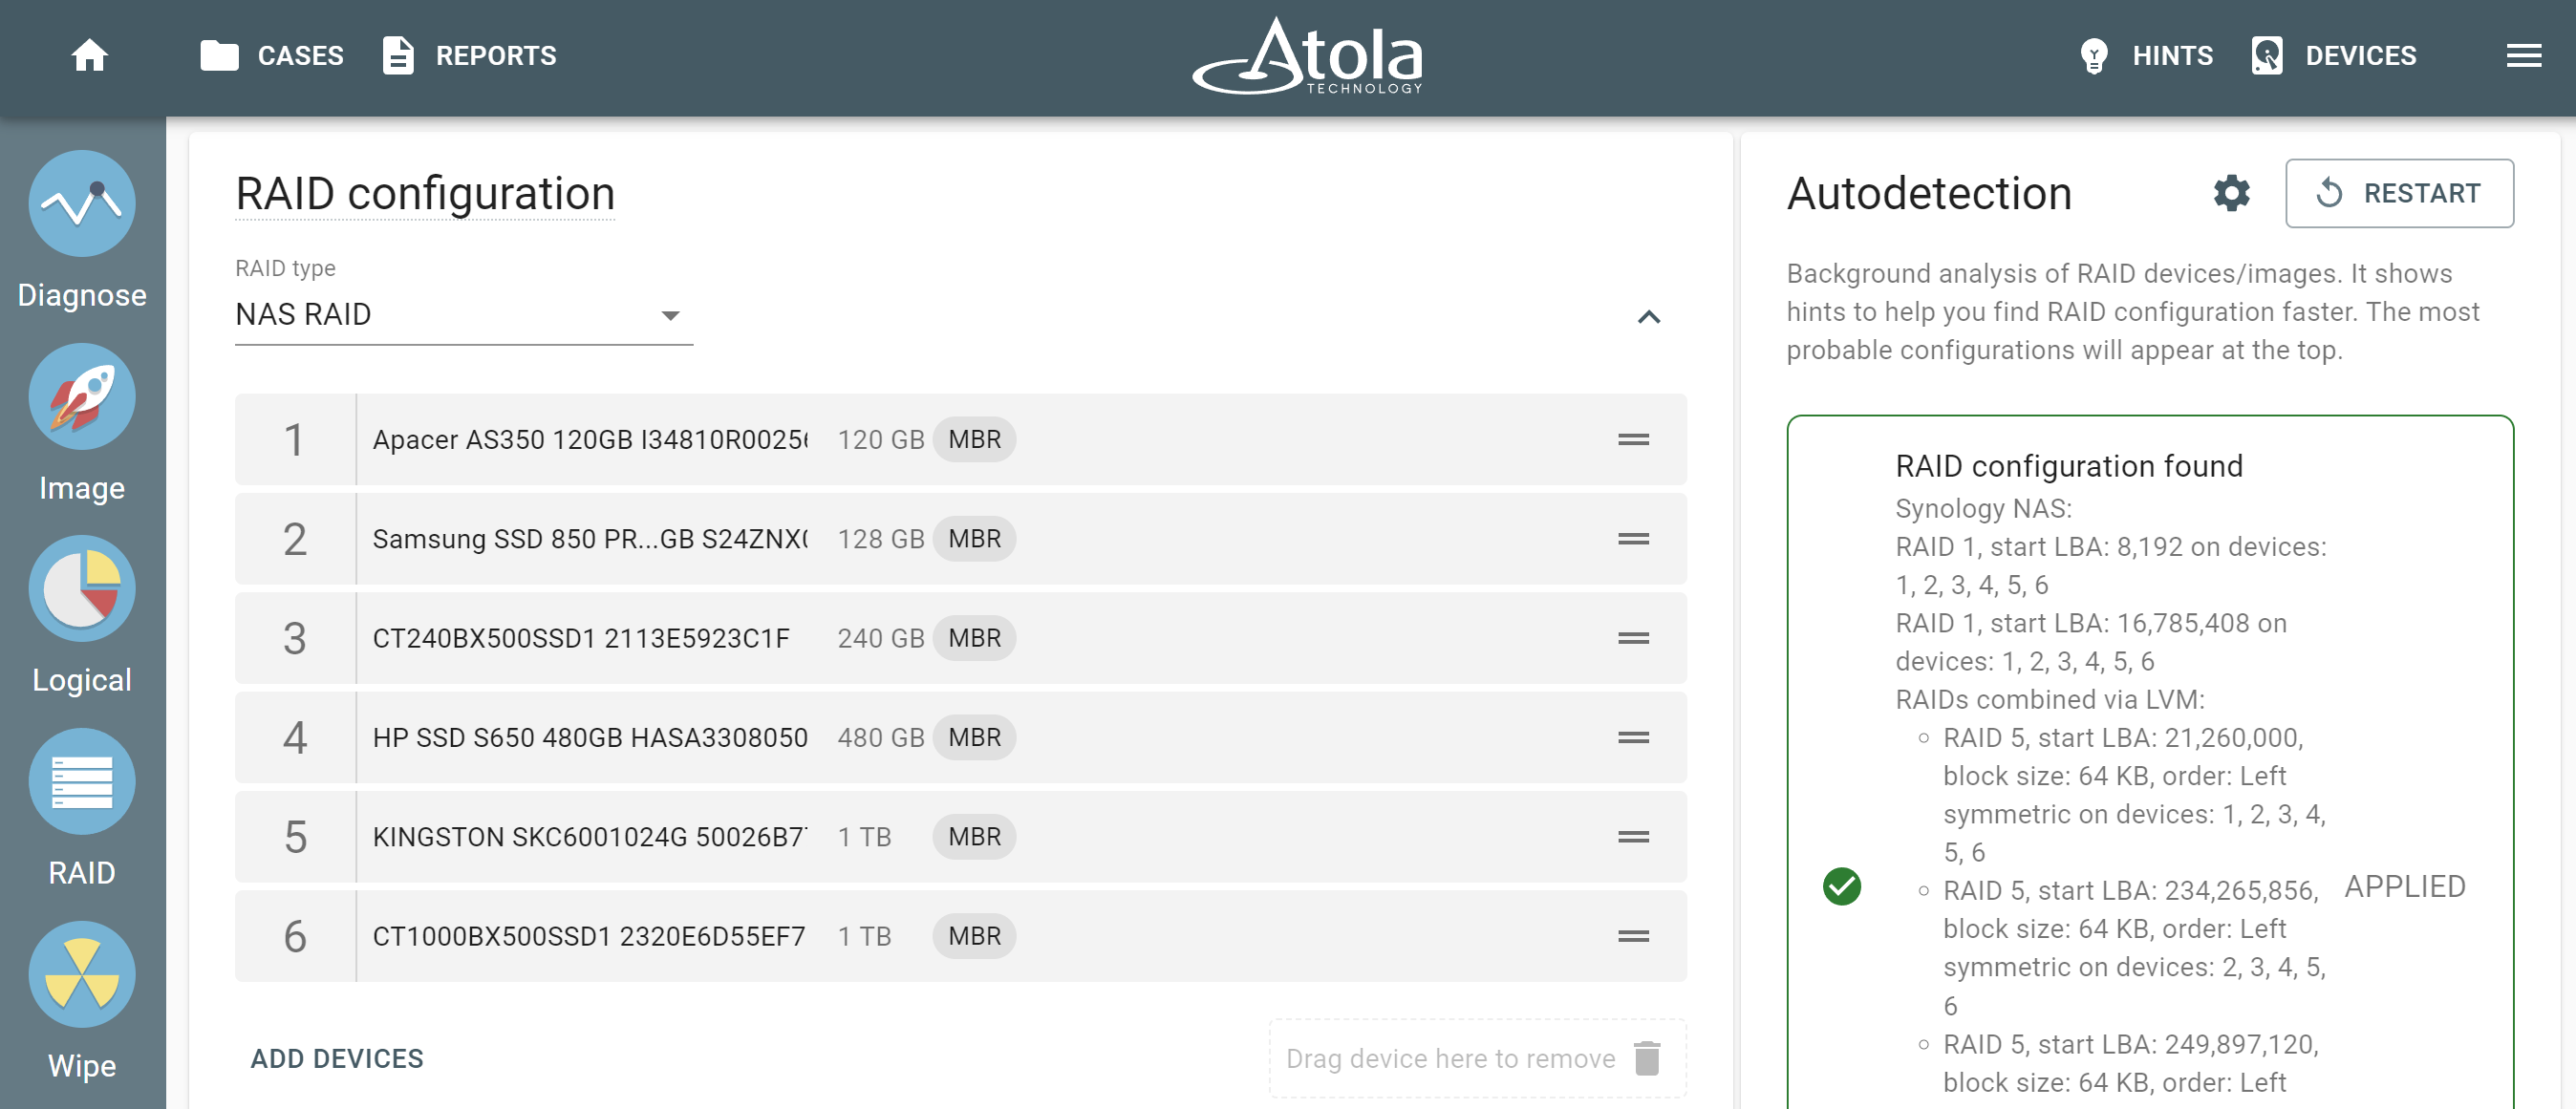
RAID configuration autodetection
To avoid imaging the whole array, you can select and acquire only its individual partitions.
Handling damaged media
A part of the Atola dev team is data recovery engineers who have designed our forensic imagers to automatically retrieve data from damaged drives. These data recovery algorithms are at the core of our technology, and they help ensure that you retrieve data even from the drives that look completely dead and undetectable to other forensic imagers.
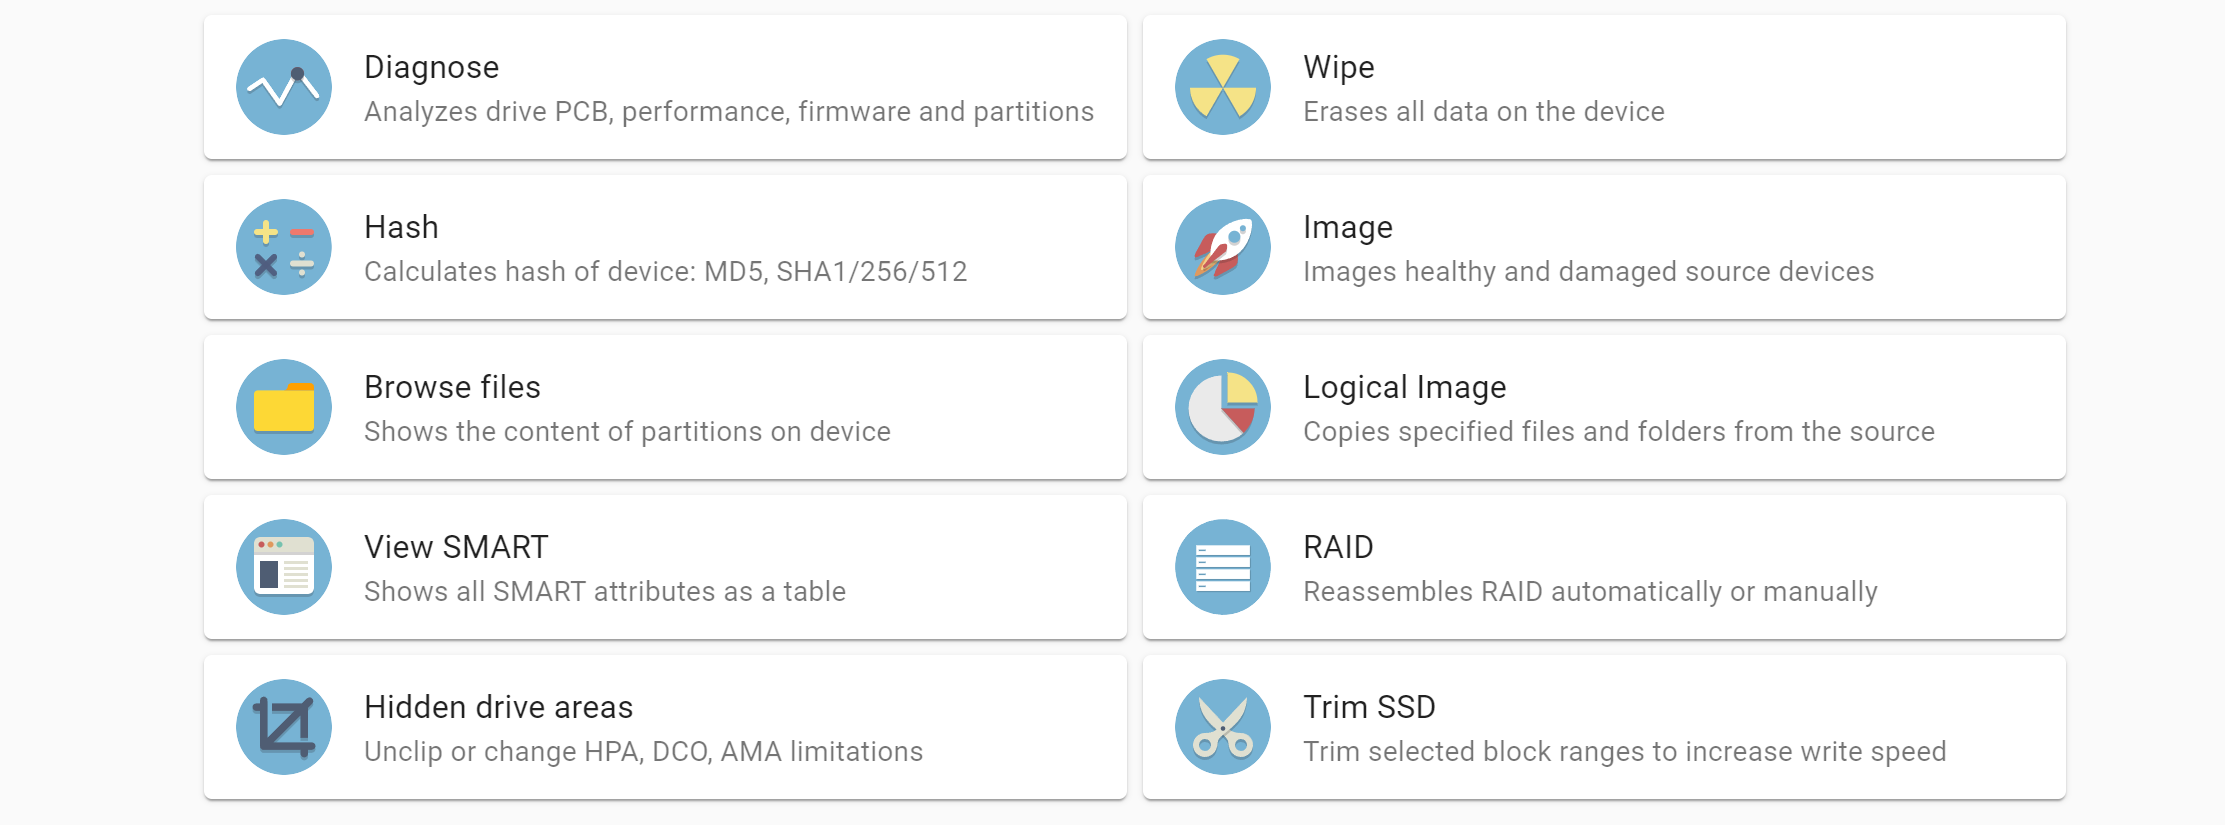
We encourage you to always diagnose a drive before imaging. Within a minute or two, it gives a complete report of the drive’s health (whether it is in good or bad condition) and gives suggestions for the imaging strategy. By adjusting the imaging settings accordingly, you get to image drives with degraded or damaged heads, scratched platters, worn-out magnetic layers, those falling into freeze, etc.
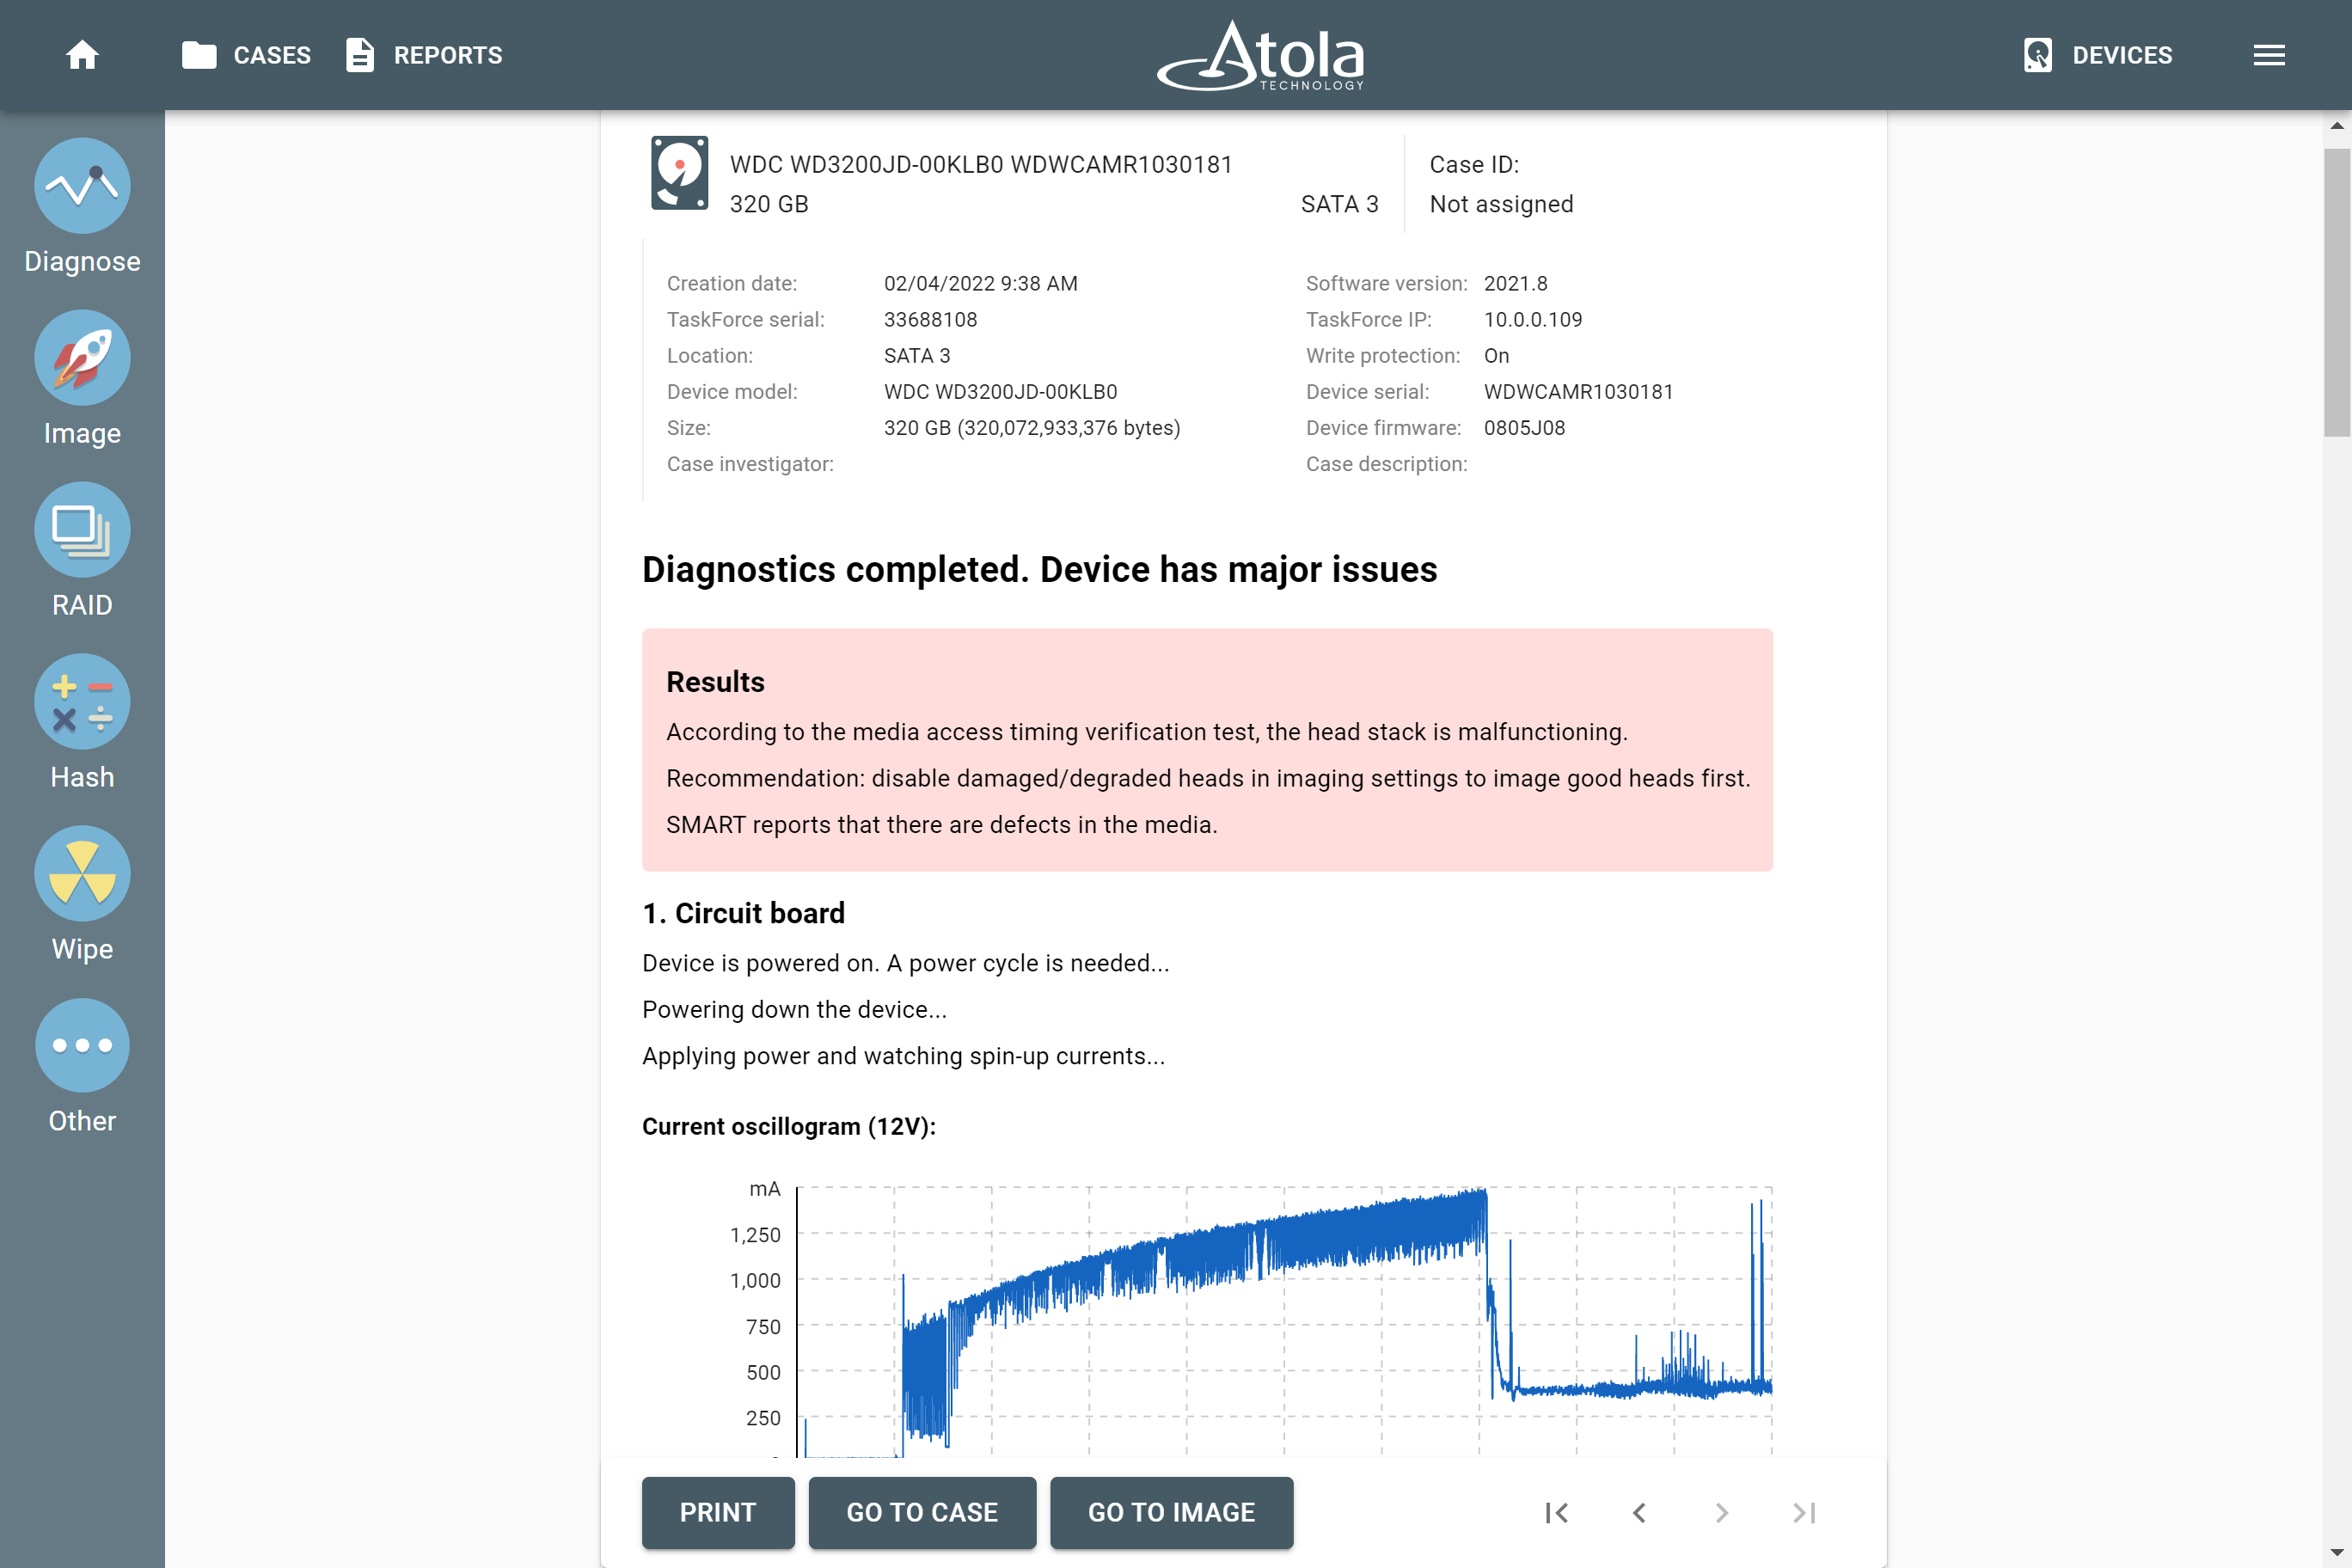
Drive diagnostics: damaged evidence drive
TaskForce is equipped with a multi-pass imaging algorithm, selective head imaging, automated reset of freezing drives, and other methods of handling shaky devices, such as imaging in reverse direction, disabling caching, hashing methods for damaged media, etc.
All of these enable Atola TaskForce to image a drive effectively and minimize the risk of causing further damage to a media in a degrading condition. All the while, the acquisition remains forensically sound, transparently reported and stored in the case management system.
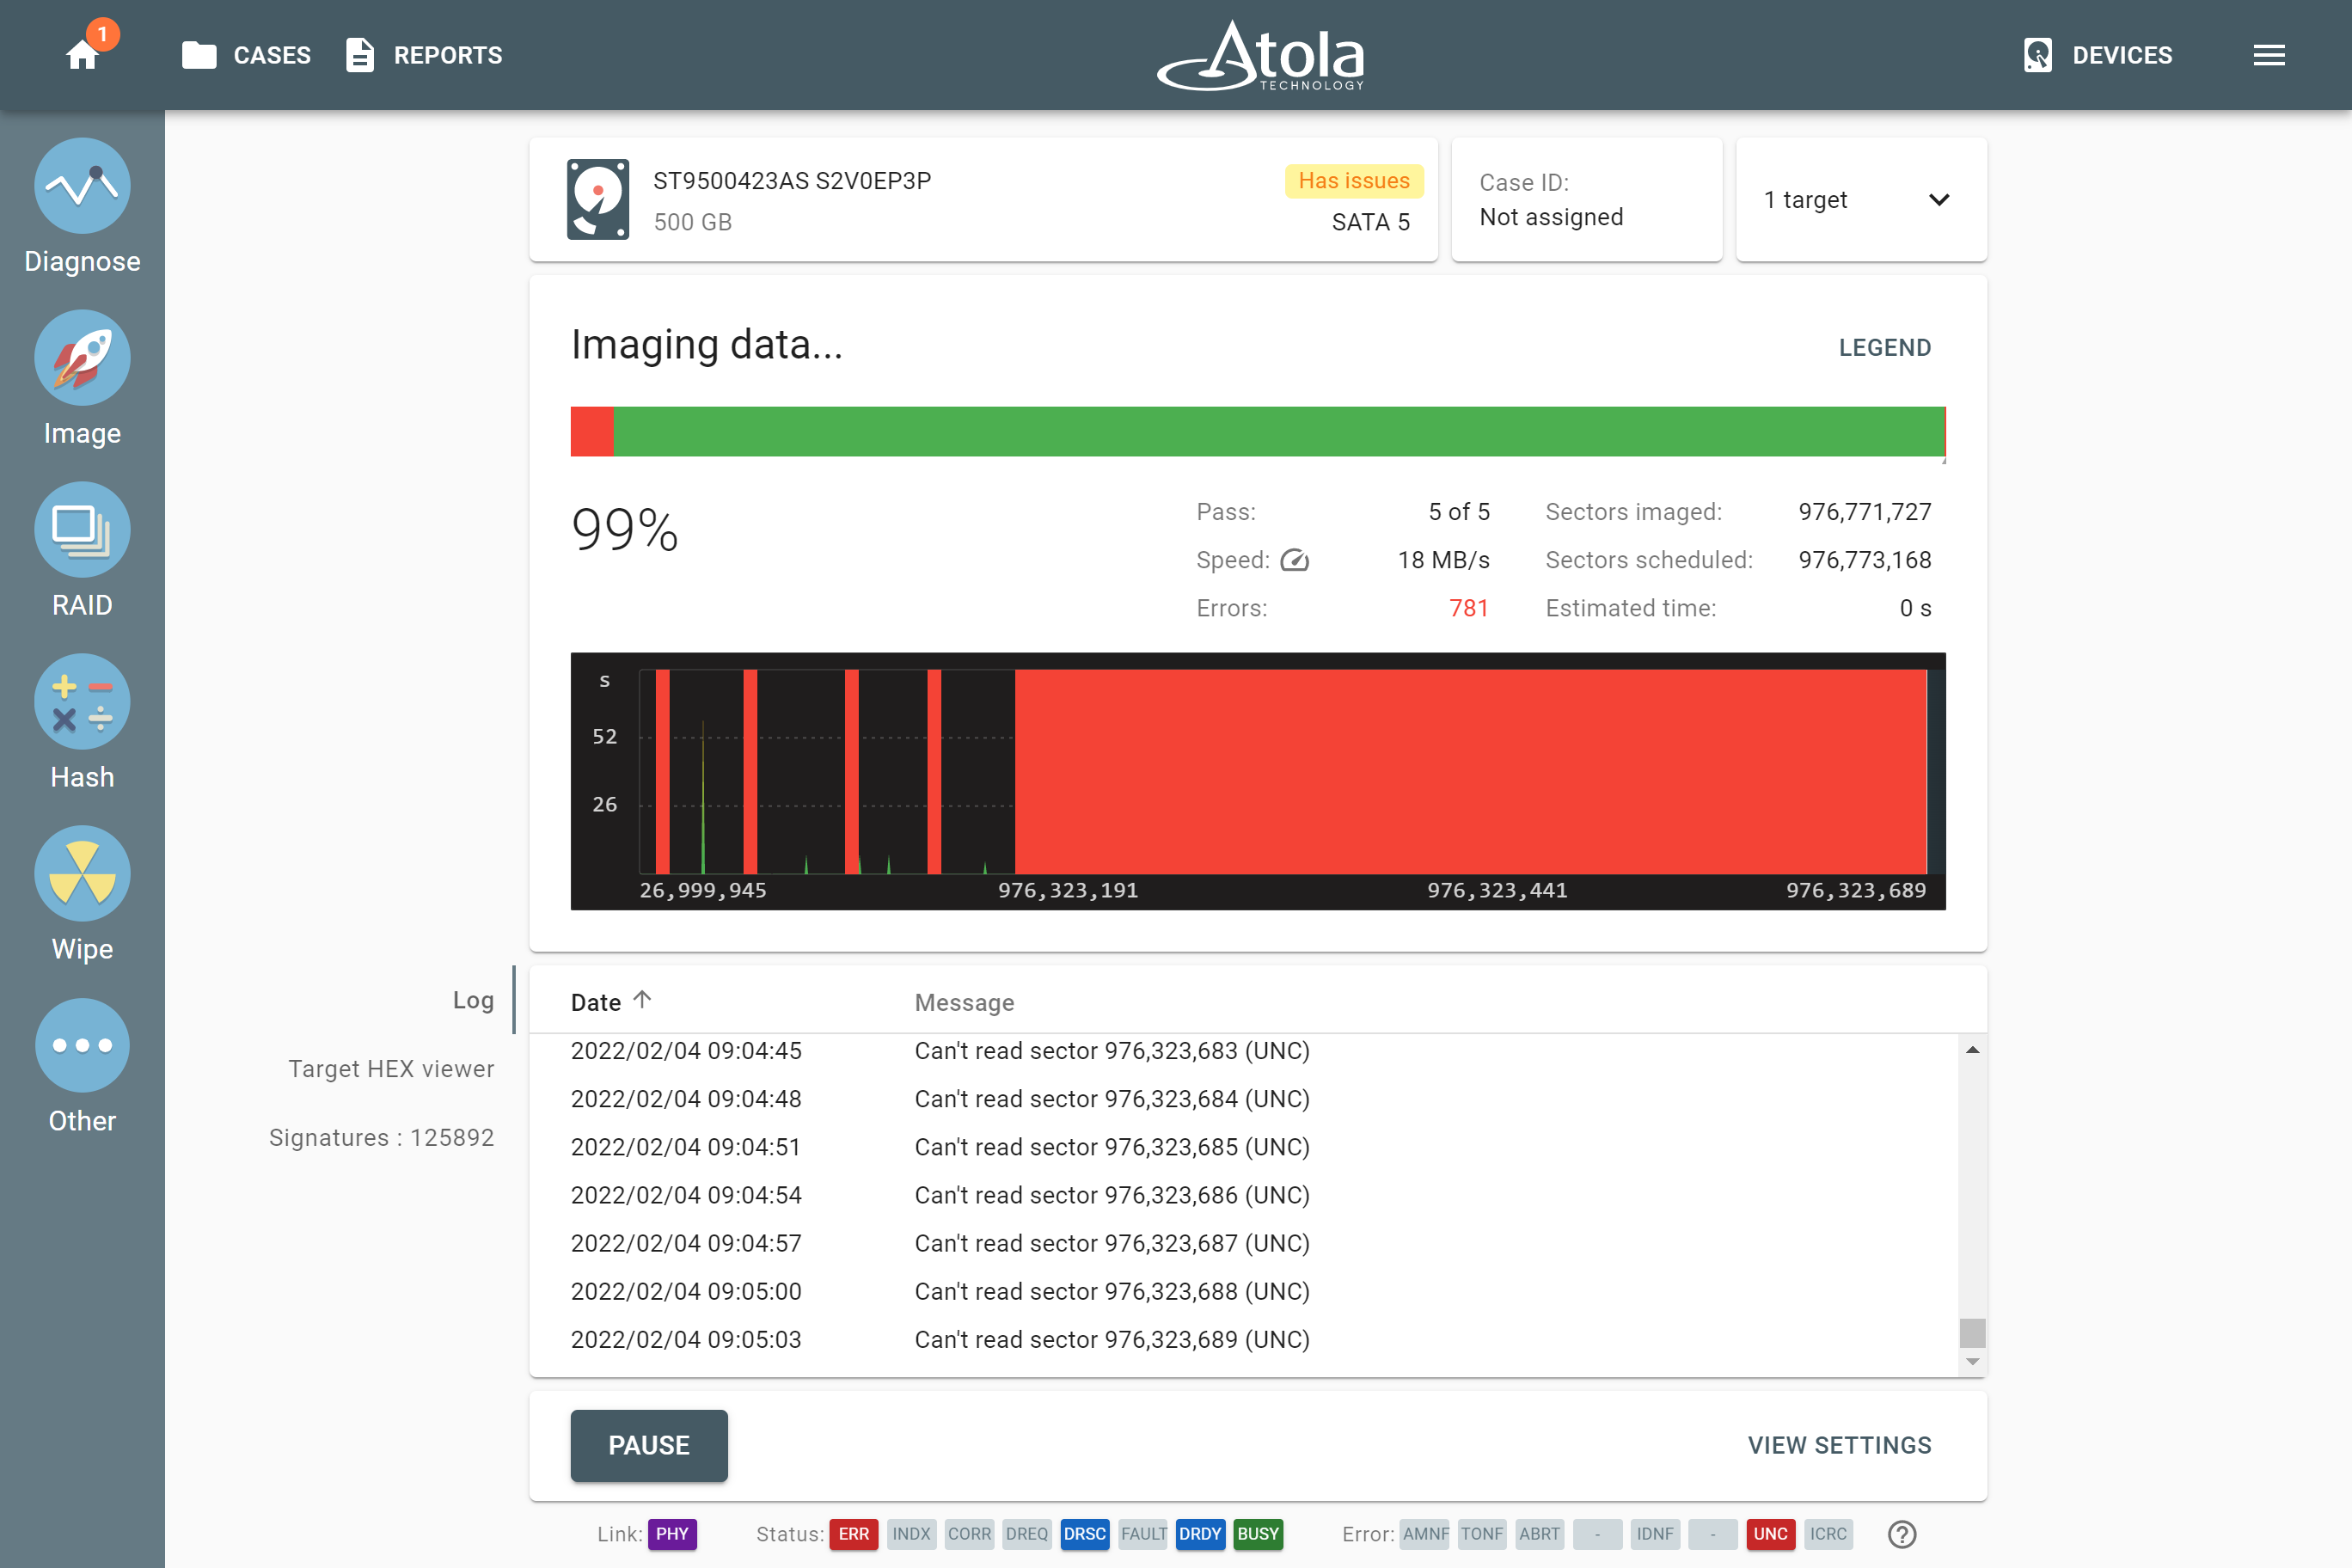
Imaging a damaged evidence drive
Prioritizing data and selective imaging
Not only does diagnostics help you choose the right imaging approaches, it also gives you the imaging time estimate and provides an overview of the drive’s file system and partitions within.
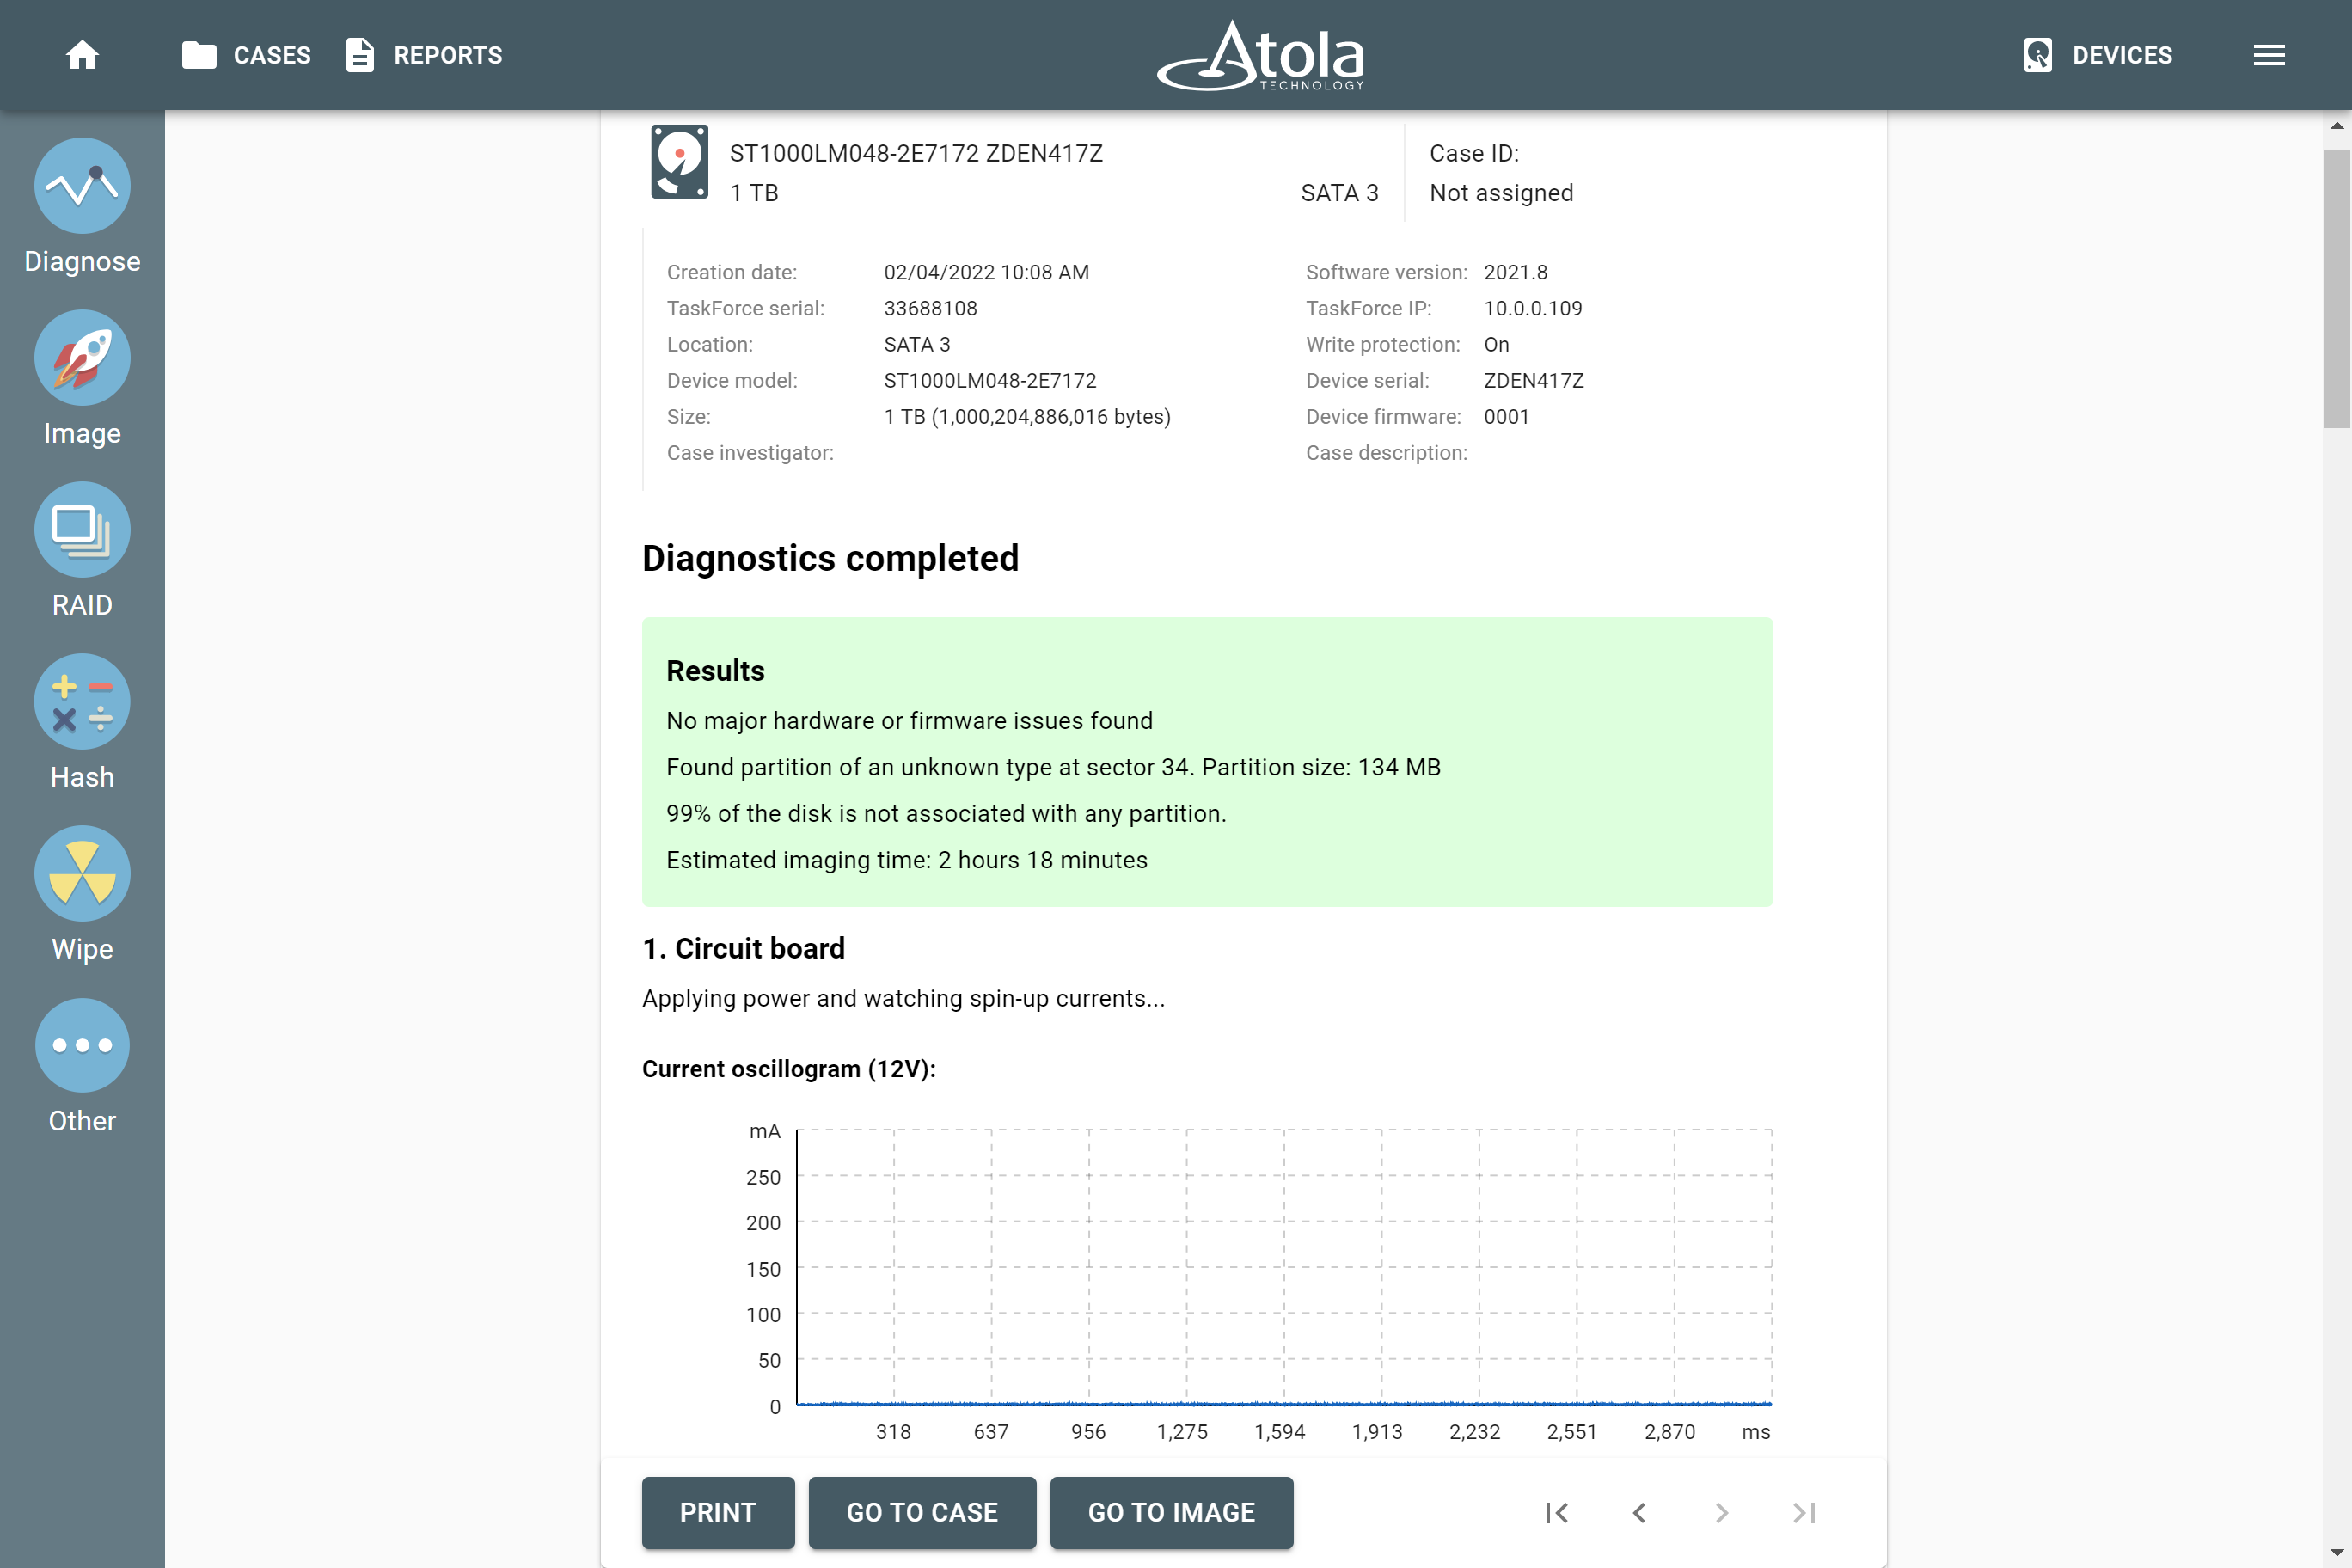
Diagnostics report. Evidence drive in good condition. Imaging time estimate and partition analysis result
For a deeper dive, use the Browse files functionality to look through the partitions and folders within them and get a clue which data may be relevant for your investigation.
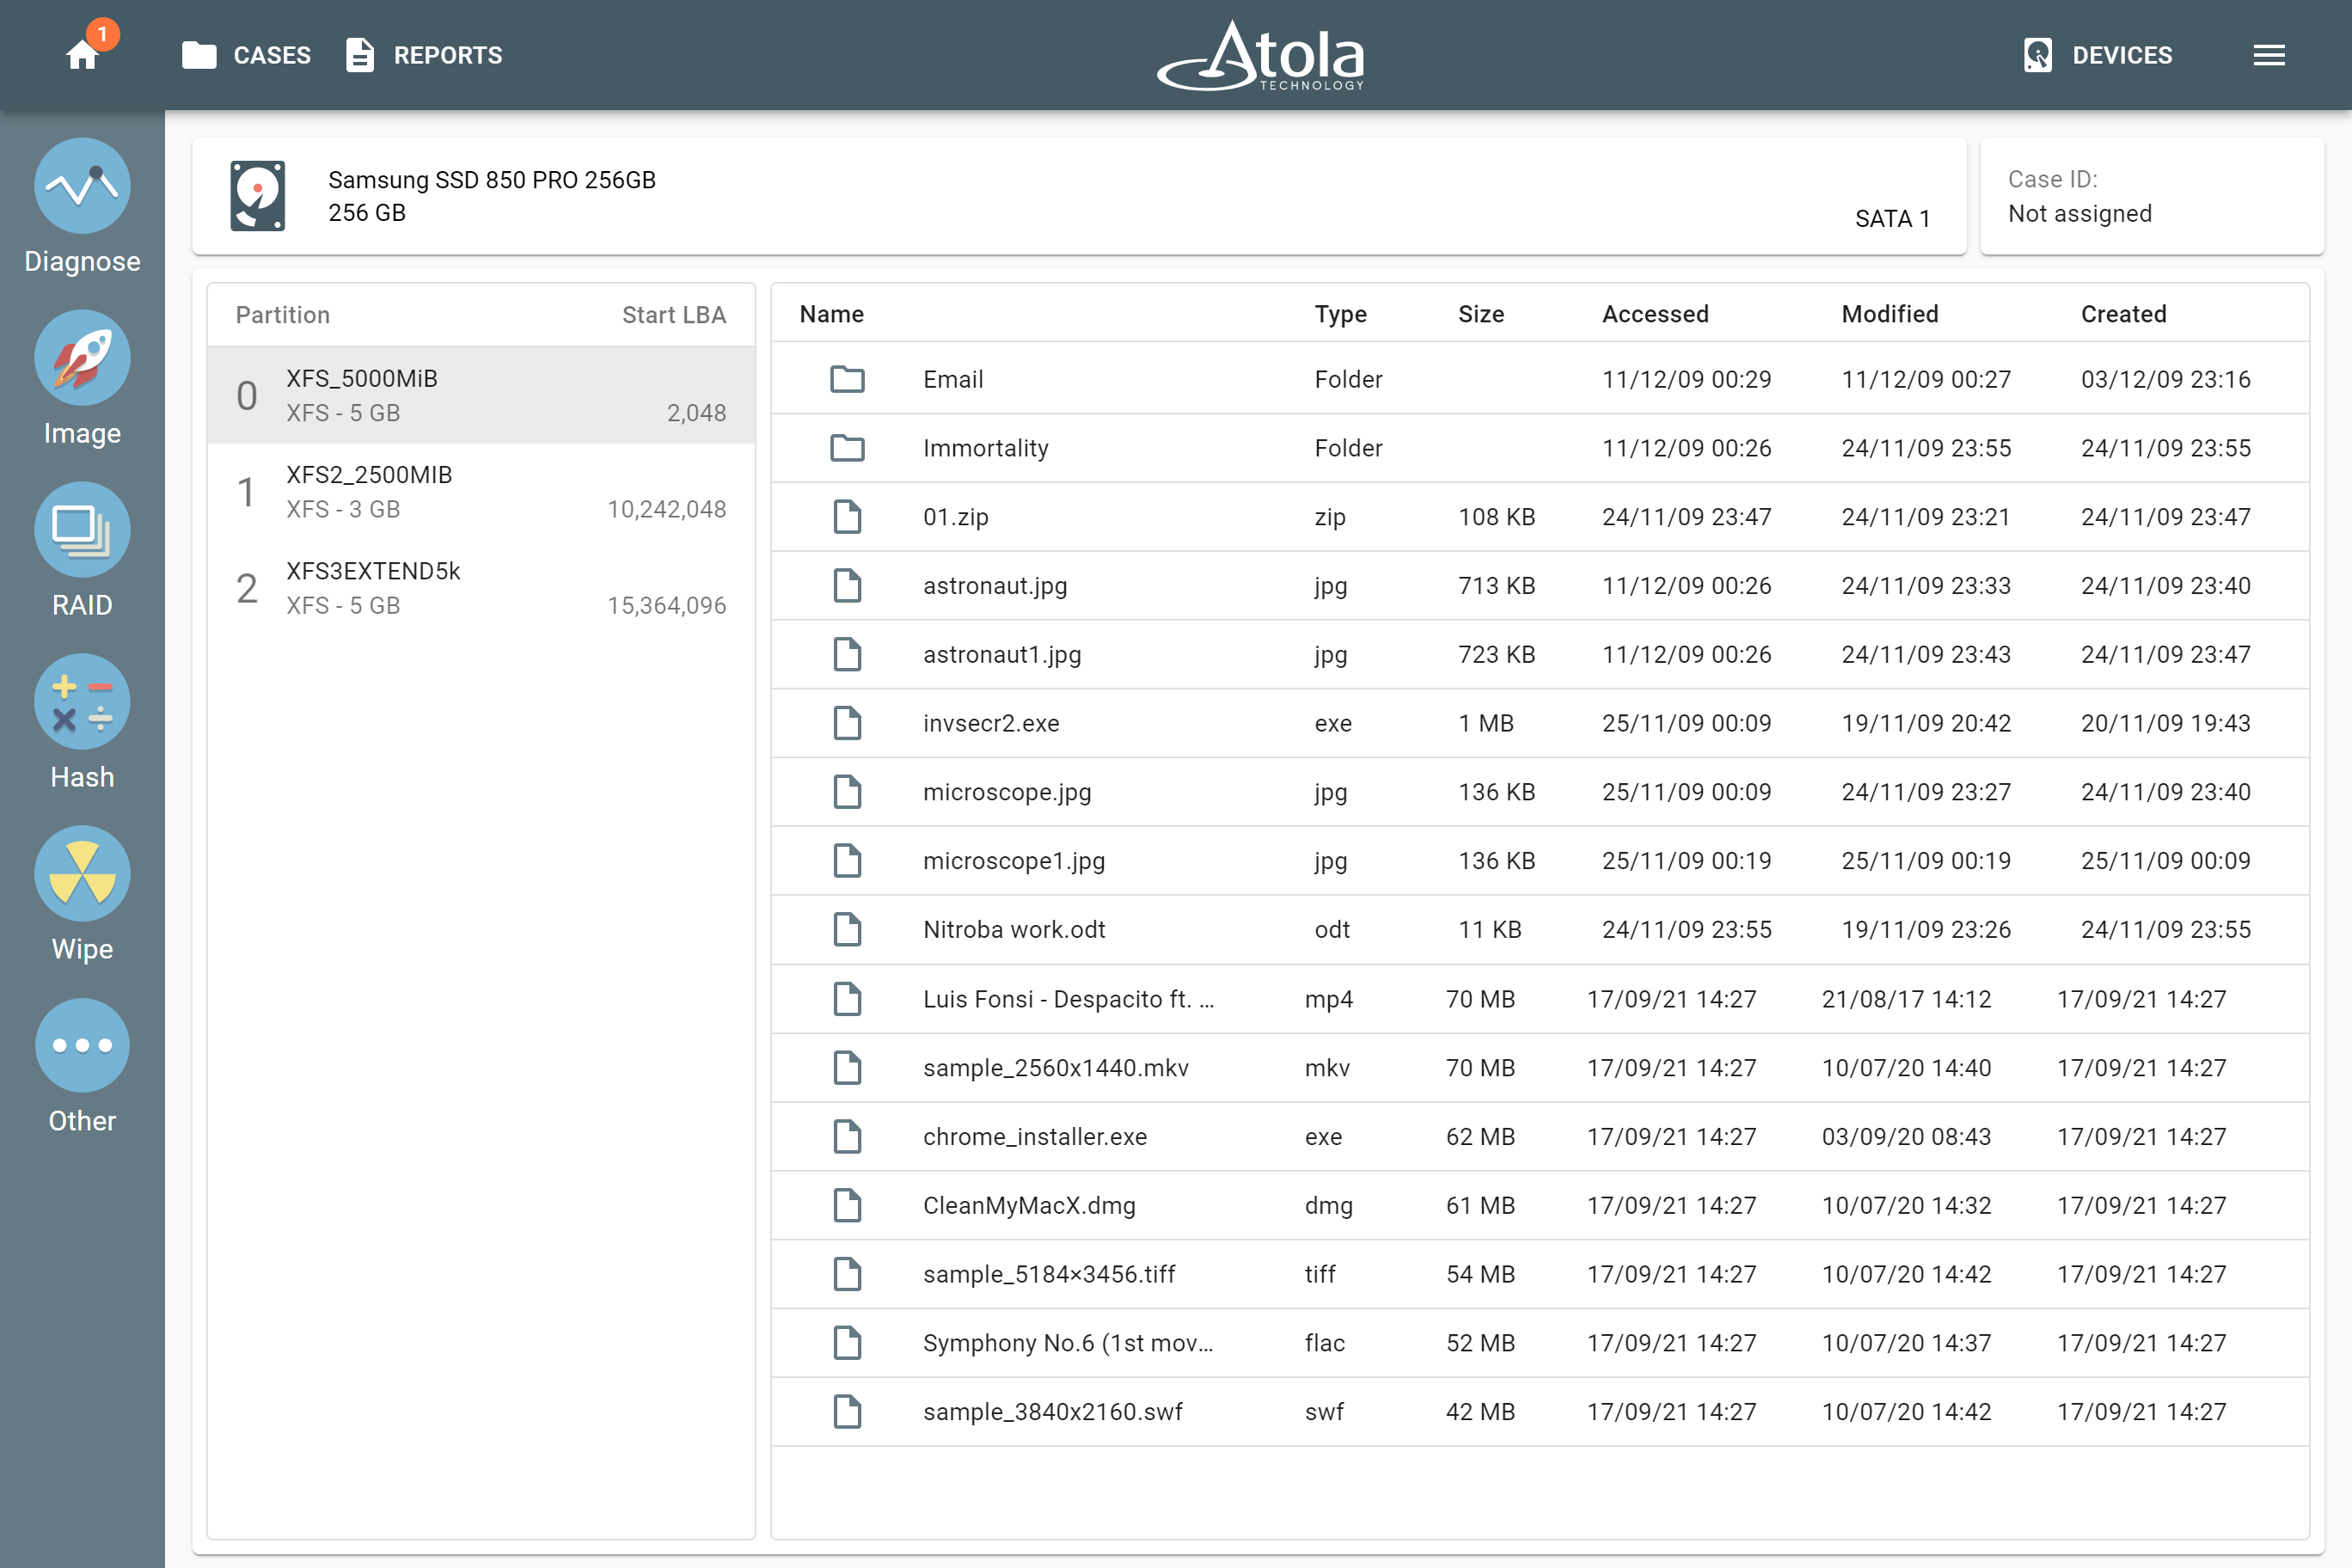
Browse file feature for easy preview of evidence drive contents
Atola TaskForce’s selective imaging functionality allows imaging only sectors containing data. These file systems are already supported: NTFS, APFS, XFS, ext2/3/4, HFS, HFS+, exFAT, FAT16, FAT32.
To image individual partitions, simply untick those you do not need.

Image only selected partitions to expedite the acquisition
TaskForce will image the sectors containing data belonging to the selected partitions, and will document the imaged ranges in the log.
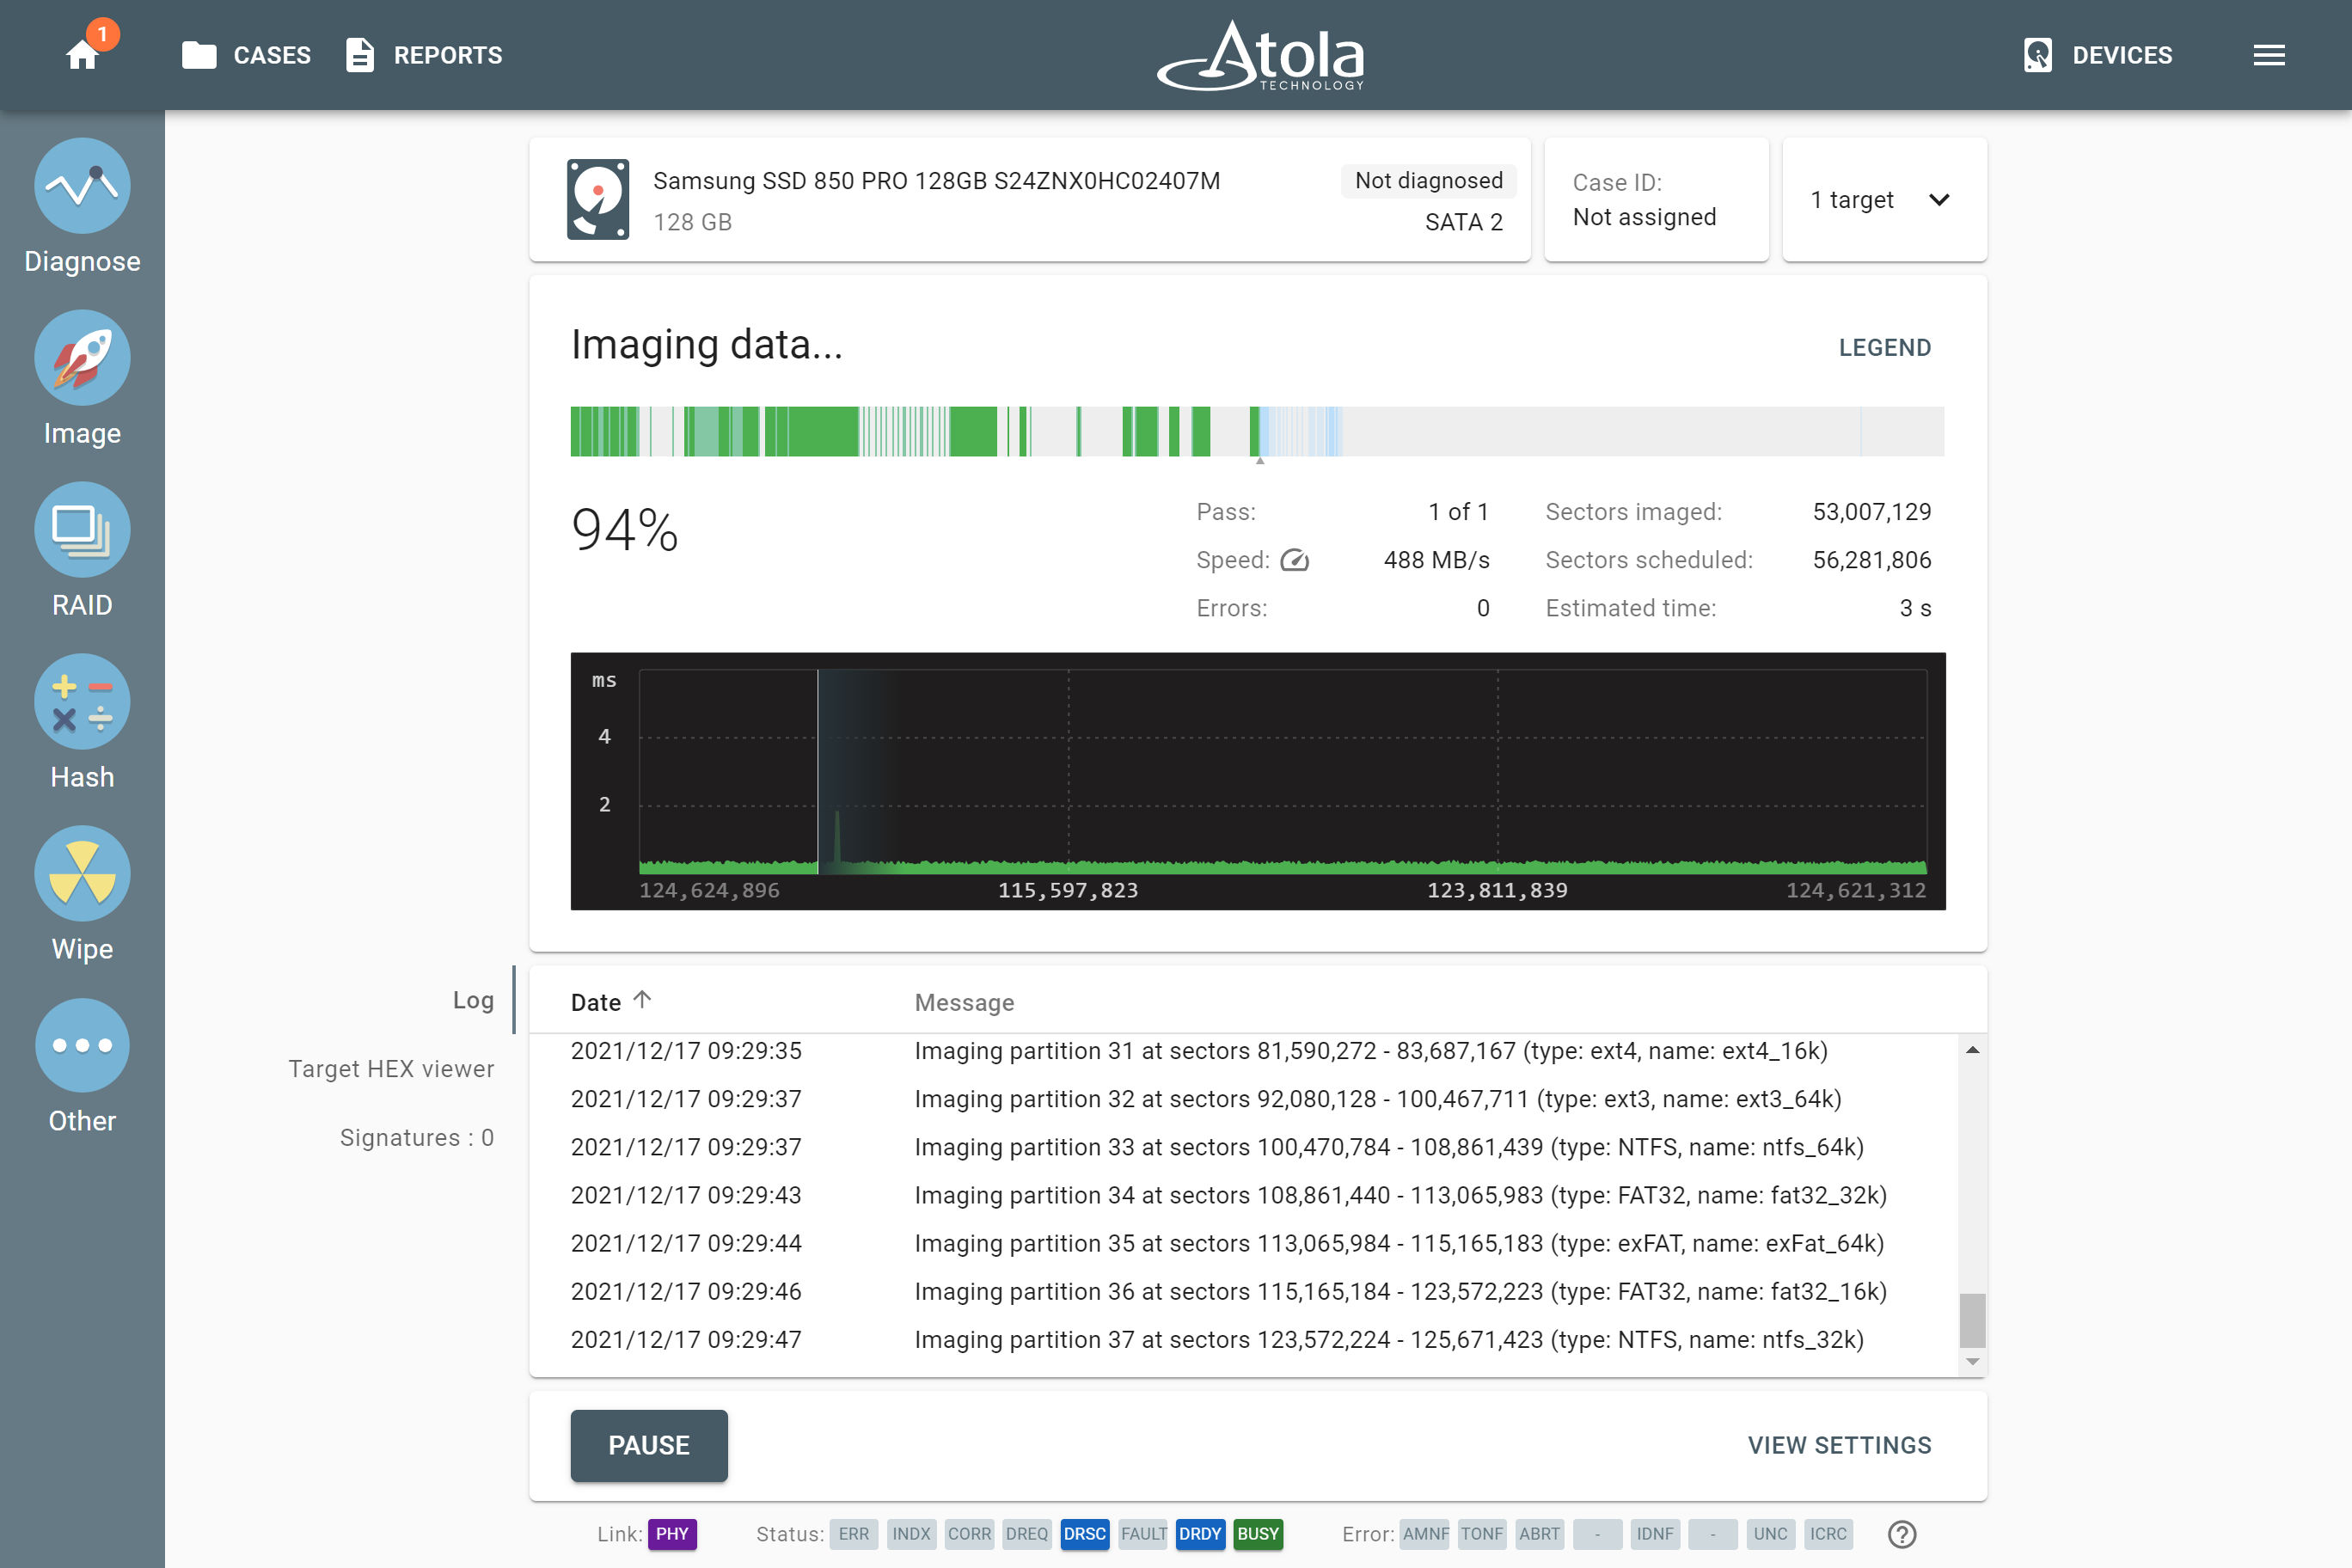
Imaging selected partitions
The variety of destinations
With Atola TaskForce you can safely and effectively image to drive, to network, to a file on a target drive or on an encrypted target drive, etc.
Imaging to a drive: Certainly, standard drive-to-drive cloning is fast and can easily achieve 500 MB/sec.
Imaging to a file: Currently, TaskForce can image to E01, AFF4 or RAW files.
TaskForce images to files on a target drive by putting a device in Storage mode. The system finds an appropriate exFAT partition on the selected drive or will offer to format the device accordingly.
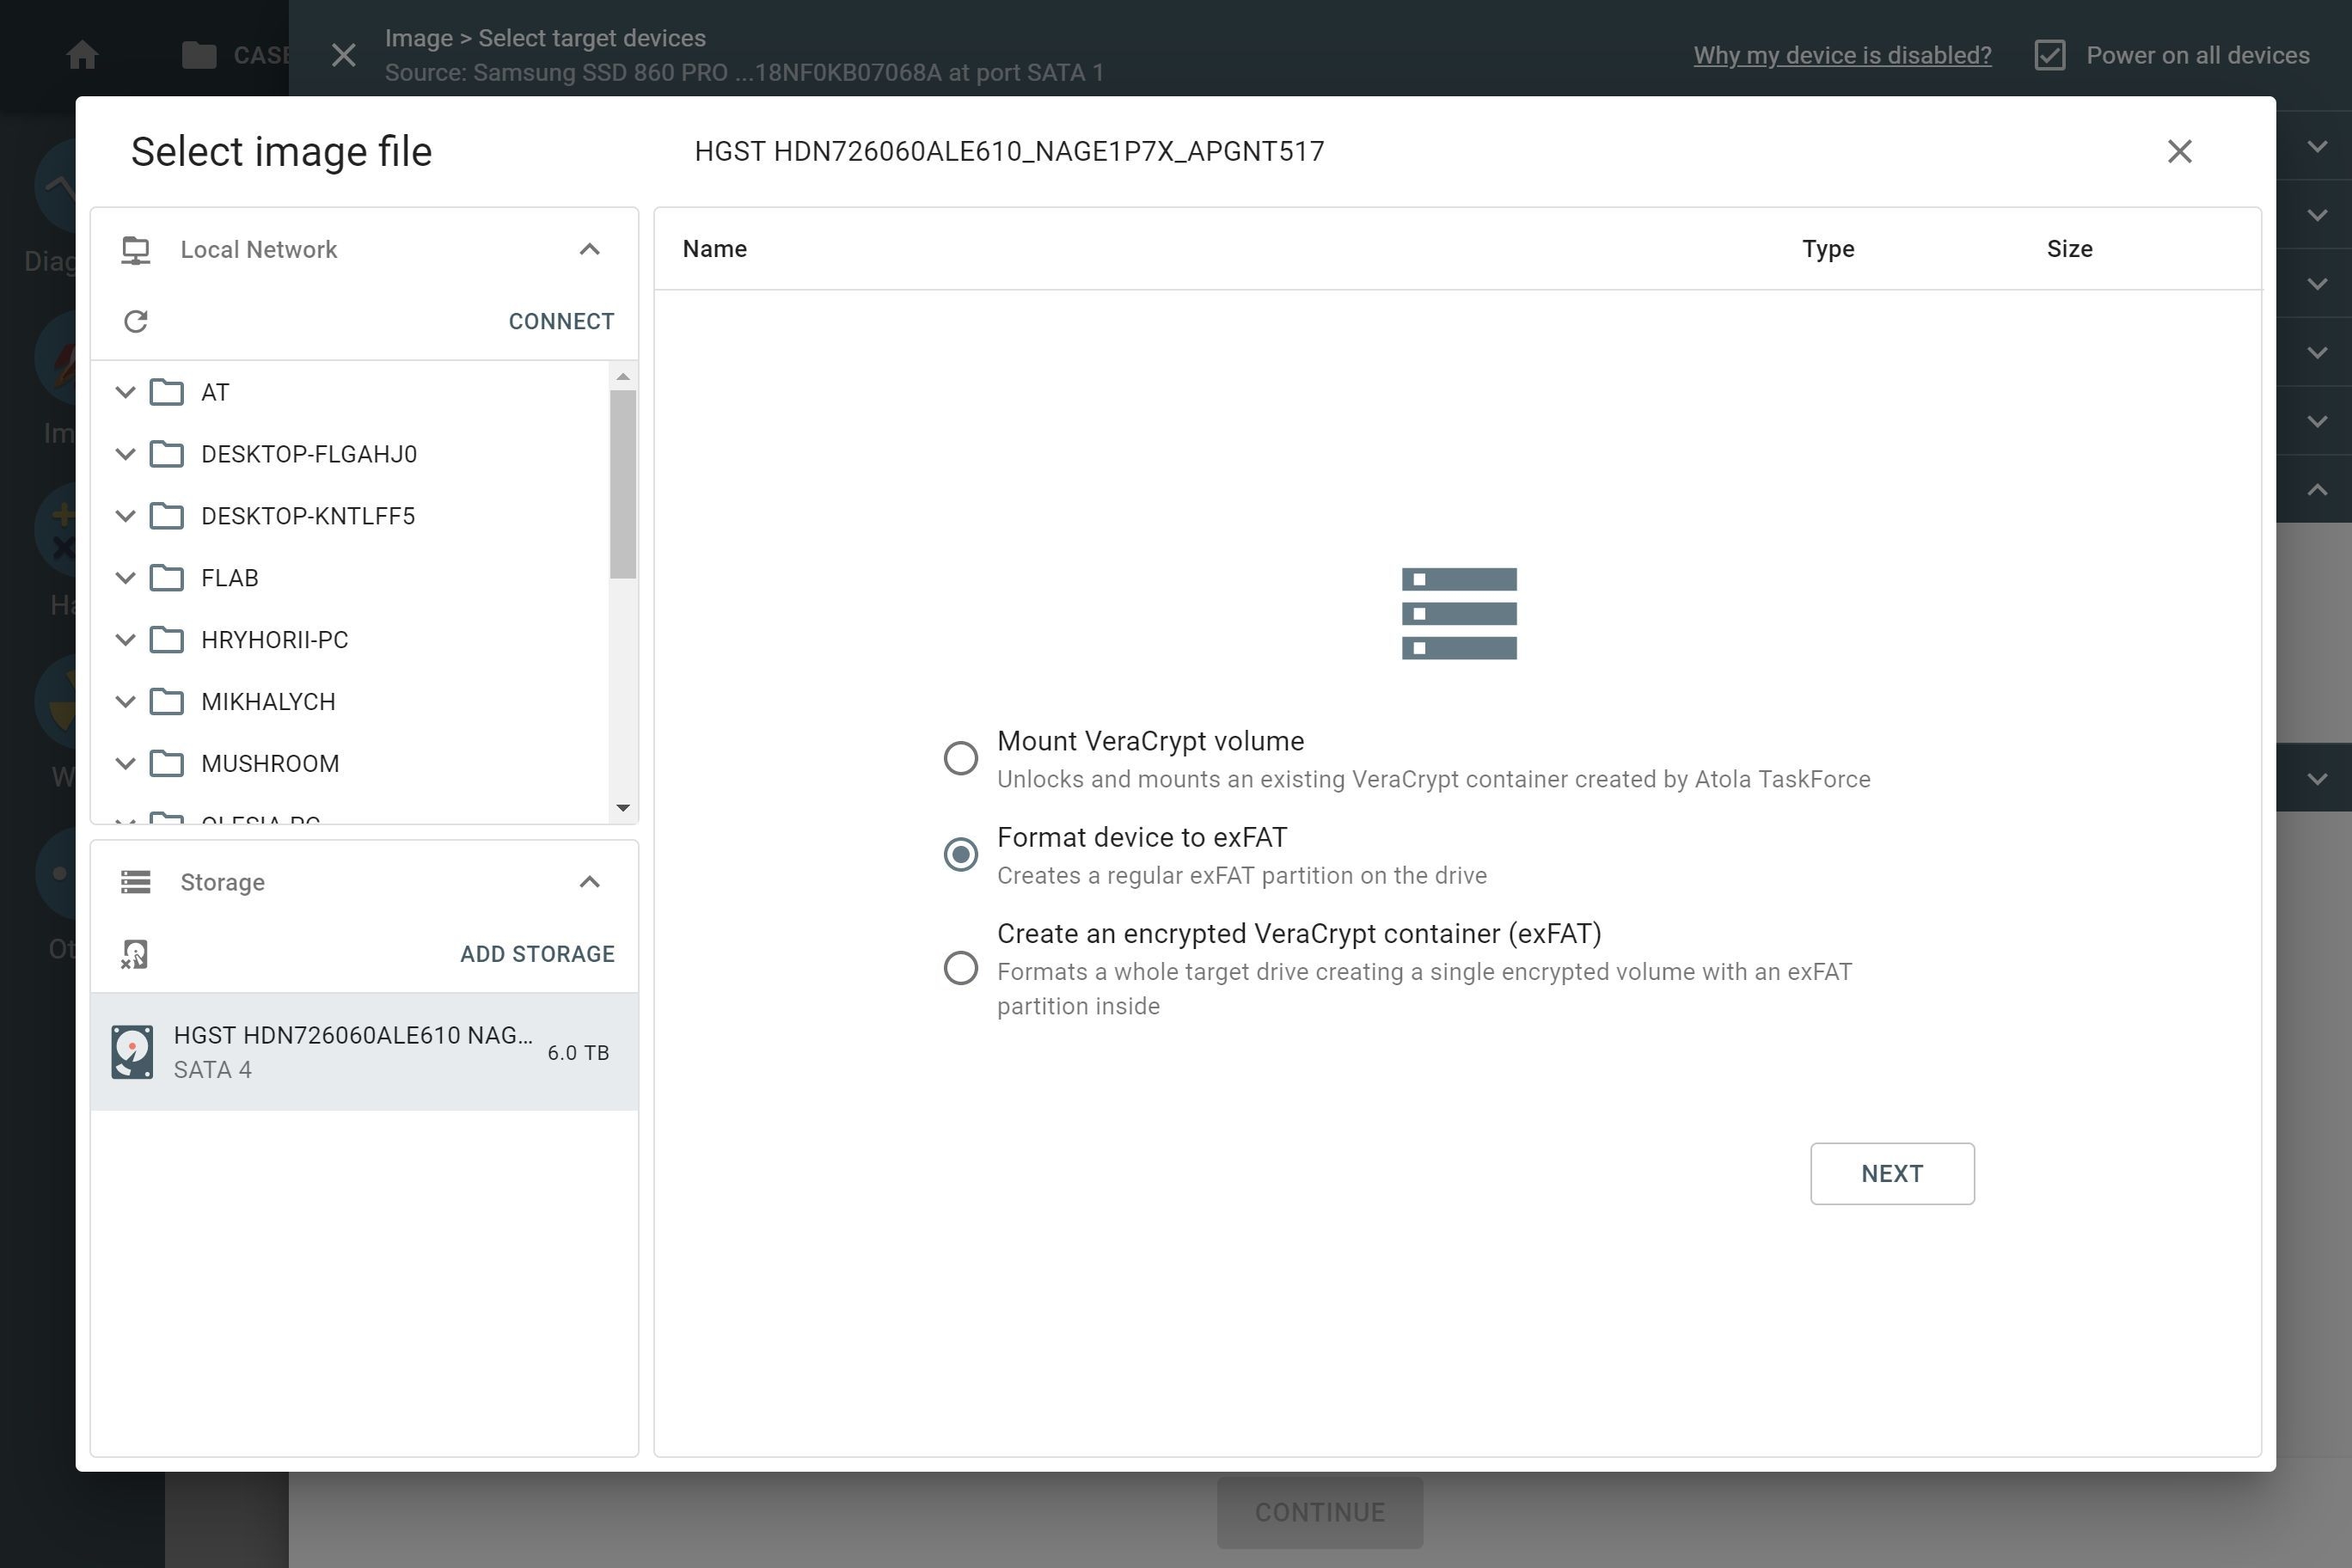
Putting a drive into Storage mode by creating an exFAT partition
To store and transport images securely, you can image into a file on an encrypted target drive using VeraCrypt. TaskForce creates an encrypted exFAT partition using VeraCrypt with a 256-bit AES algorithm on the target drive, locked with a user-set password.
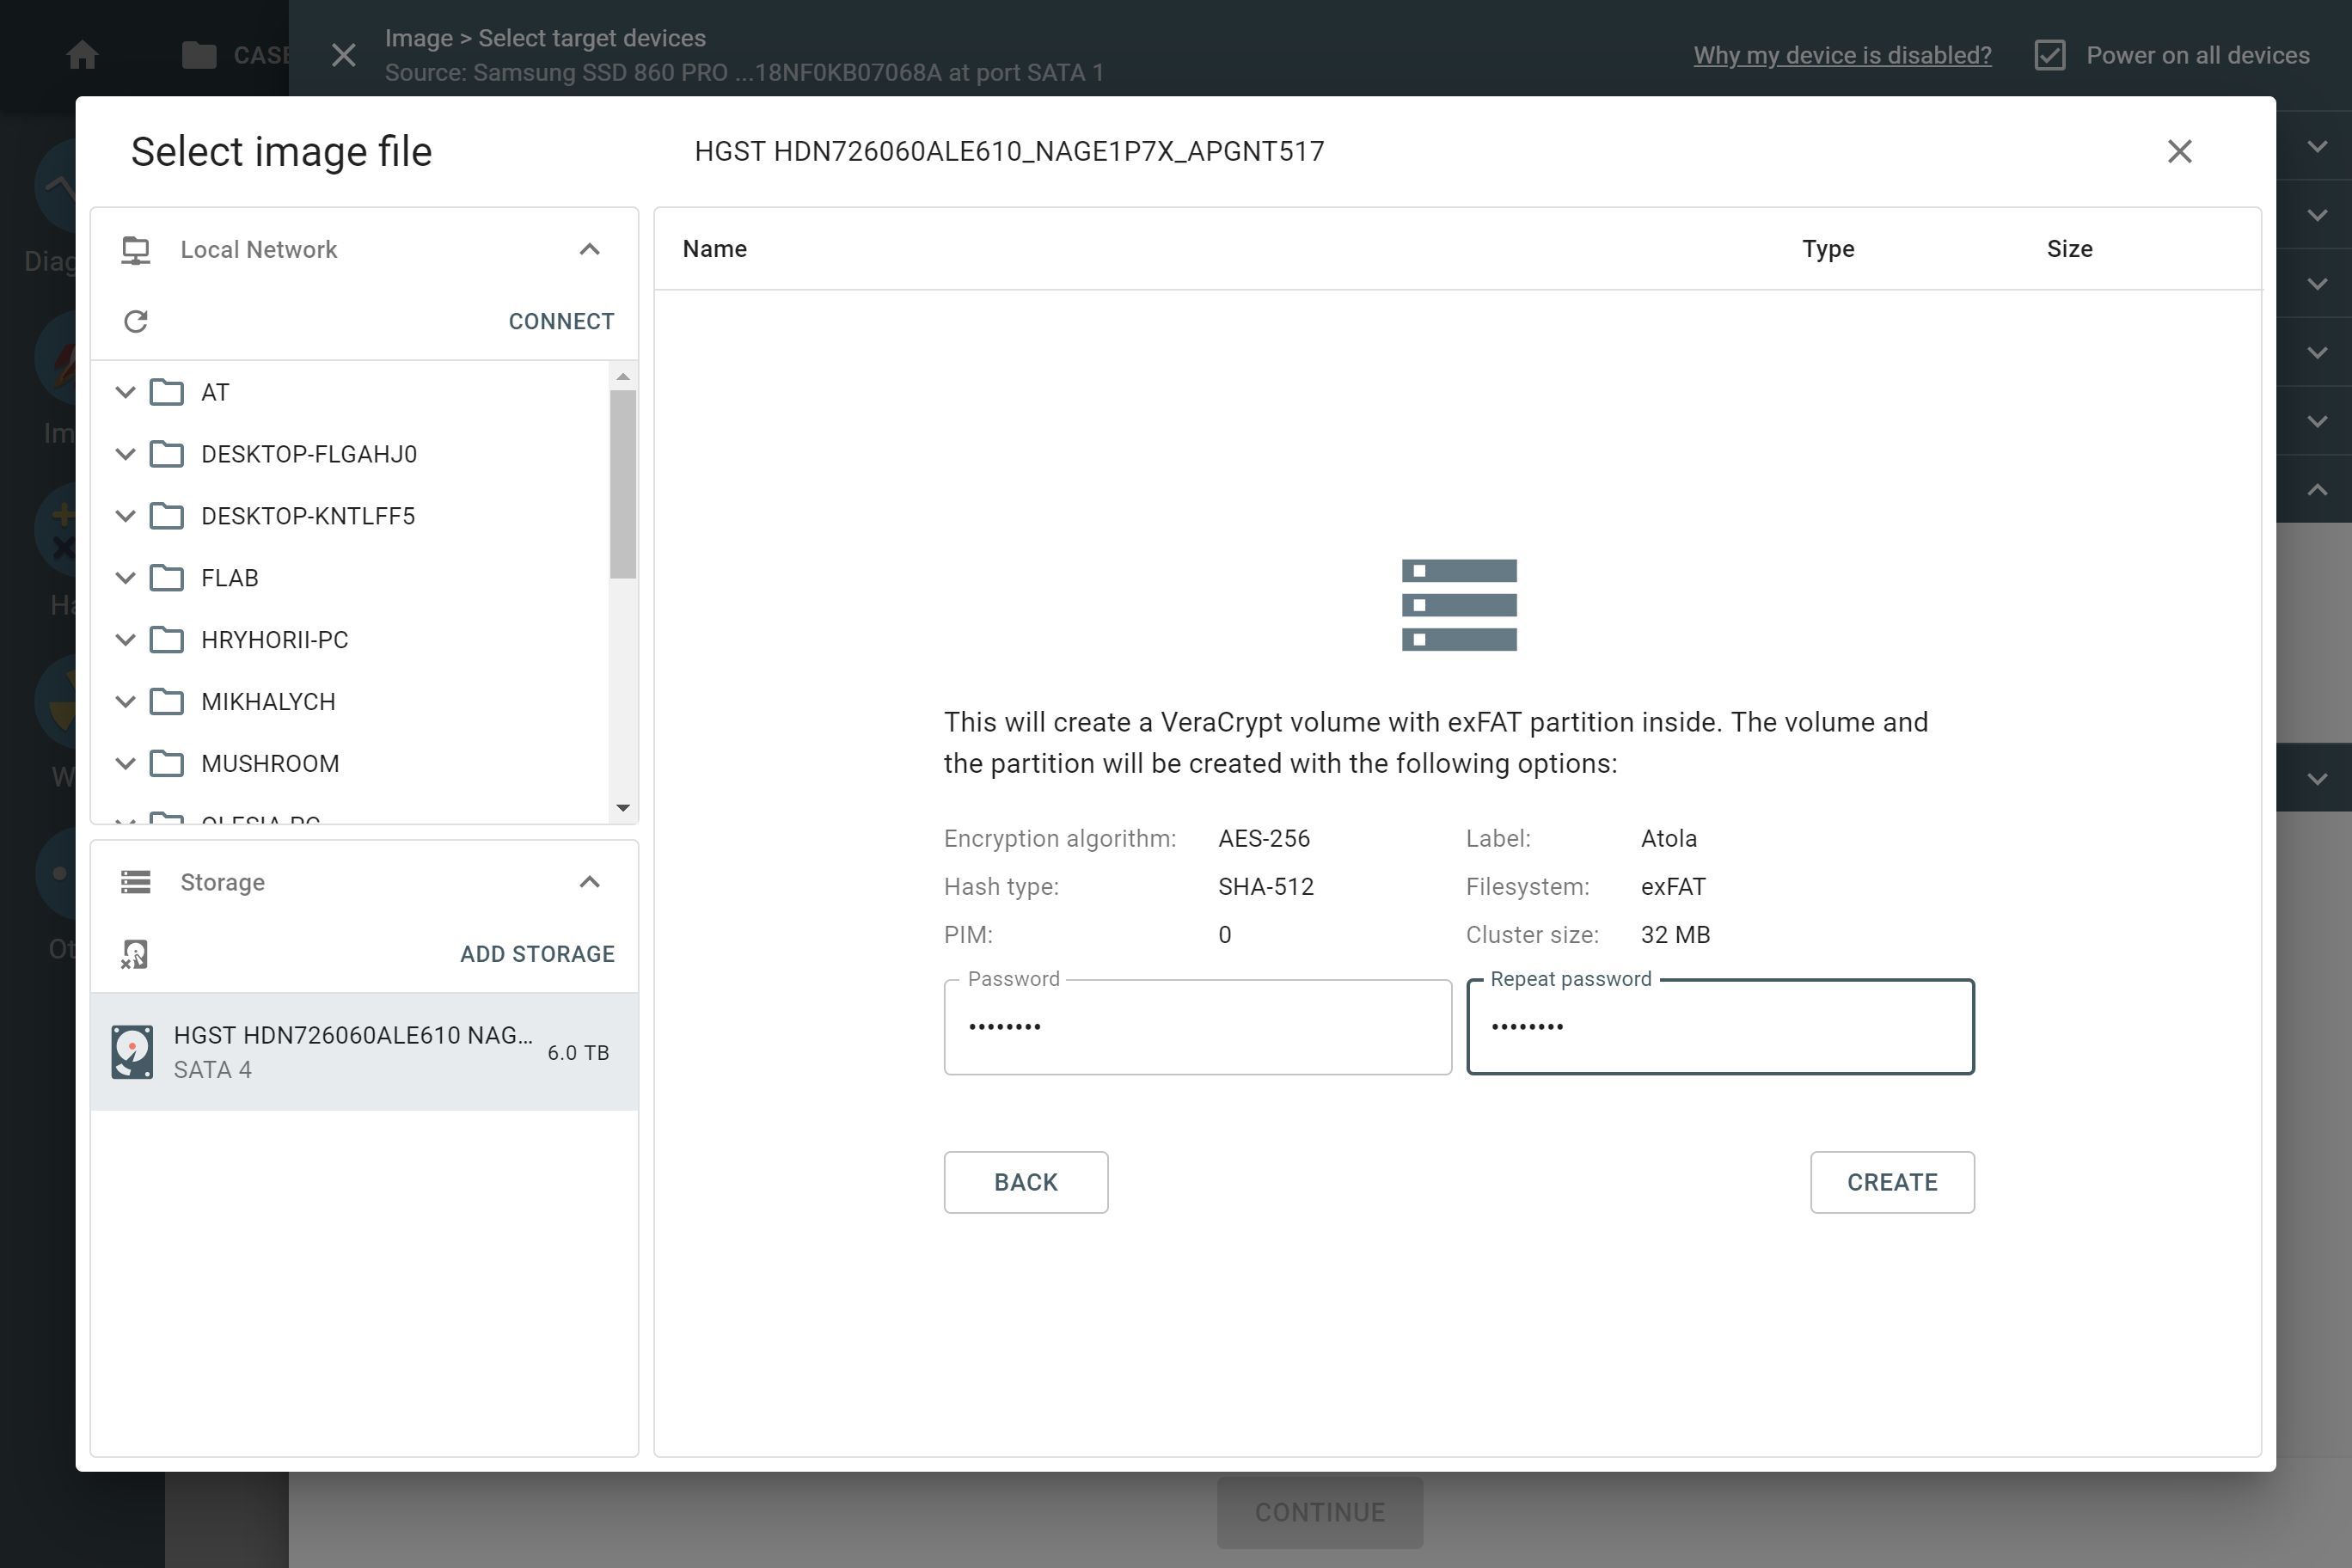
Formatting a drive and creating a VeraCrypt volume on it for secure storing and transportation of images on a drive
When imaging to a server, which is the standard for many organizations, TaskForce allows accessing password-protected servers. For the best data throughput, use a 10-Gbit switch and enable Jumbo frames in TaskForce’s settings.
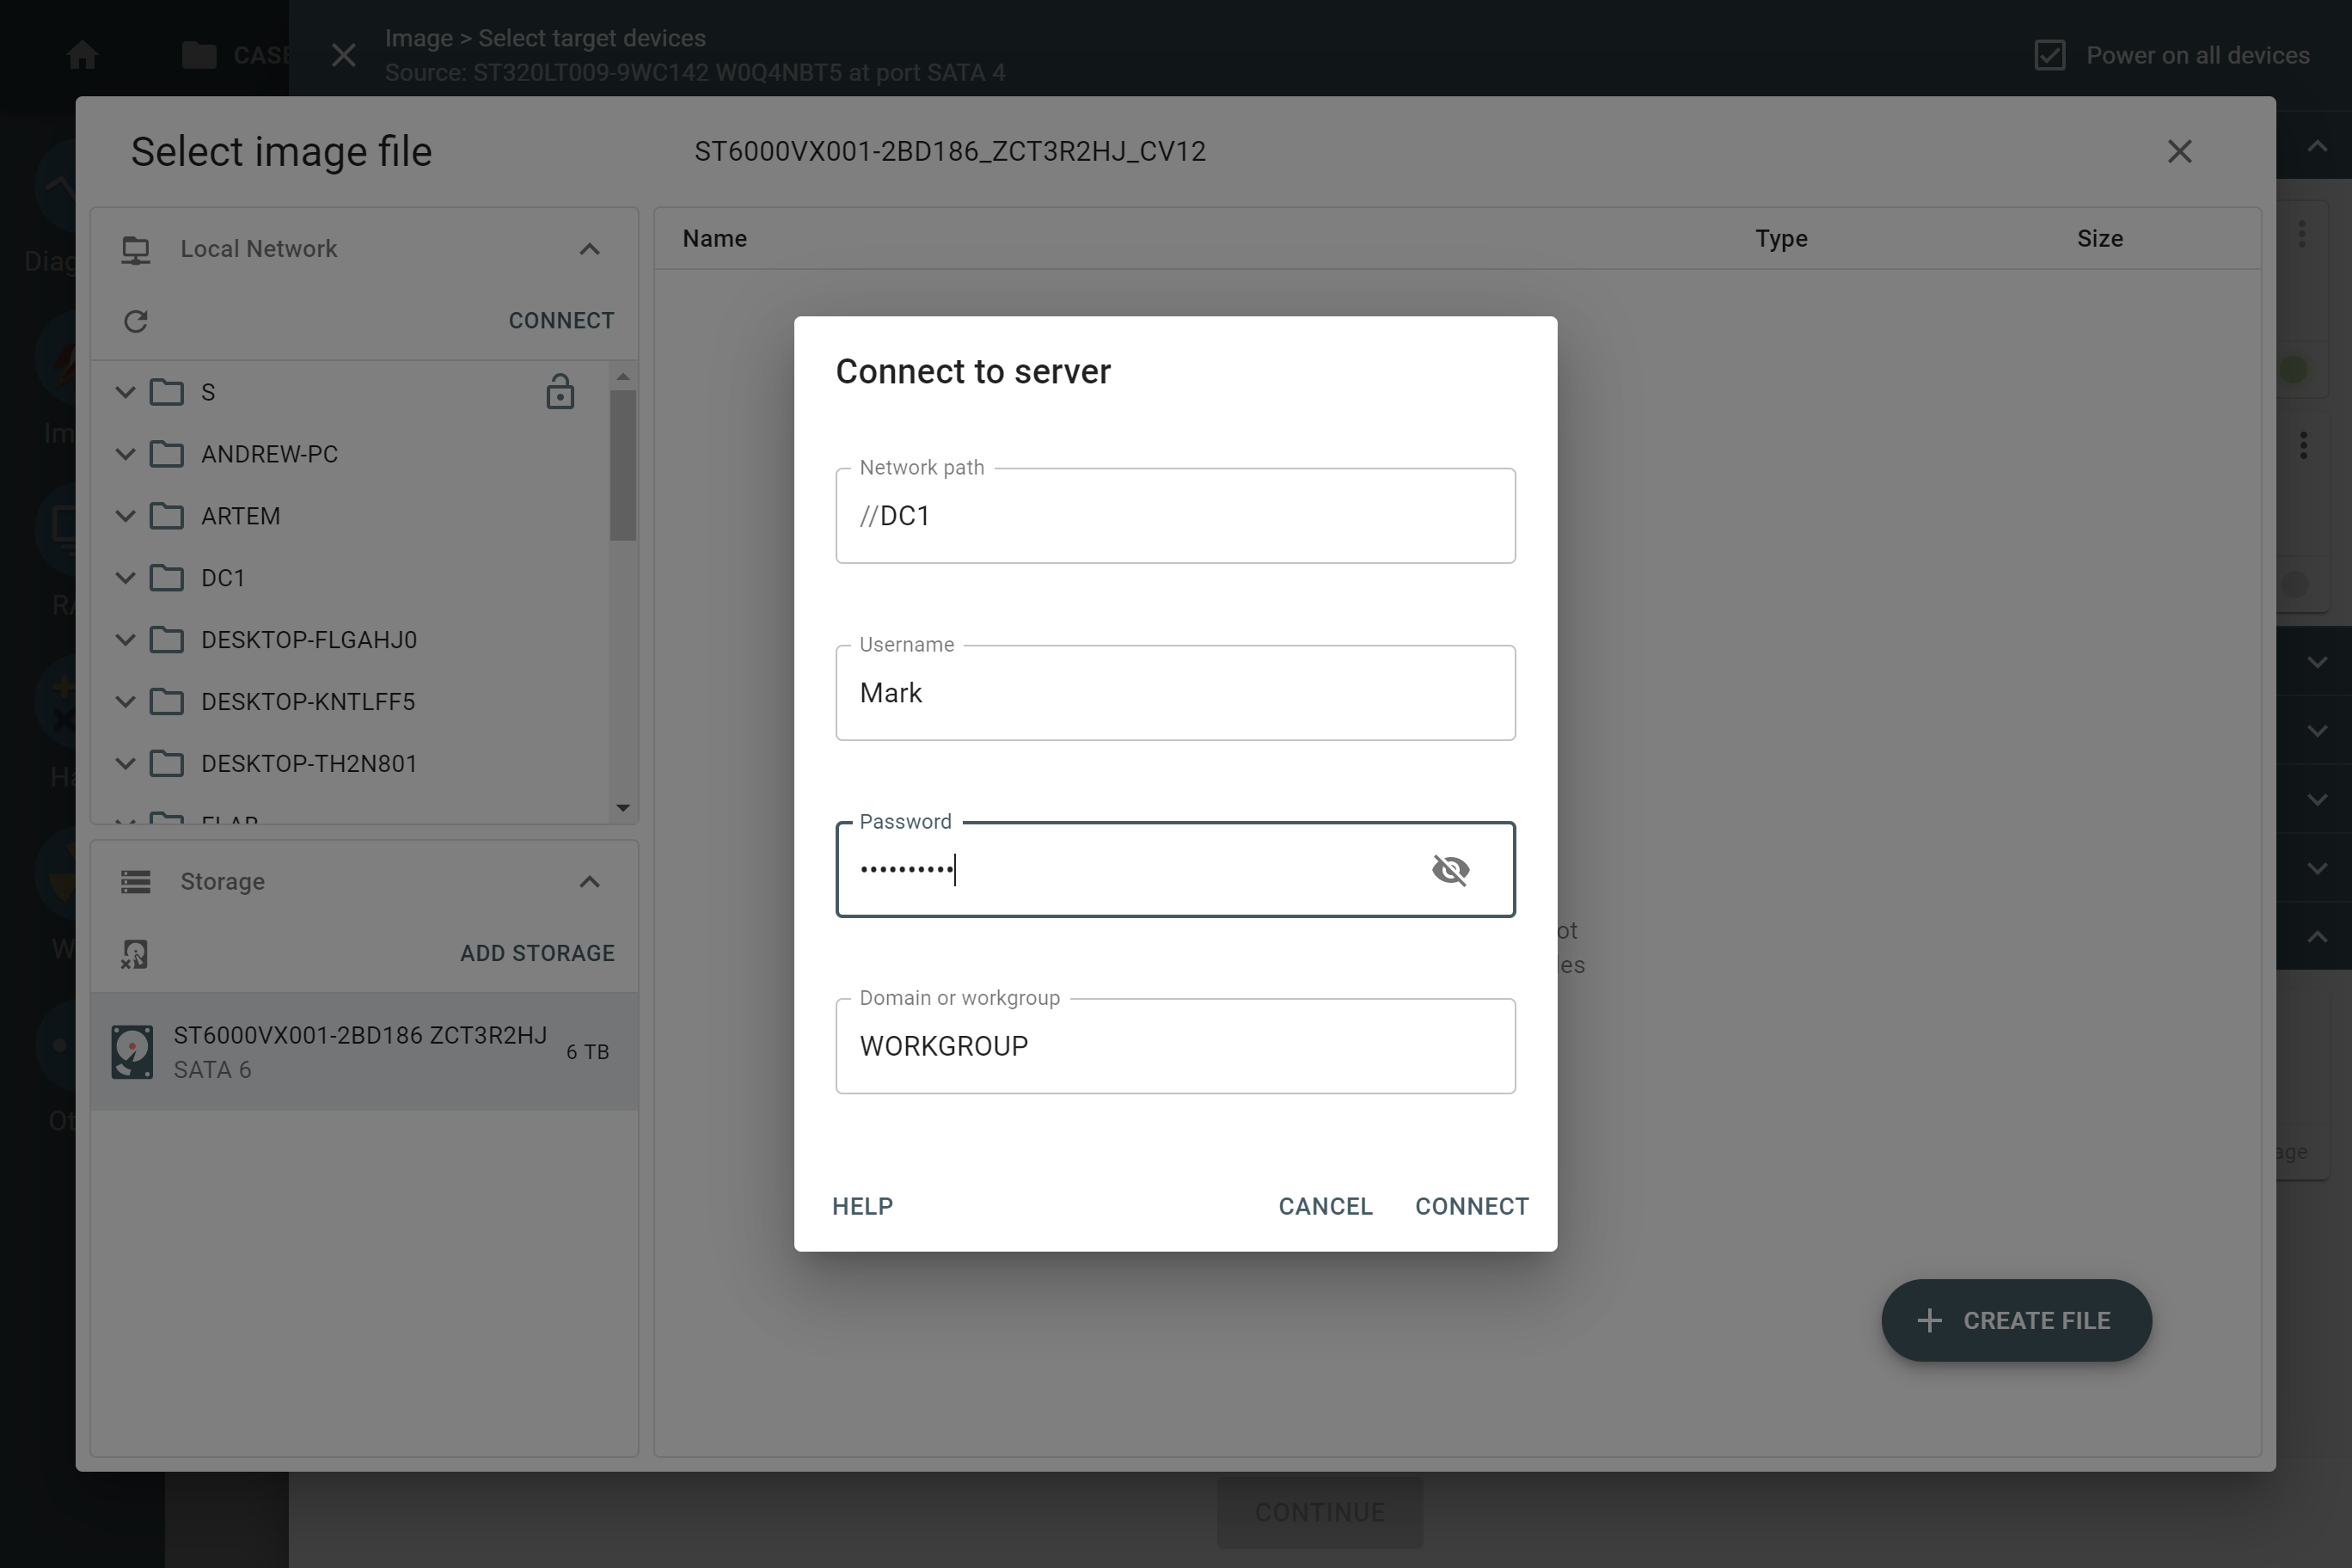
Imaging to a password-protected server
When imaging to a drive that is larger than the source, you may want to clip the target drive’s space so that both are identical and their hashes match. A simple tick of this option in TaskForce’s imaging settings instantly limits the target disk size to source size using the HPA (host protected area).
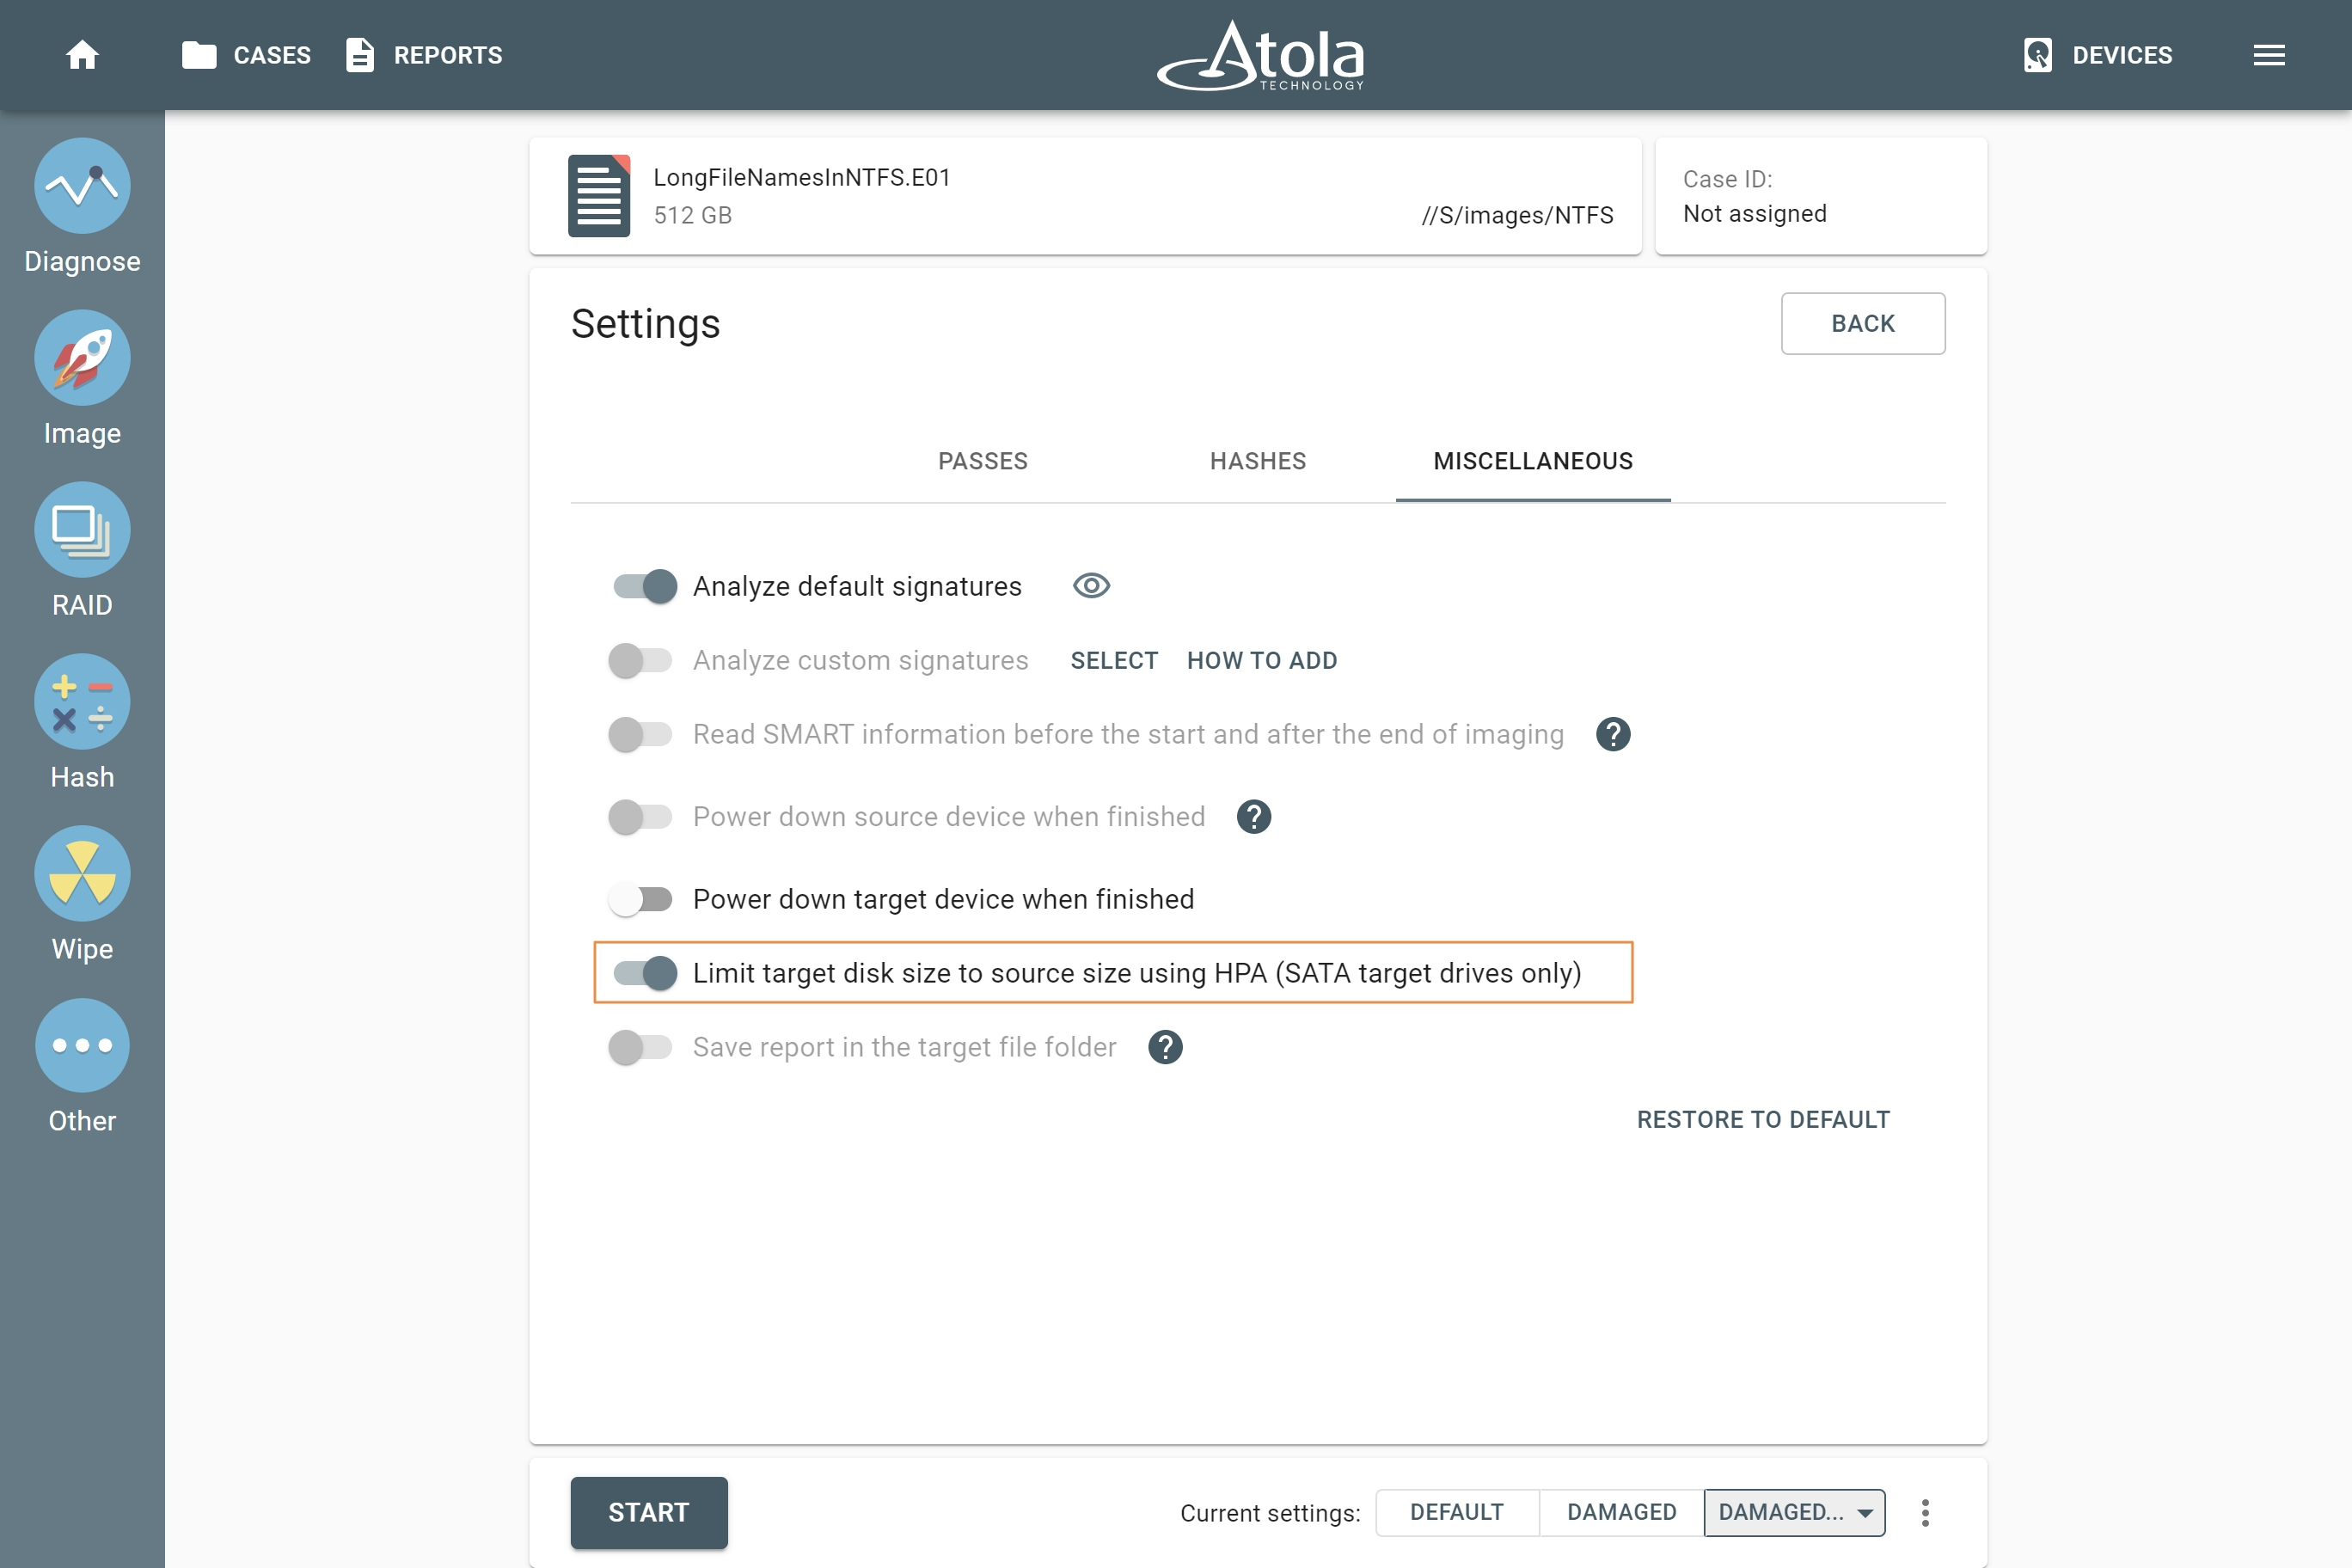
Limit target drive size to evidence drive’s capacity for an identical clone
The drive’s capacity can be restored later.
When it comes to the number of targets per session, it is hard to beat TaskForce. You can image to up to 5 targets at a time and they can be a combination of drives (clones), E01, AFF4, RAW files on a drive, NAS or a local server.
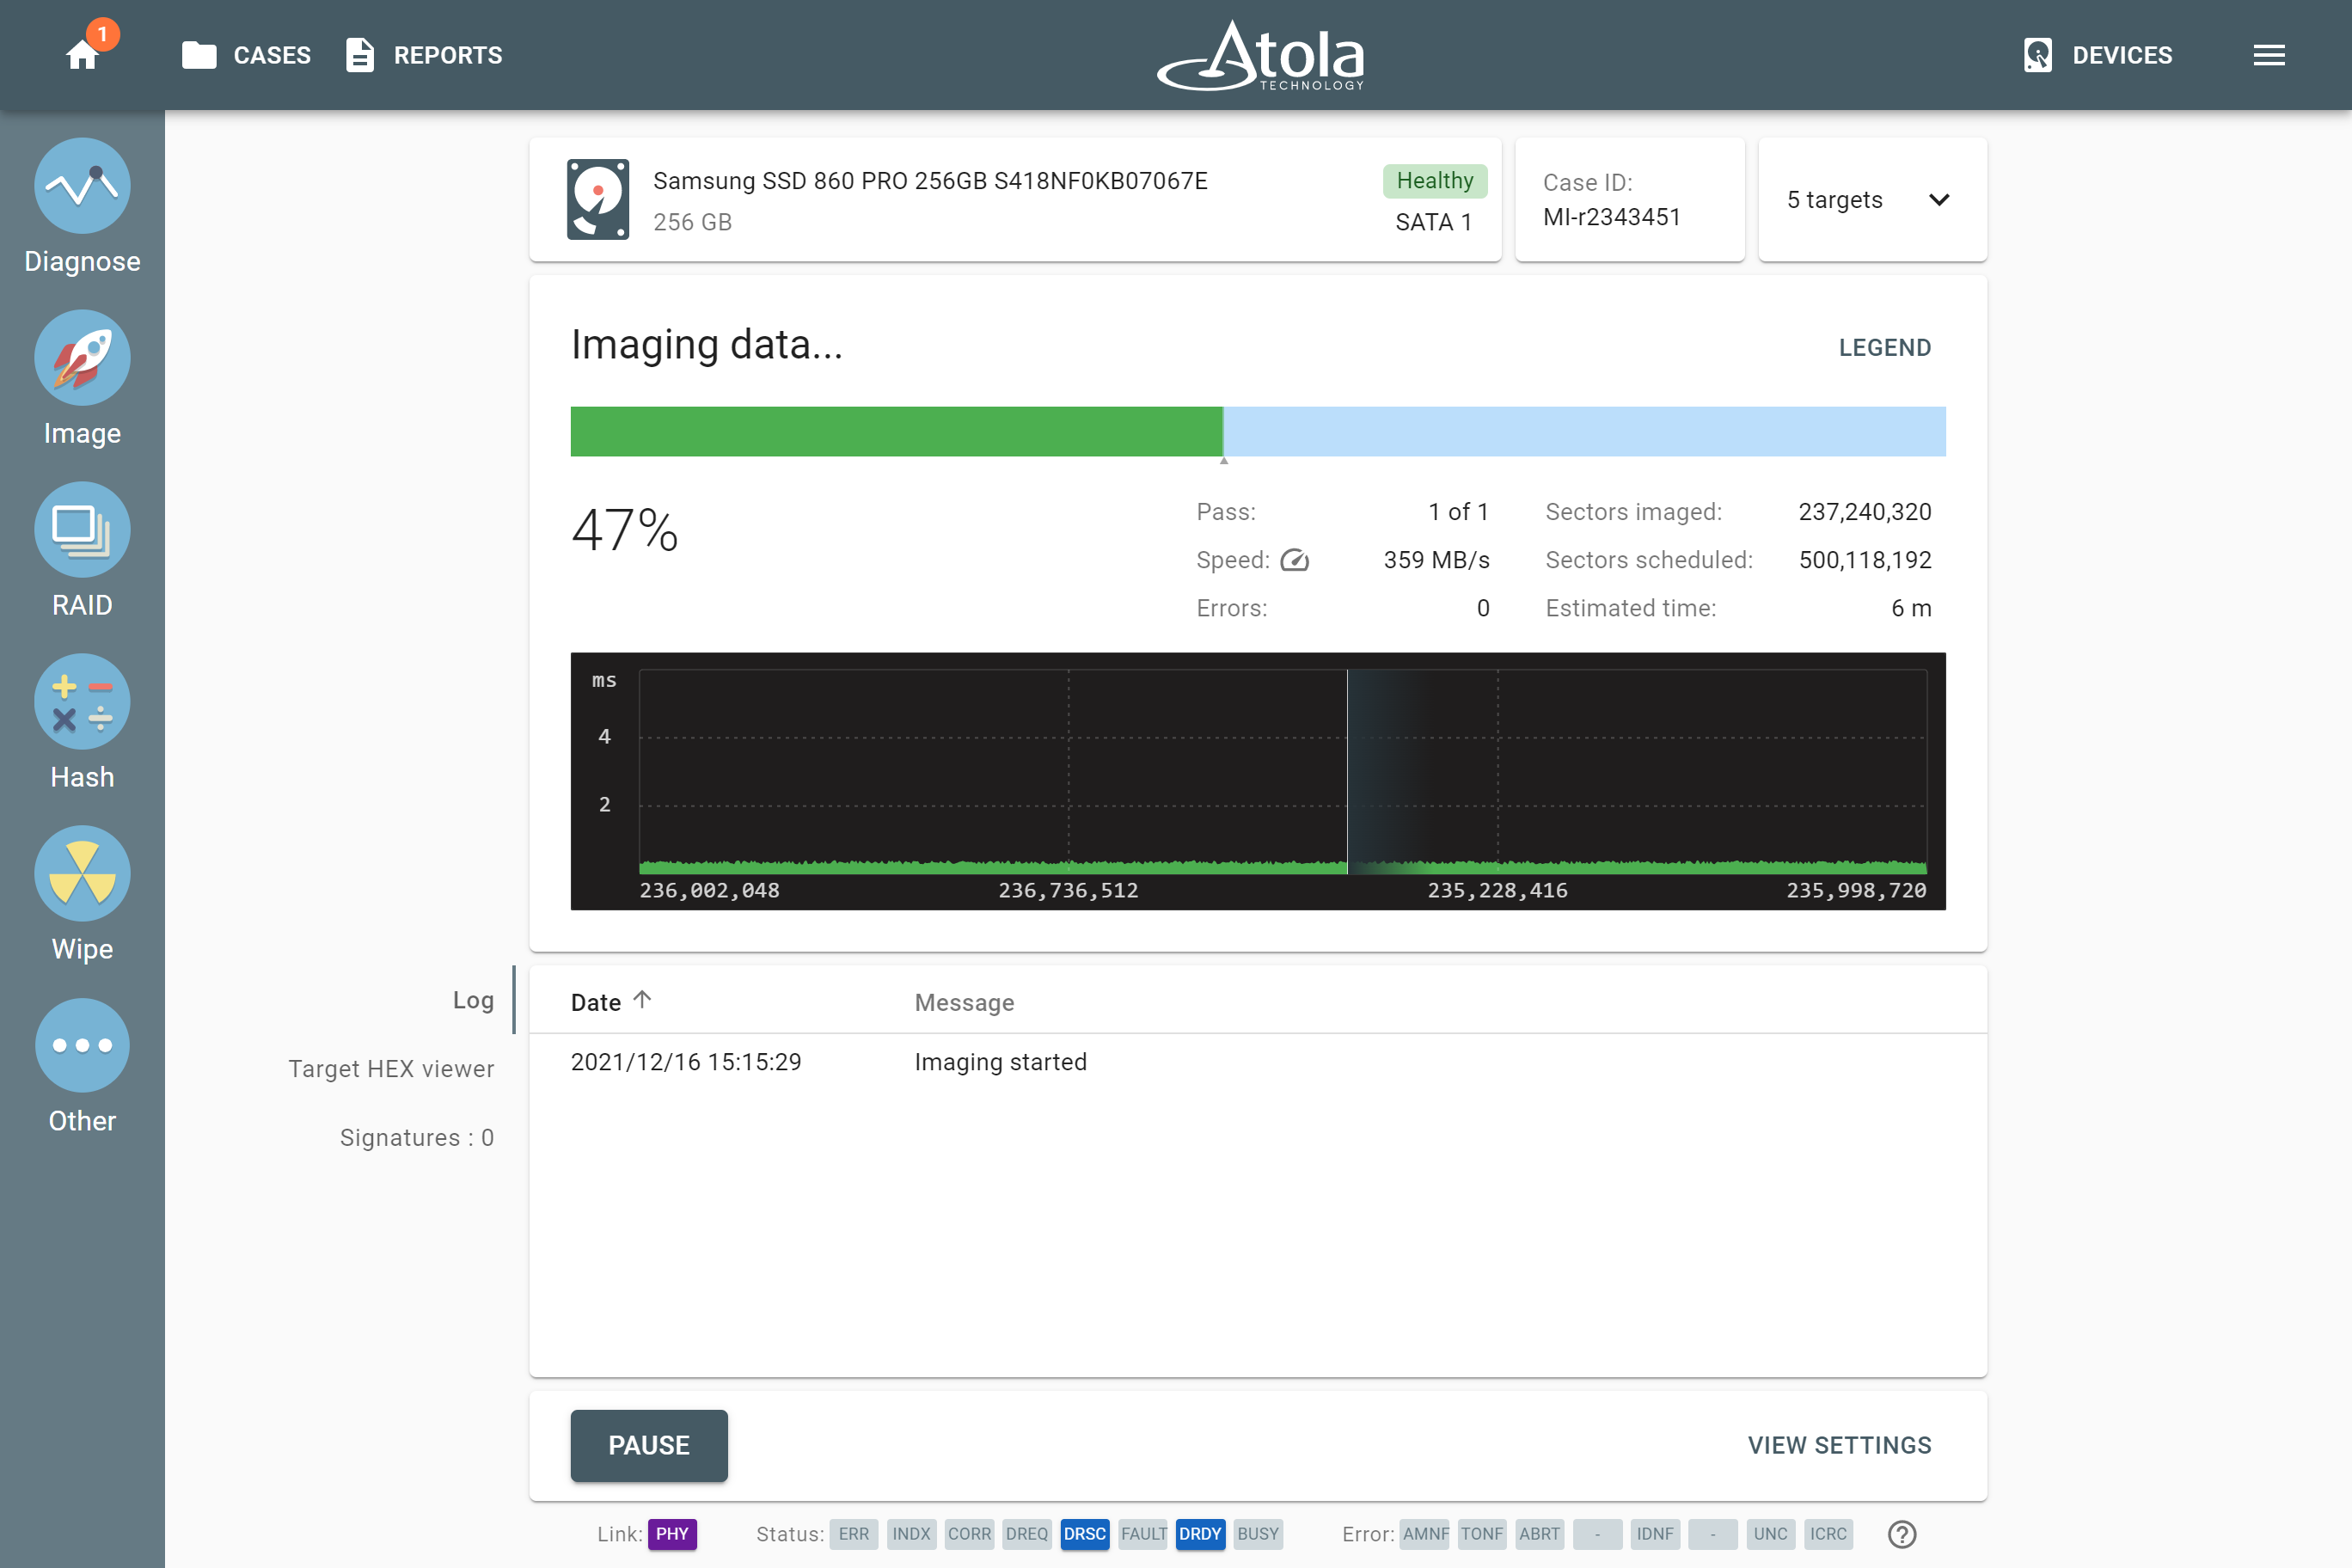
Imaging to 5 targets per session
Restoring image files to a drive can be handy if you need a copy of the evidence on a drive. Atola TaskForce lets you restore E01, AFF4 and RAW files to a drive.
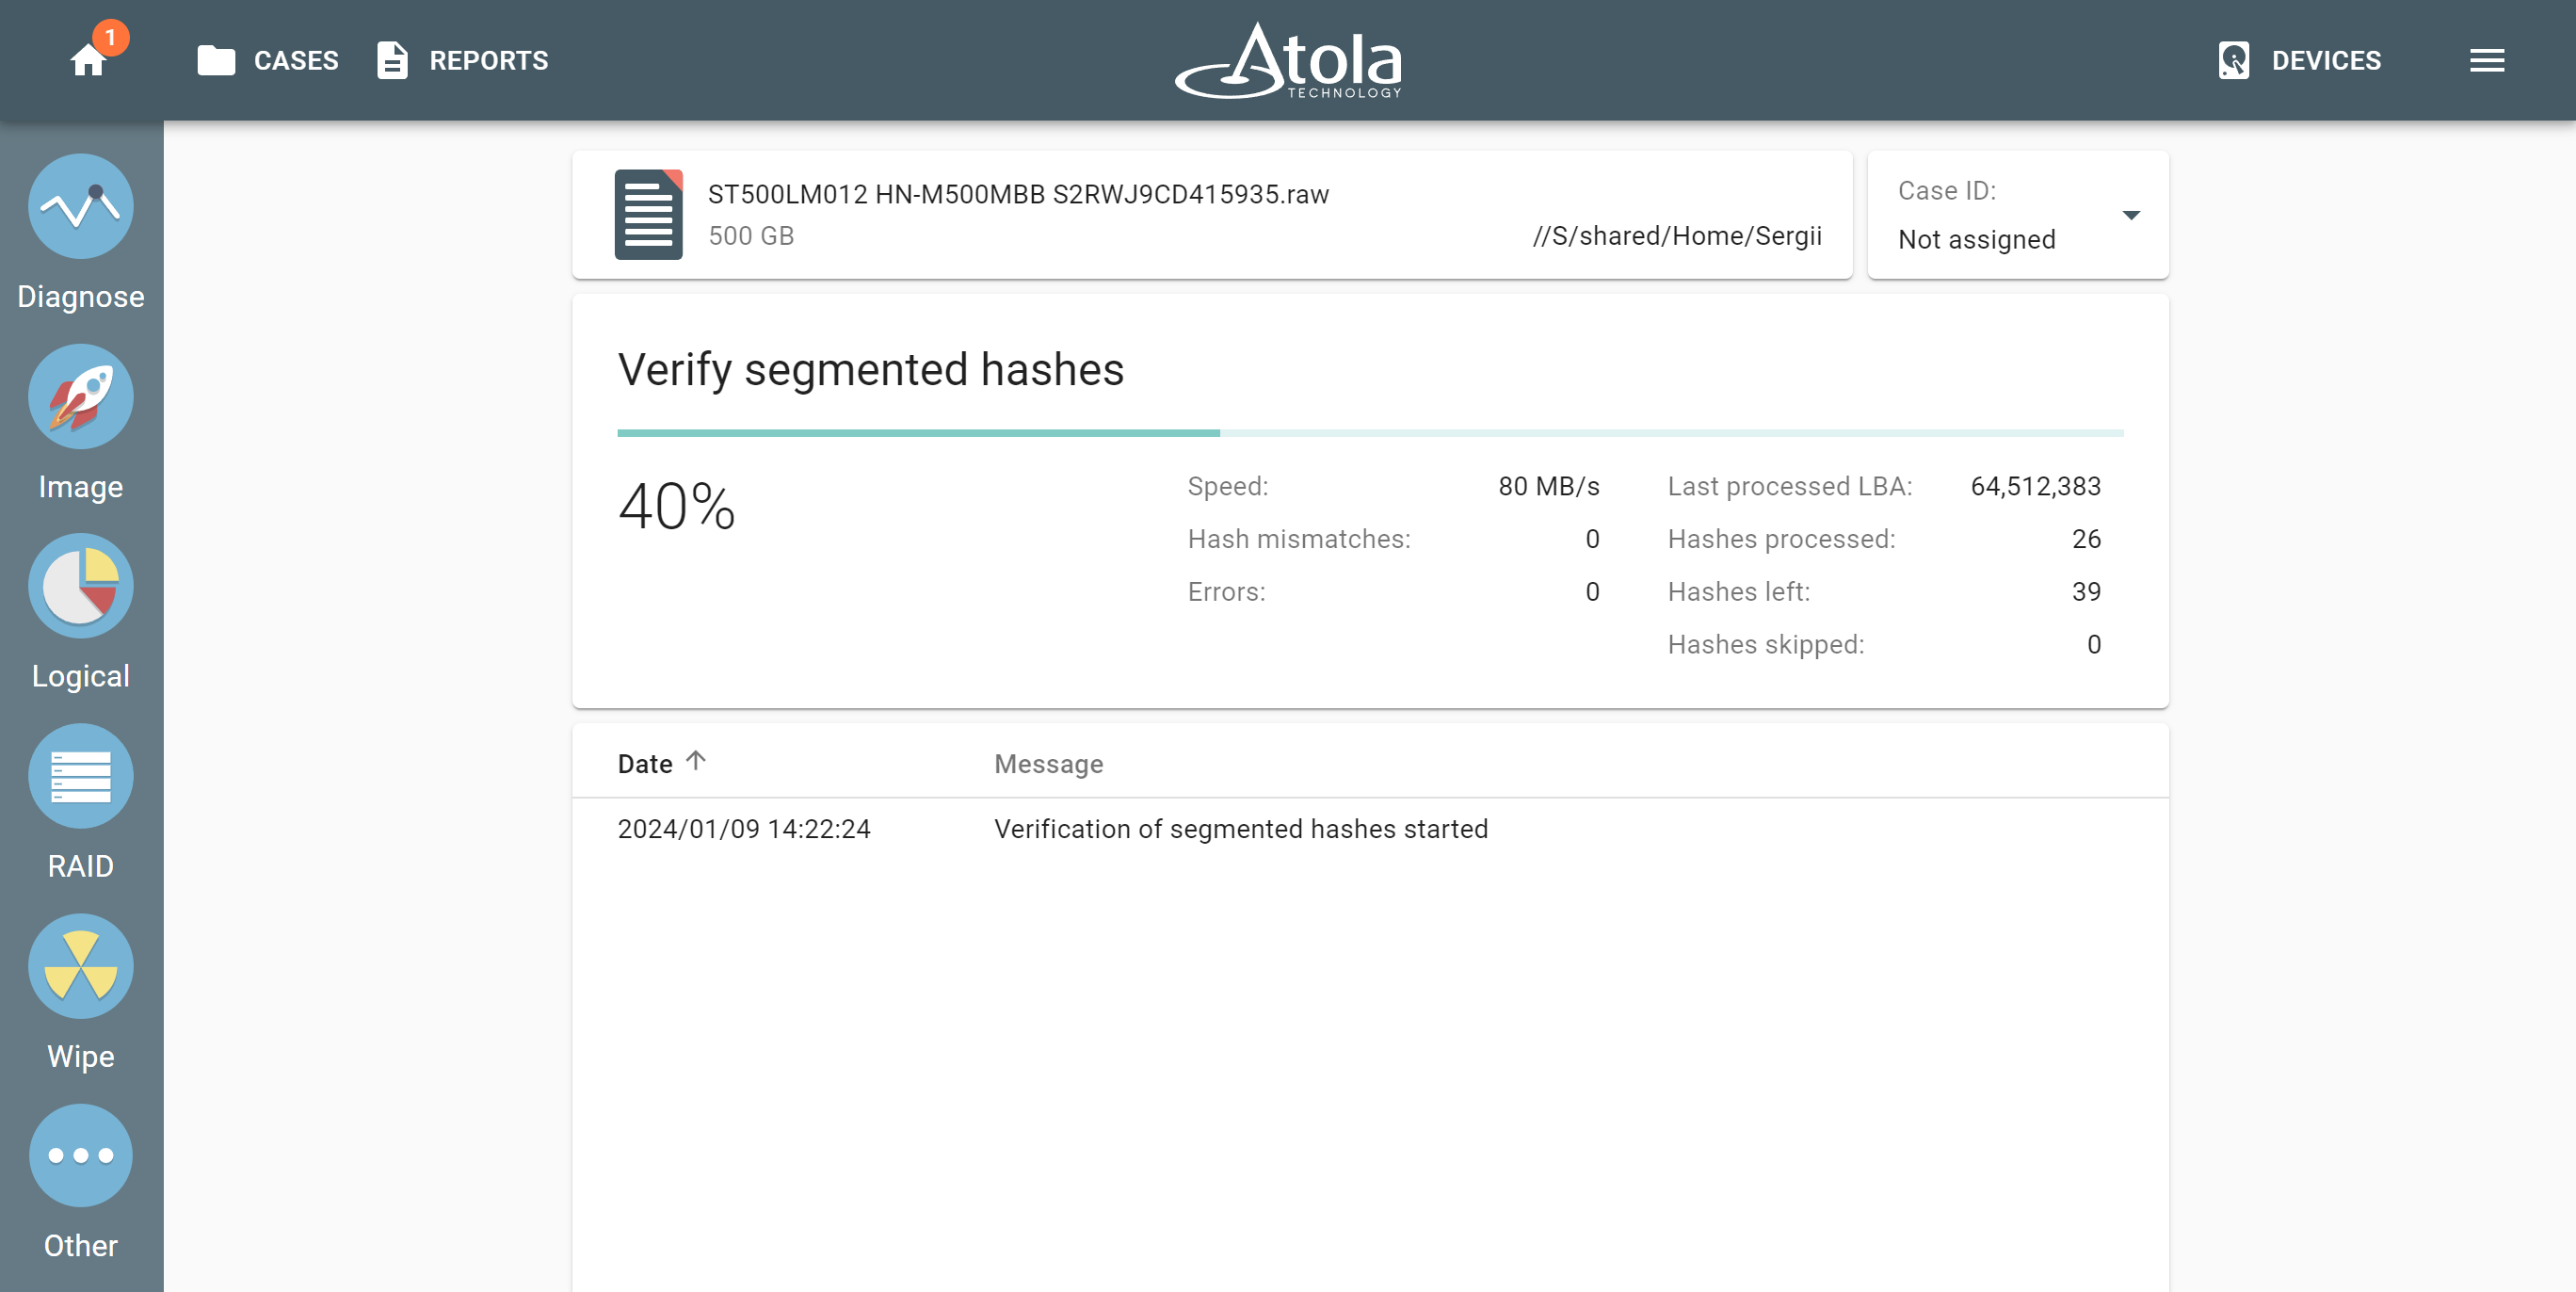
Pause and resume
Oh, and did you know that you can pause and resume an imaging session?
As long as the same target is connected to the imager, the data already imaged to it will be supplemented by the remaining data from the source. This is thanks to the imaging map that is created during the imaging session that tracks all the imaged sectors of the drive that the imaging module will address only the unimaged areas after the resume. This way even an unexpected power outage will not make you start an imaging job from scratch!
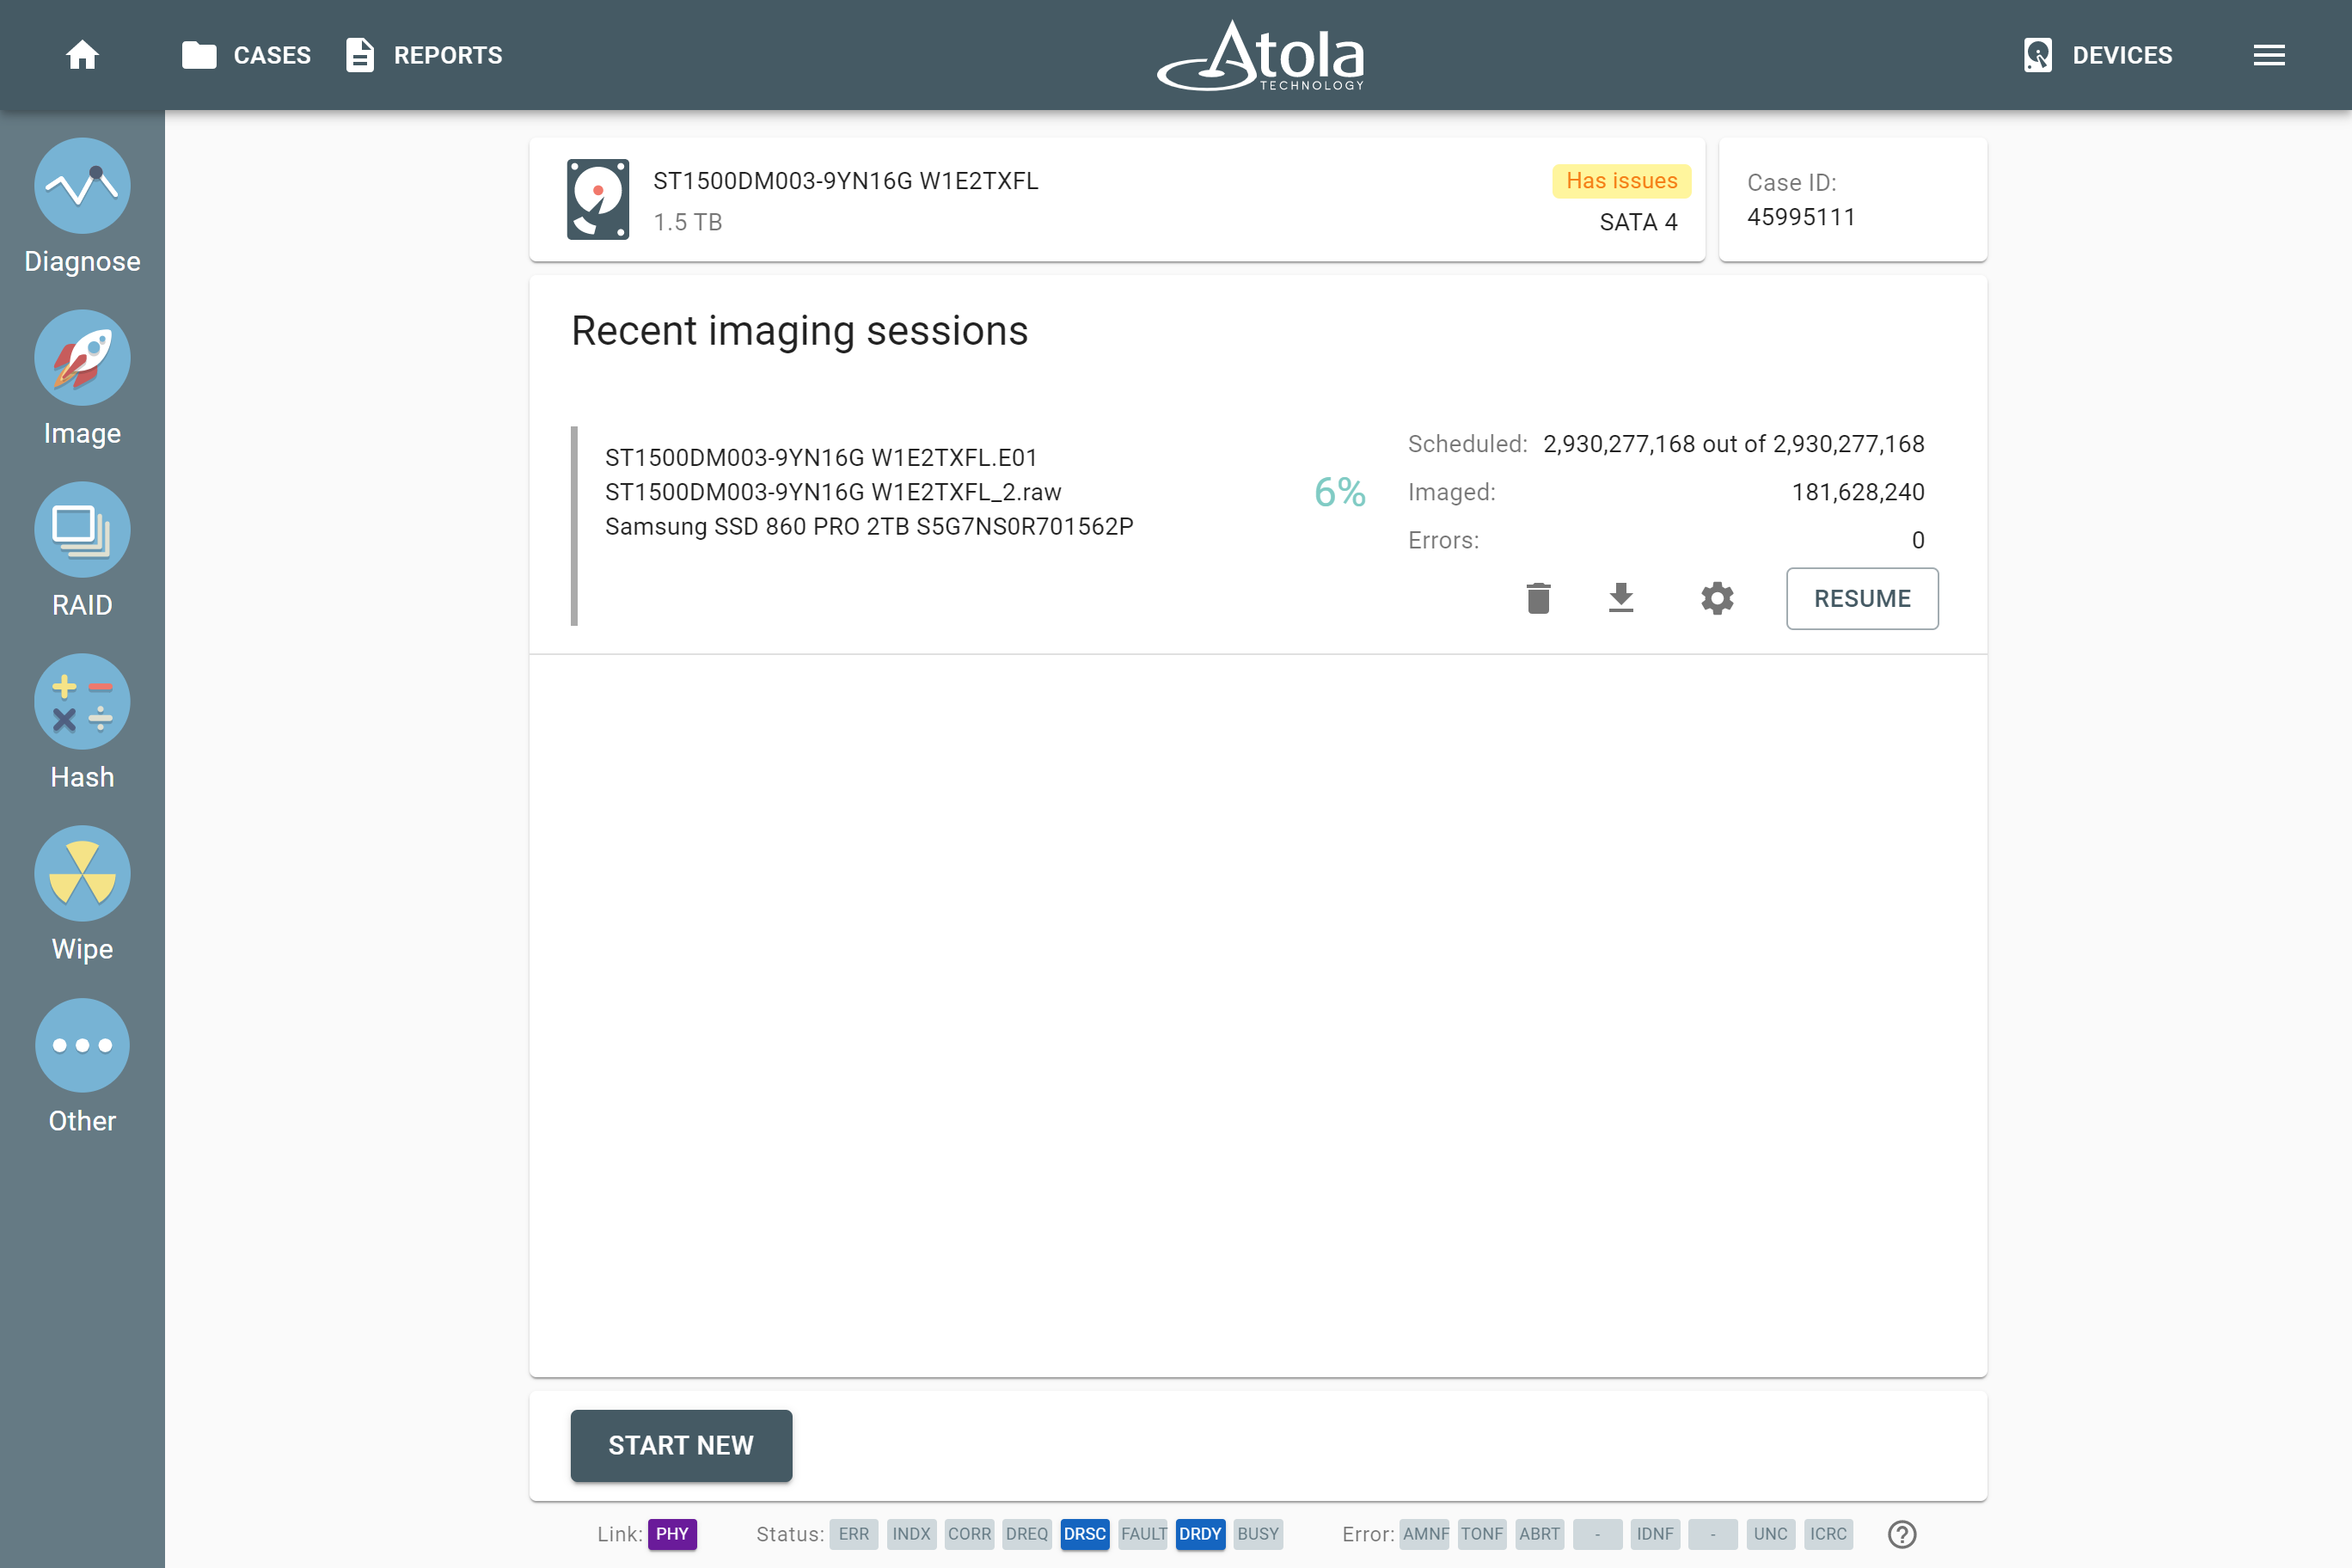
Make sure all targets are connected to the imager and image files are accessible. Then click the Resume button
Expect more!
Atola team never stops enhancing TaskForce’s imaging module to make even the most complex acquisition job fast and effortless for each of our customers.
We encourage you to reach out to us about your experience with Atola TaskForce and ideas for new features. This feedback inspires us and helps prioritize your needs higher!

- RAID imaging made easy with TaskForce - May 3, 2022
- Image. Anything. Fast.What makes TaskForce the ultimate forensic imager - February 9, 2022
- RAID configuration detection in Atola TaskForce - April 7, 2021
Olga Milishenko
Olga believes that marketing is about letting the target audience fall in love with your product. She takes pleasure in catching the coolest features of Atola imagers with her camera.