In summer 2020, Atola released a groundbreaking RAID functionality in TaskForce to identify, reassemble and image arrays in a fast and forensically sound manner. It made TaskForce the only hardware RAID imager in the world. Nearly two years and a few firmware updates later, TaskForce is a 3-in-1 solution that:
- automatically identifies the RAID type and configuration;
- images the array or its specific parts (partition, folder or file level) at high speed;
- automatically rebuilds data in arrays with redundancy (1, 5, 10) and recovers data from damaged RAID members.
The most recent releases supplemented the existing features set with more RAID types and file systems, enhanced configuration search algorithms and logical imaging of selected files. And more additions are underway!
Supported as of April 2022: RAID types: RAID 0, 1, 5, 10 & JBOD
File systems: NTFS, ext4/3/2, XFS, exFAT, HFS/HFS+
The scope of the RAID module today
Configuration autodetection:
- Fast and effective RAID configuration autodetection of unknown RAIDs
- Instant configuration autodetection of mdadm-created arrays
- RAID partition preview for fast confirmation of a successful reassembly
Imaging:
- Physical imaging of a whole RAID
- Imaging of selected partitions
- Logical acquisition of selected files and folders
RAID data rebuilding and recovery:
- For RAIDs with redundancy: automatic rebuilding of RAID data when a drive is missing, or one/multiple are damaged
- For all RAID types: automatic data recovery imaging algorithms applied to damaged members to obtain as complete image of the RAID data as possible
Now, let’s look into the different cases in more detail.
RAID Autodetection
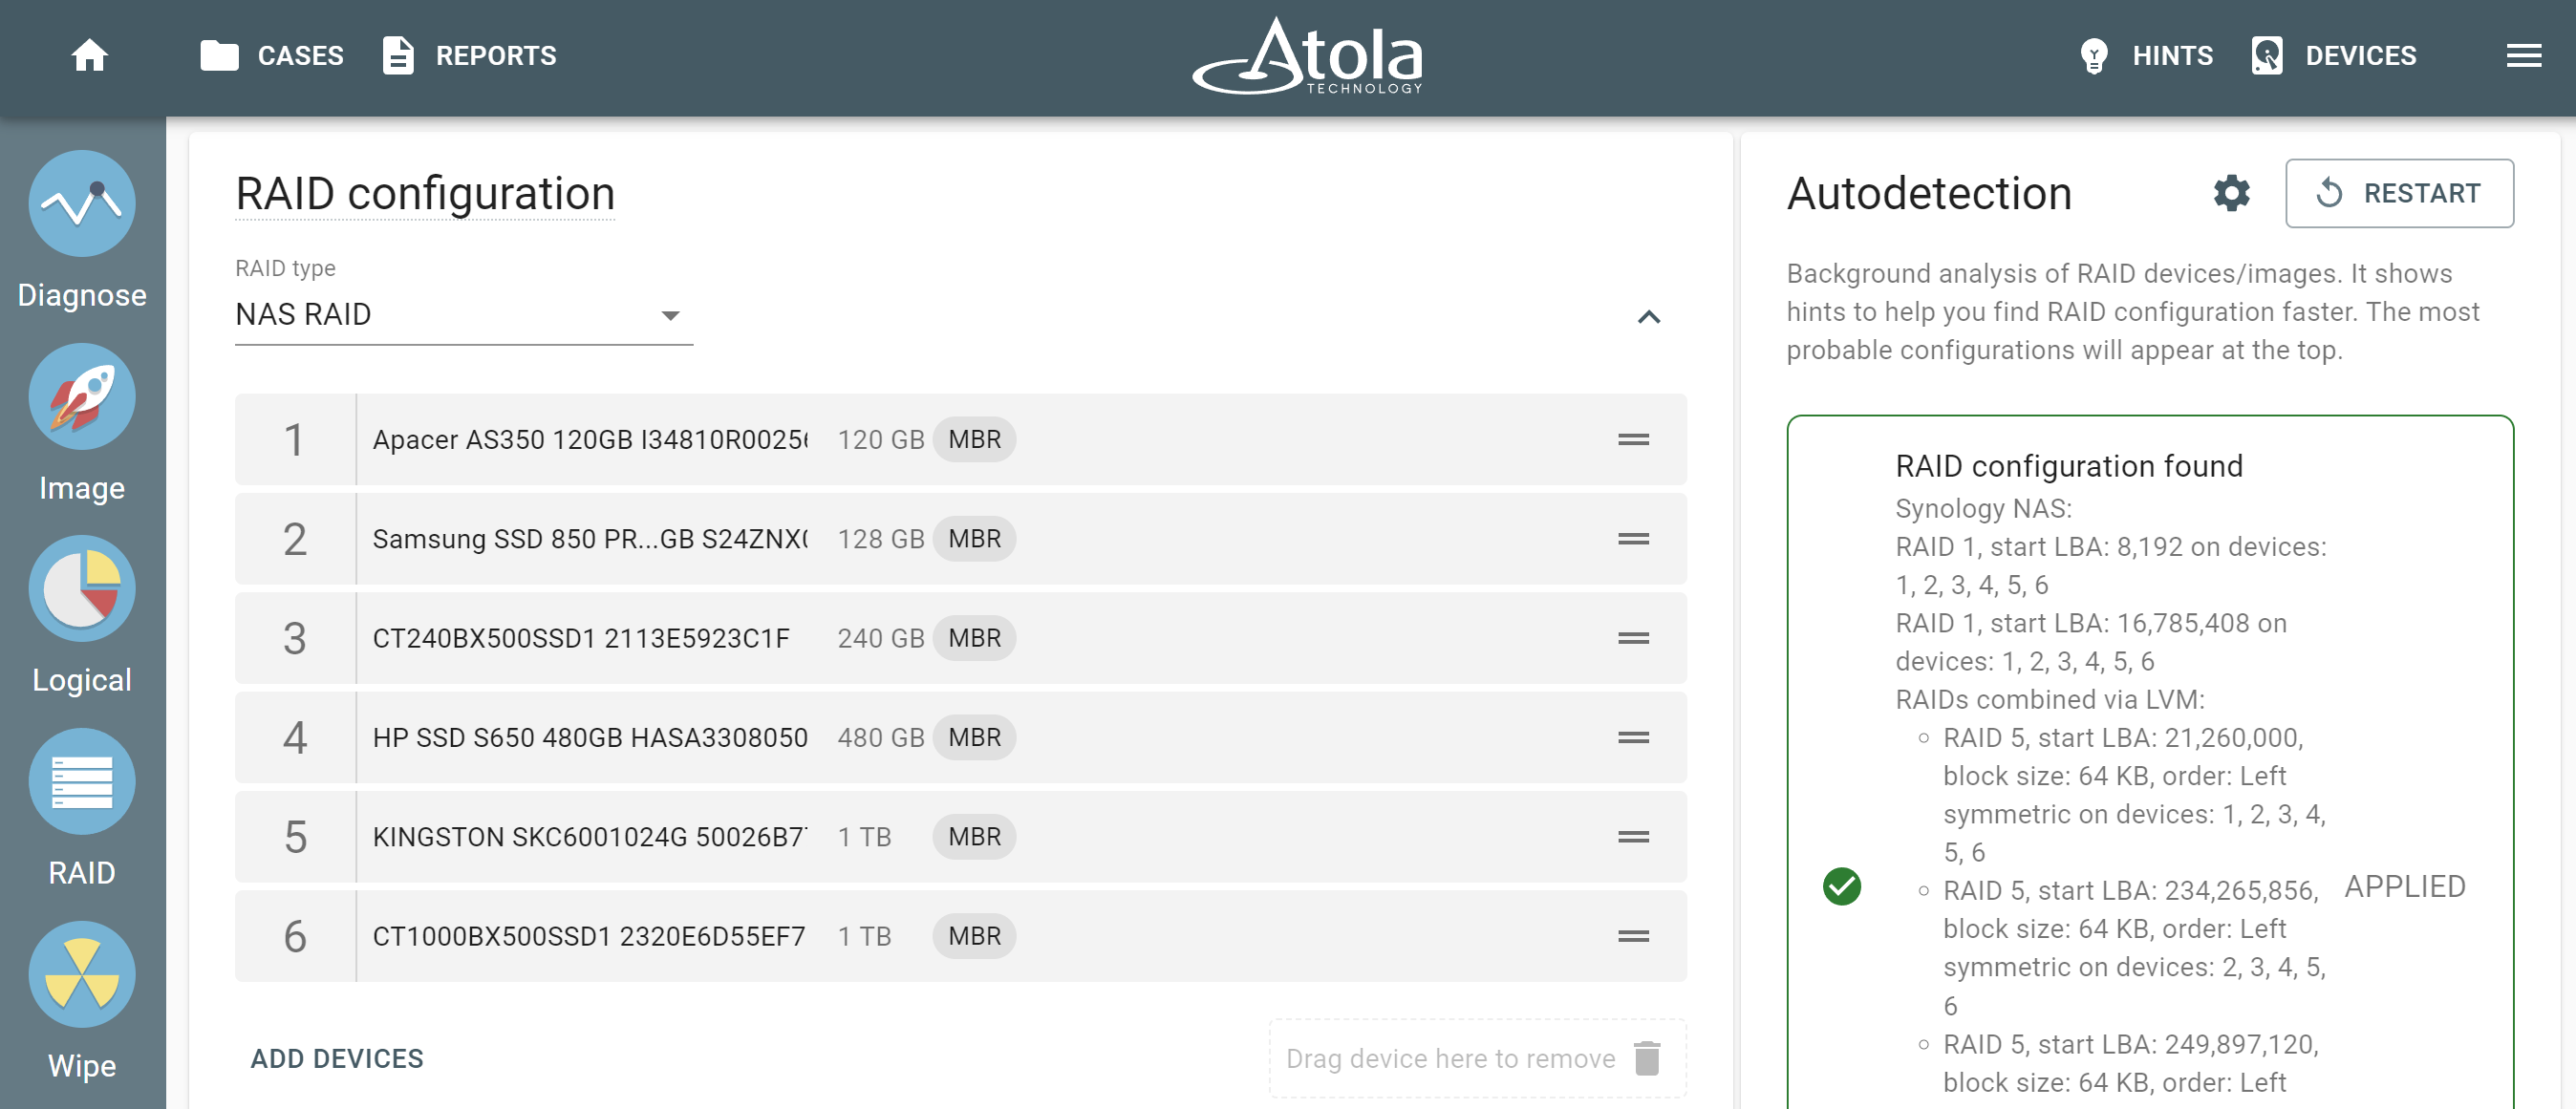
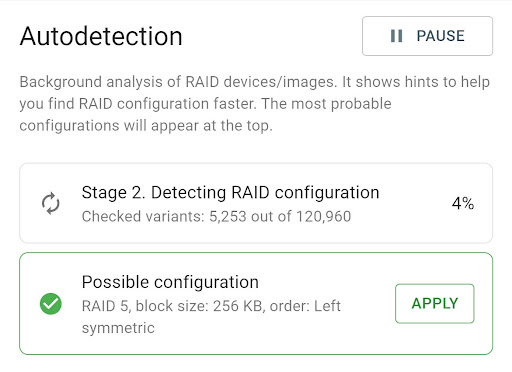
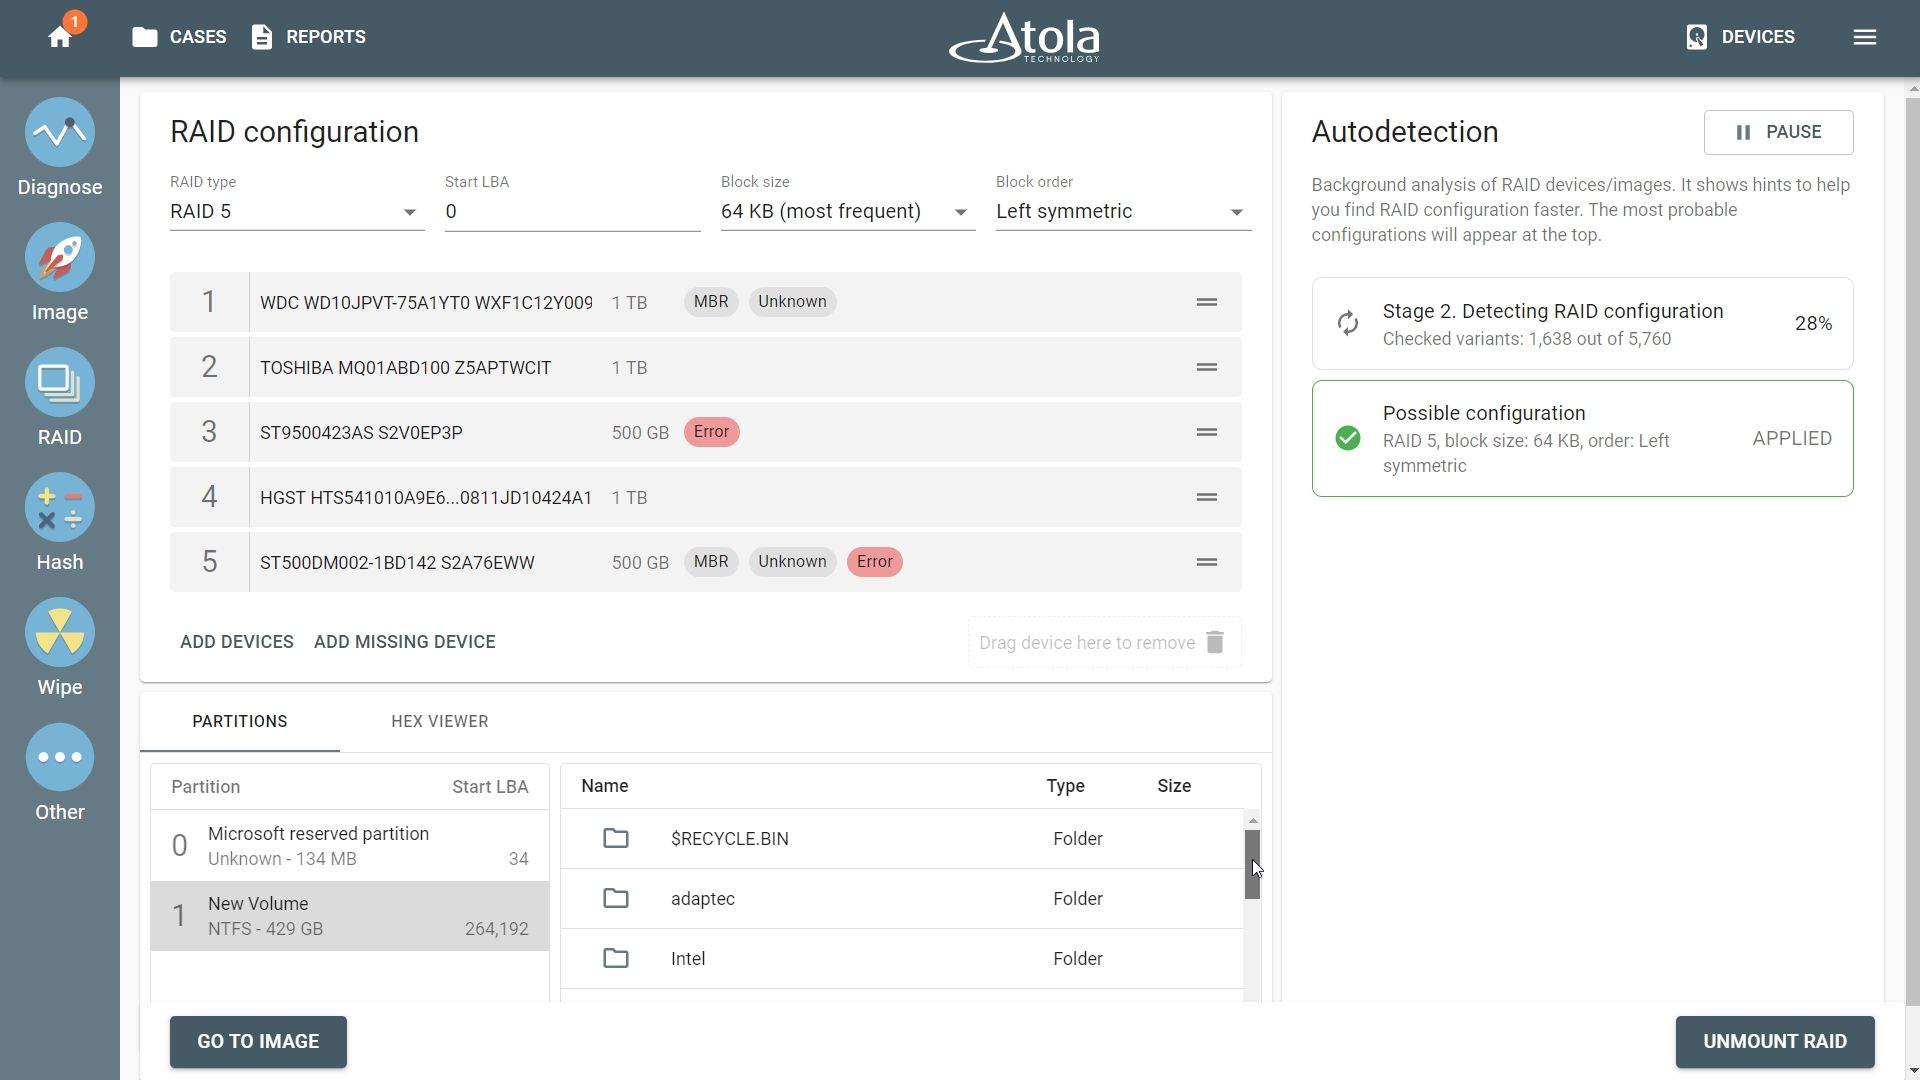
A simple selection of all RAID members (be it devices, images or a combination) instantly launches Autodetection that consists of two stages.
Stage 1: TaskForce reads data from the initial 3M sectors of the members to identify the RAID type and narrow down the number of combinations for the next stage;
Stage 2: TaskForce runs through thousands (in some cases, millions) of possible configurations searching for the suitable ones. The maximum combination count per Autodetection is set to 100,000,000. And if you think it is too many, then here is an example. With 12 possible block (stripe) sizes ranging from 512 bytes to 1 MB, TaskForce is able to check all possible RAID configurations for:
- 9 devices in RAID 5 array (17,418,240 variants)
- 10 devices in RAID 0 array (43,545,600 variants)
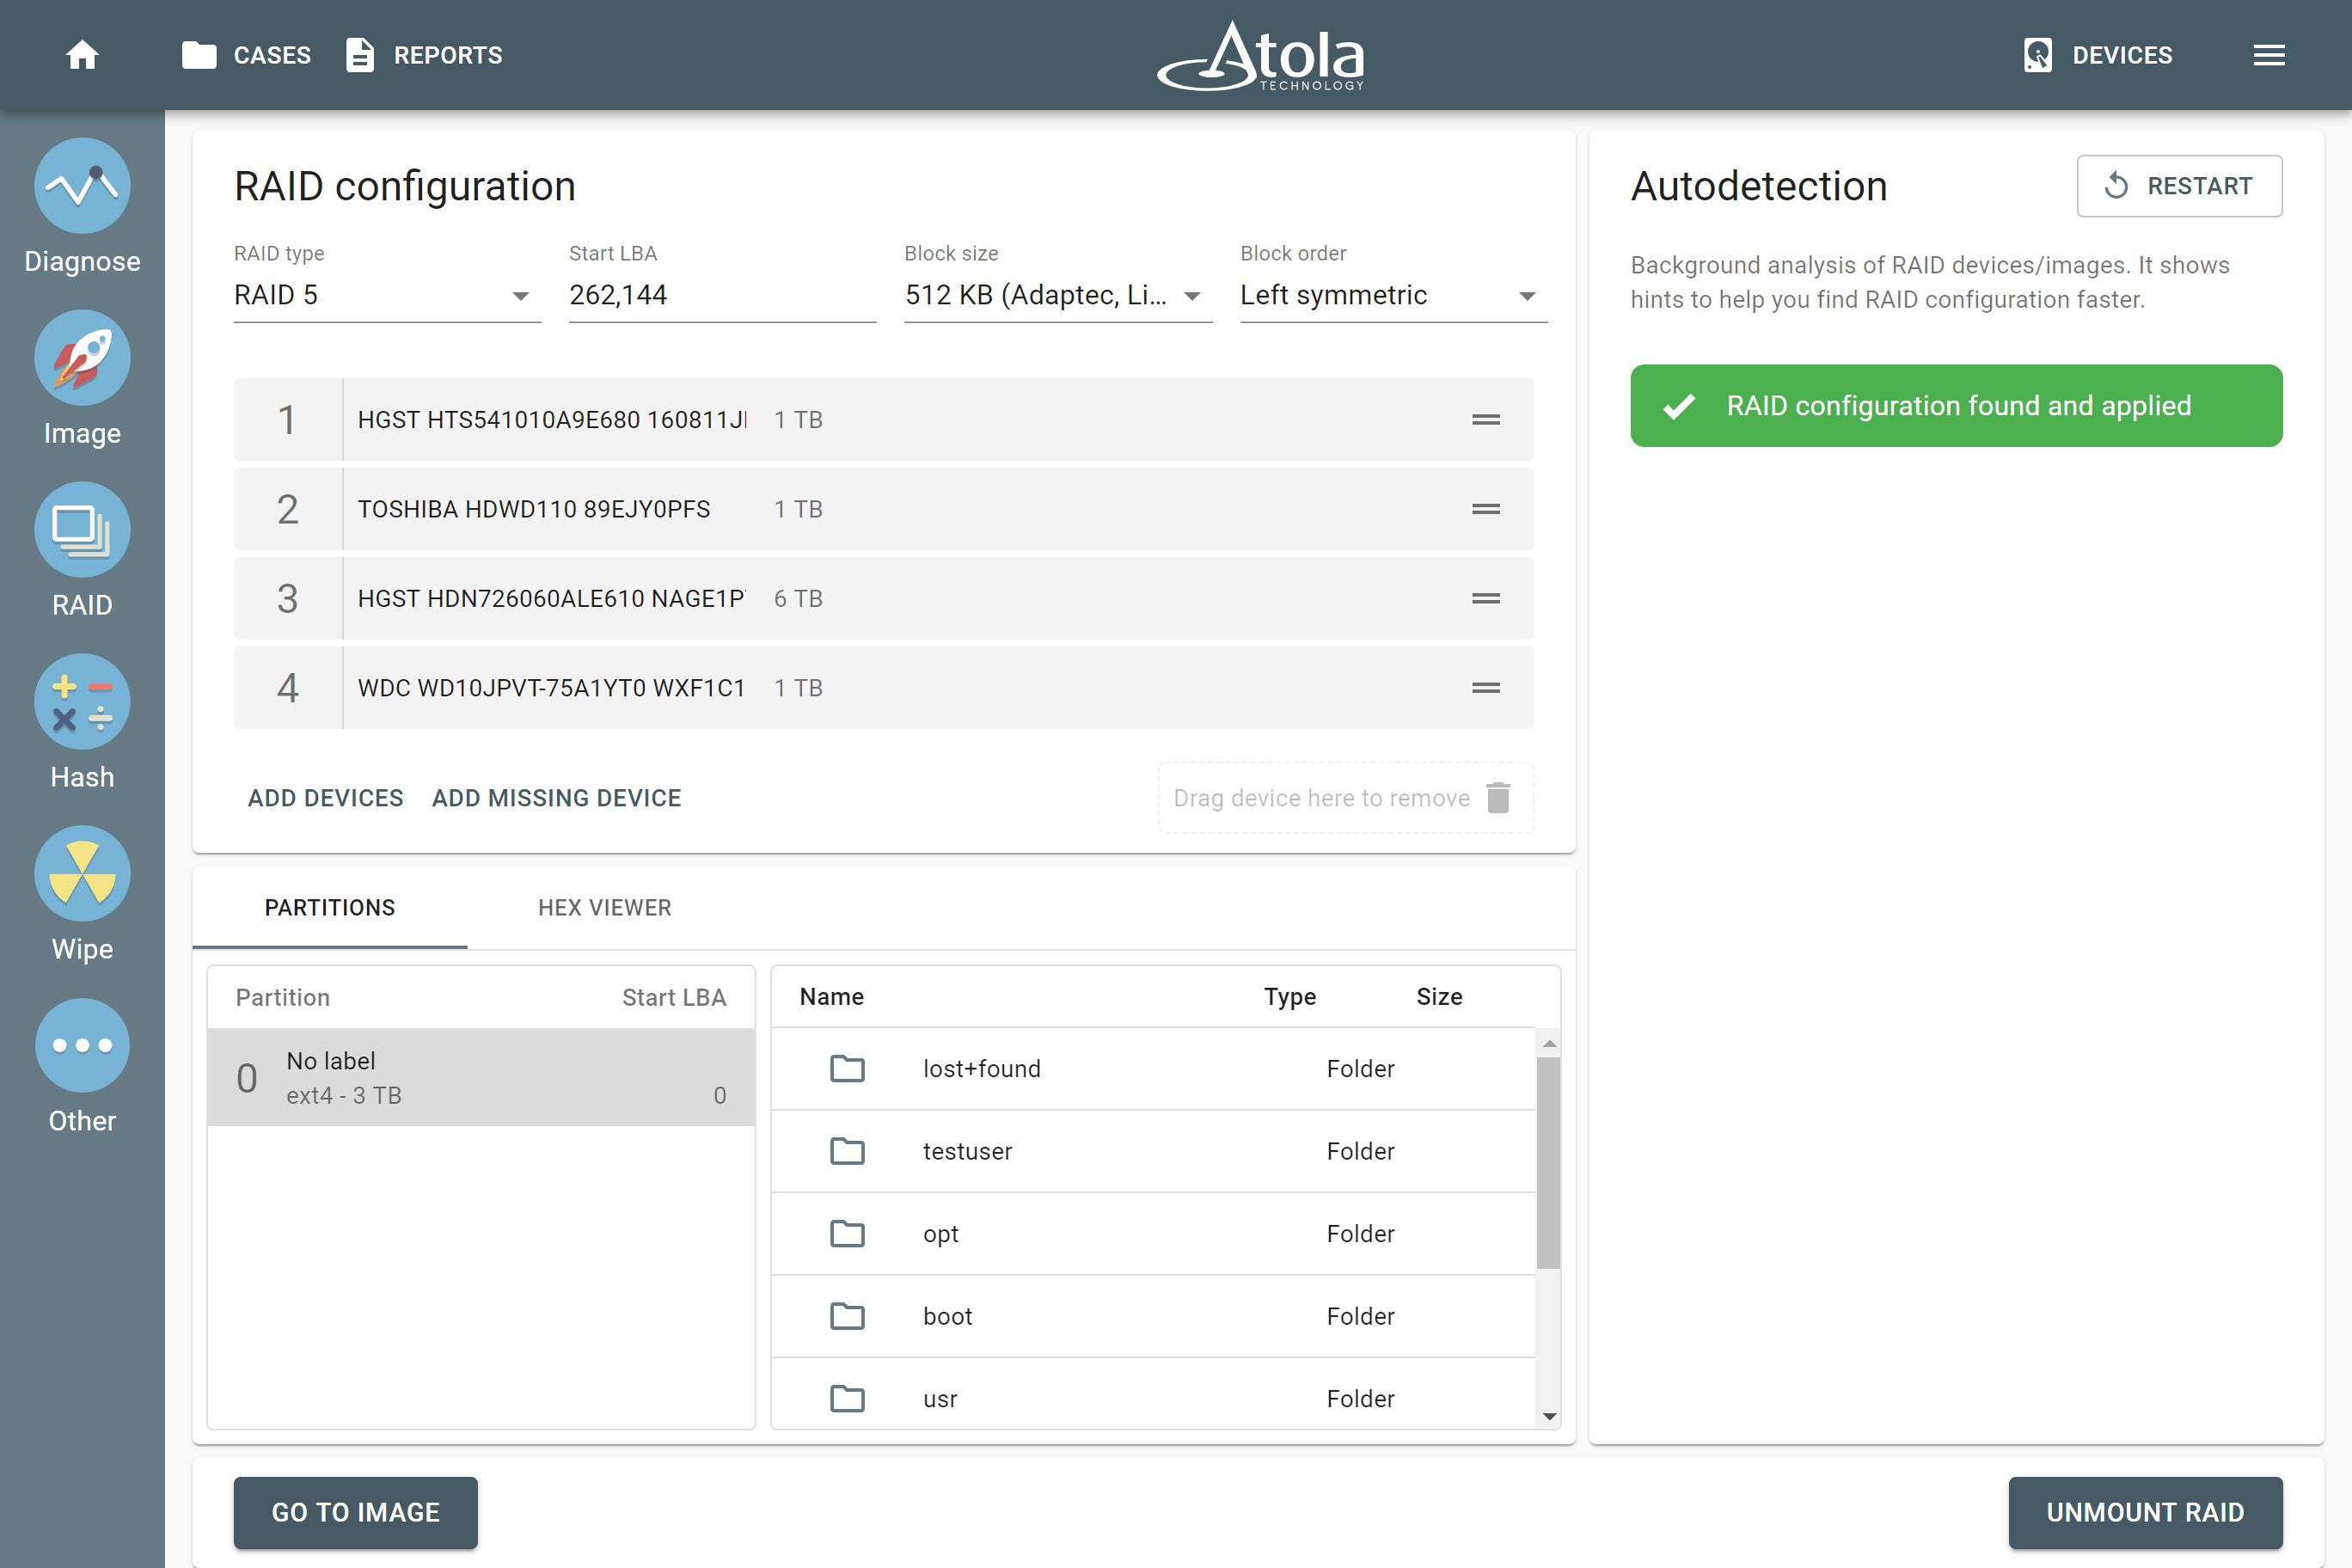
If you know the configuration, you are free to enter it manually. The Autodetection module produces an output of configurations that are deemed suitable after a verification of the RAID’s file system. To apply the suggested configuration, simply click the Apply button.
At this point, the members are instantly arranged into the correct order, RAID type and other configurations are applied automatically, file systems are mounted and you get a preview of the file structure in the Partition preview. In case no suitable configuration has been identified, we have introduced an additional Stage 3 of Autodetection process. It uses an alternative heuristic approach during the configuration search and indicates the percentage of valid files resulting from each possible configuration it has detected.
RAID partition preview
Every change in RAID configuration prompts the bottom Partitions panel to refresh. If the configuration is correct, file systems are found and validated, so that you see partitions and their contents.

When a RAID array is reassembled, you can proceed to either imaging or logical imaging.
Linux mdadm: instant RAID recognition
Atola TaskForce instantly identifies and mounts mdadm-created RAID arrays and their configuration by detecting controller metadata. With TaskForce, this process takes no more than two seconds and requires no manual application.
Imaging a reassembled RAID
For full image acquisition, simply select your target, and start the session. All imaging settings can be applied to such acquisitions. TaskForce will image data at a speed sustained by the selected target. Targets are usually the bottleneck when imaging RAIDs whose data transfer rate is higher than that of a single drive.
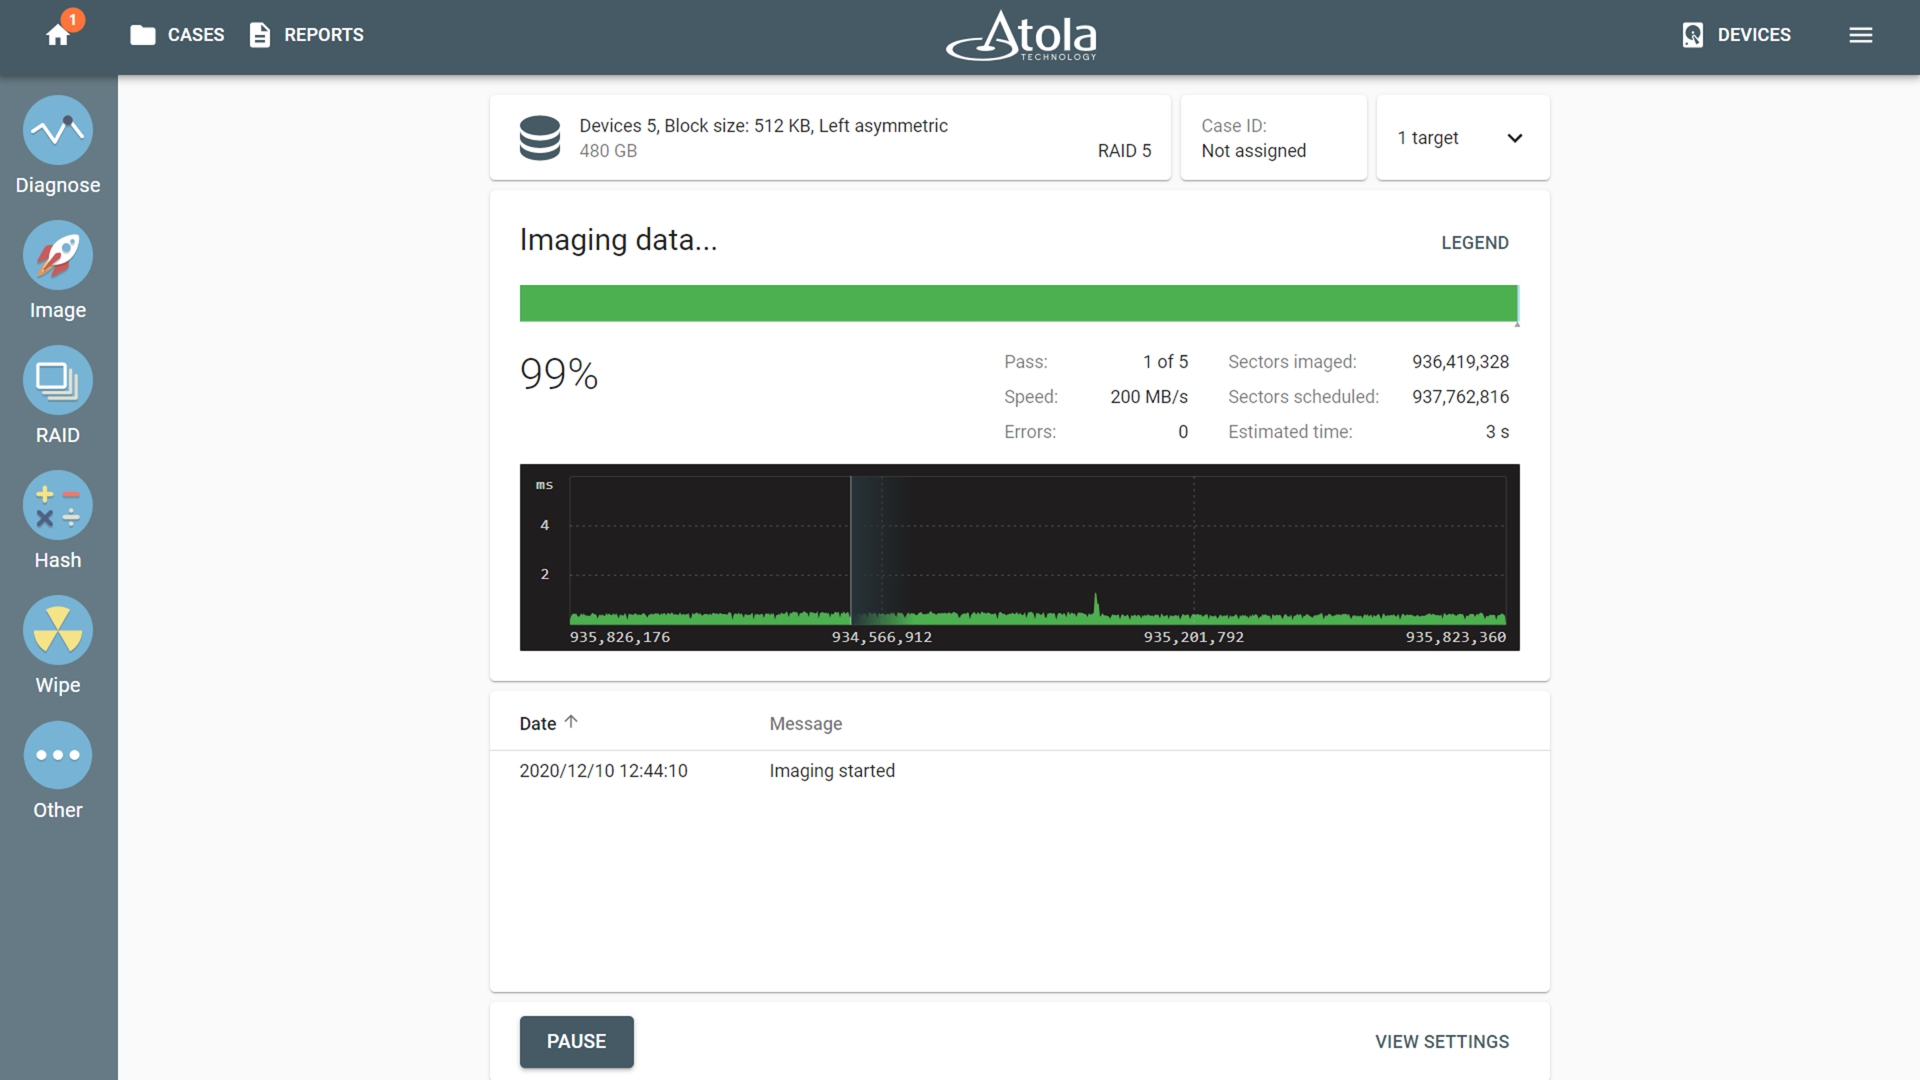
Upon the completion of imaging, TaskForce provides you with an imaging report that lists all RAID details including all members, RAID configuration, selected data range (the whole RAID or its elements, etc.).
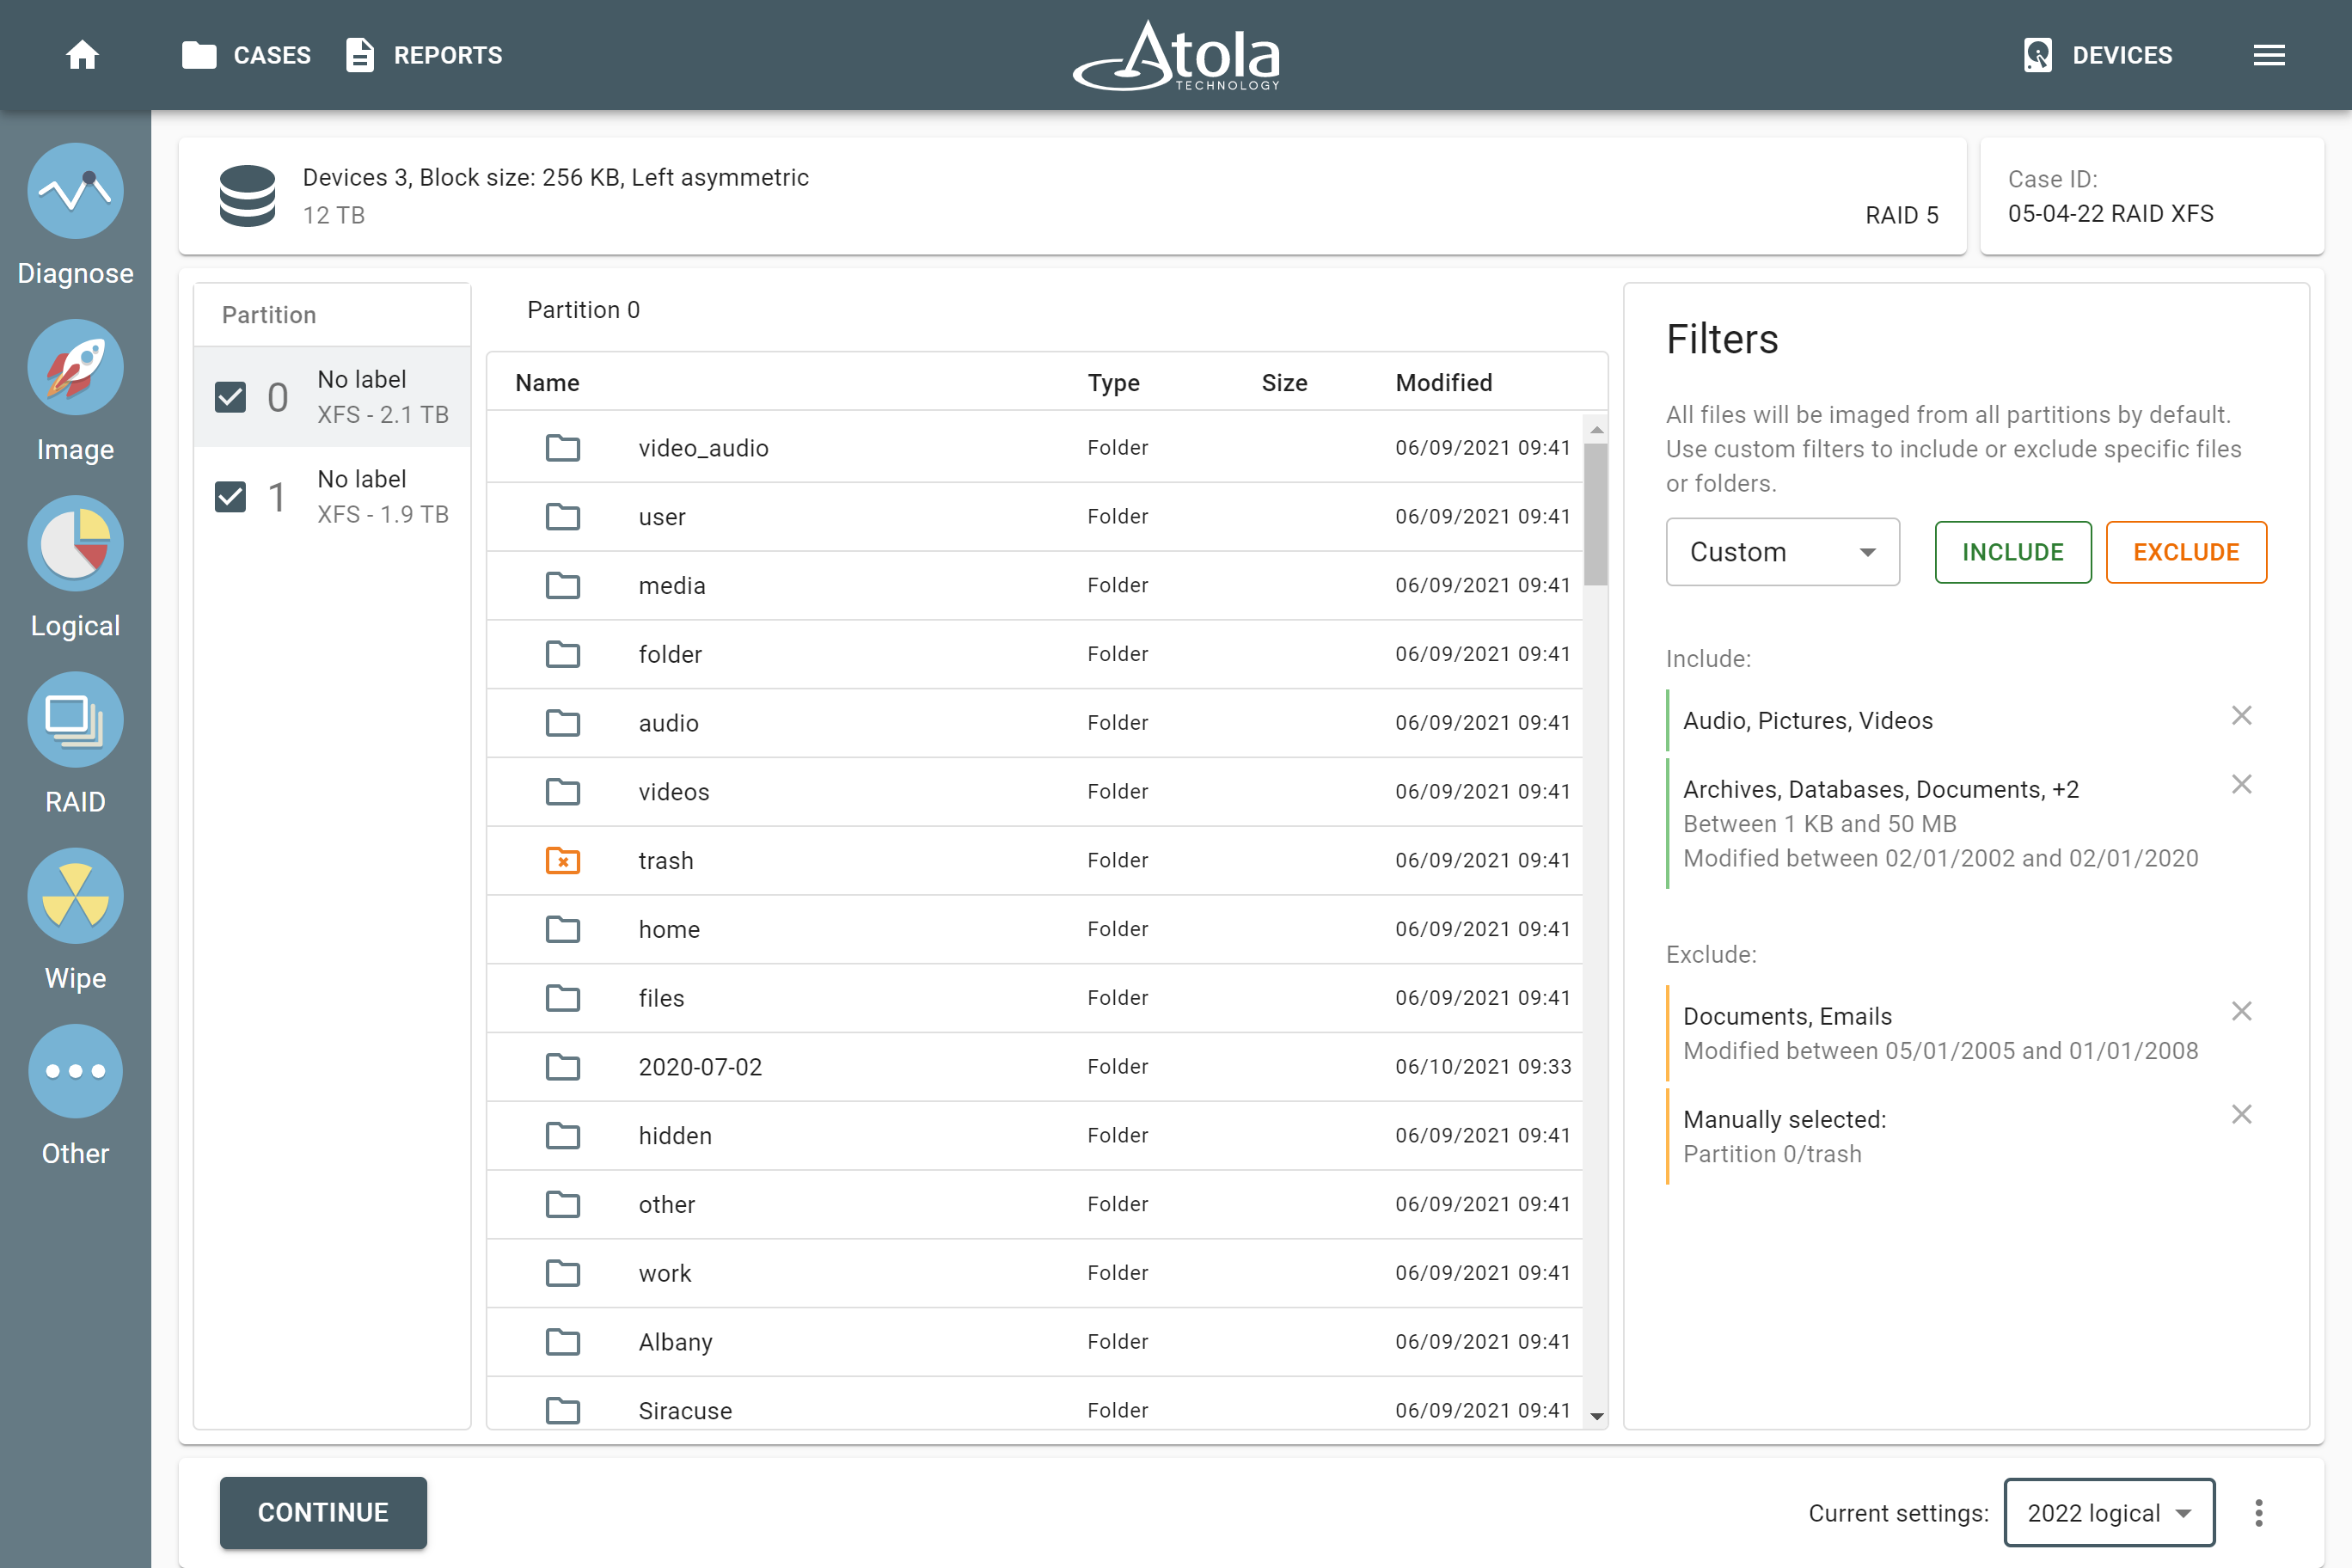
Logical imaging of a RAID
To save time and quickly acquire the most critical data from a RAID, use logical imaging. By default, logical imaging is set to image all files from the drive. To fine-tune your selection, include what you need:
- All or selected partitions
- Manually selected files and/or folders
- Select files types: archives, emails, documents, databases, financial, virtual machine, audio, video, pictures, security keys.
- Folder types: only user or only OS folders
- Time spans: when files were accessed, created, modified
- File size: from 1 byte to infinity
Exclude what is irrelevant:
- Exclude filters allow using the same parameters to eliminate irrelevant files and folders for further precision of your search.
Imaging selected partitions
Atola TaskForce lets you image individual partitions of a RAID. After RAID configuration is applied, the file system is confirmed and you can see the detected partitions. Preview their contents and decide which of the partitions is of interest. Click the Go to Image button, select the target you want to use, go to the Settings and select Imaging only sectors with data. Unselect the partitions you want to exclude from imaging, Save this change and click Start.
Imaging RAIDs with redundancy that contain a missing device
TaskForce uses the redundancy of RAIDs (such as RAID 1, 5 or 10) to create a full image of the RAID even if a member is missing or is heavily damaged. To do that, select all the available RAID members and click Add missing device button underneath the list of RAID members. This will make TaskForce take into consideration the possibility of such unknown device being a part of this RAID when searching for a suitable configuration.
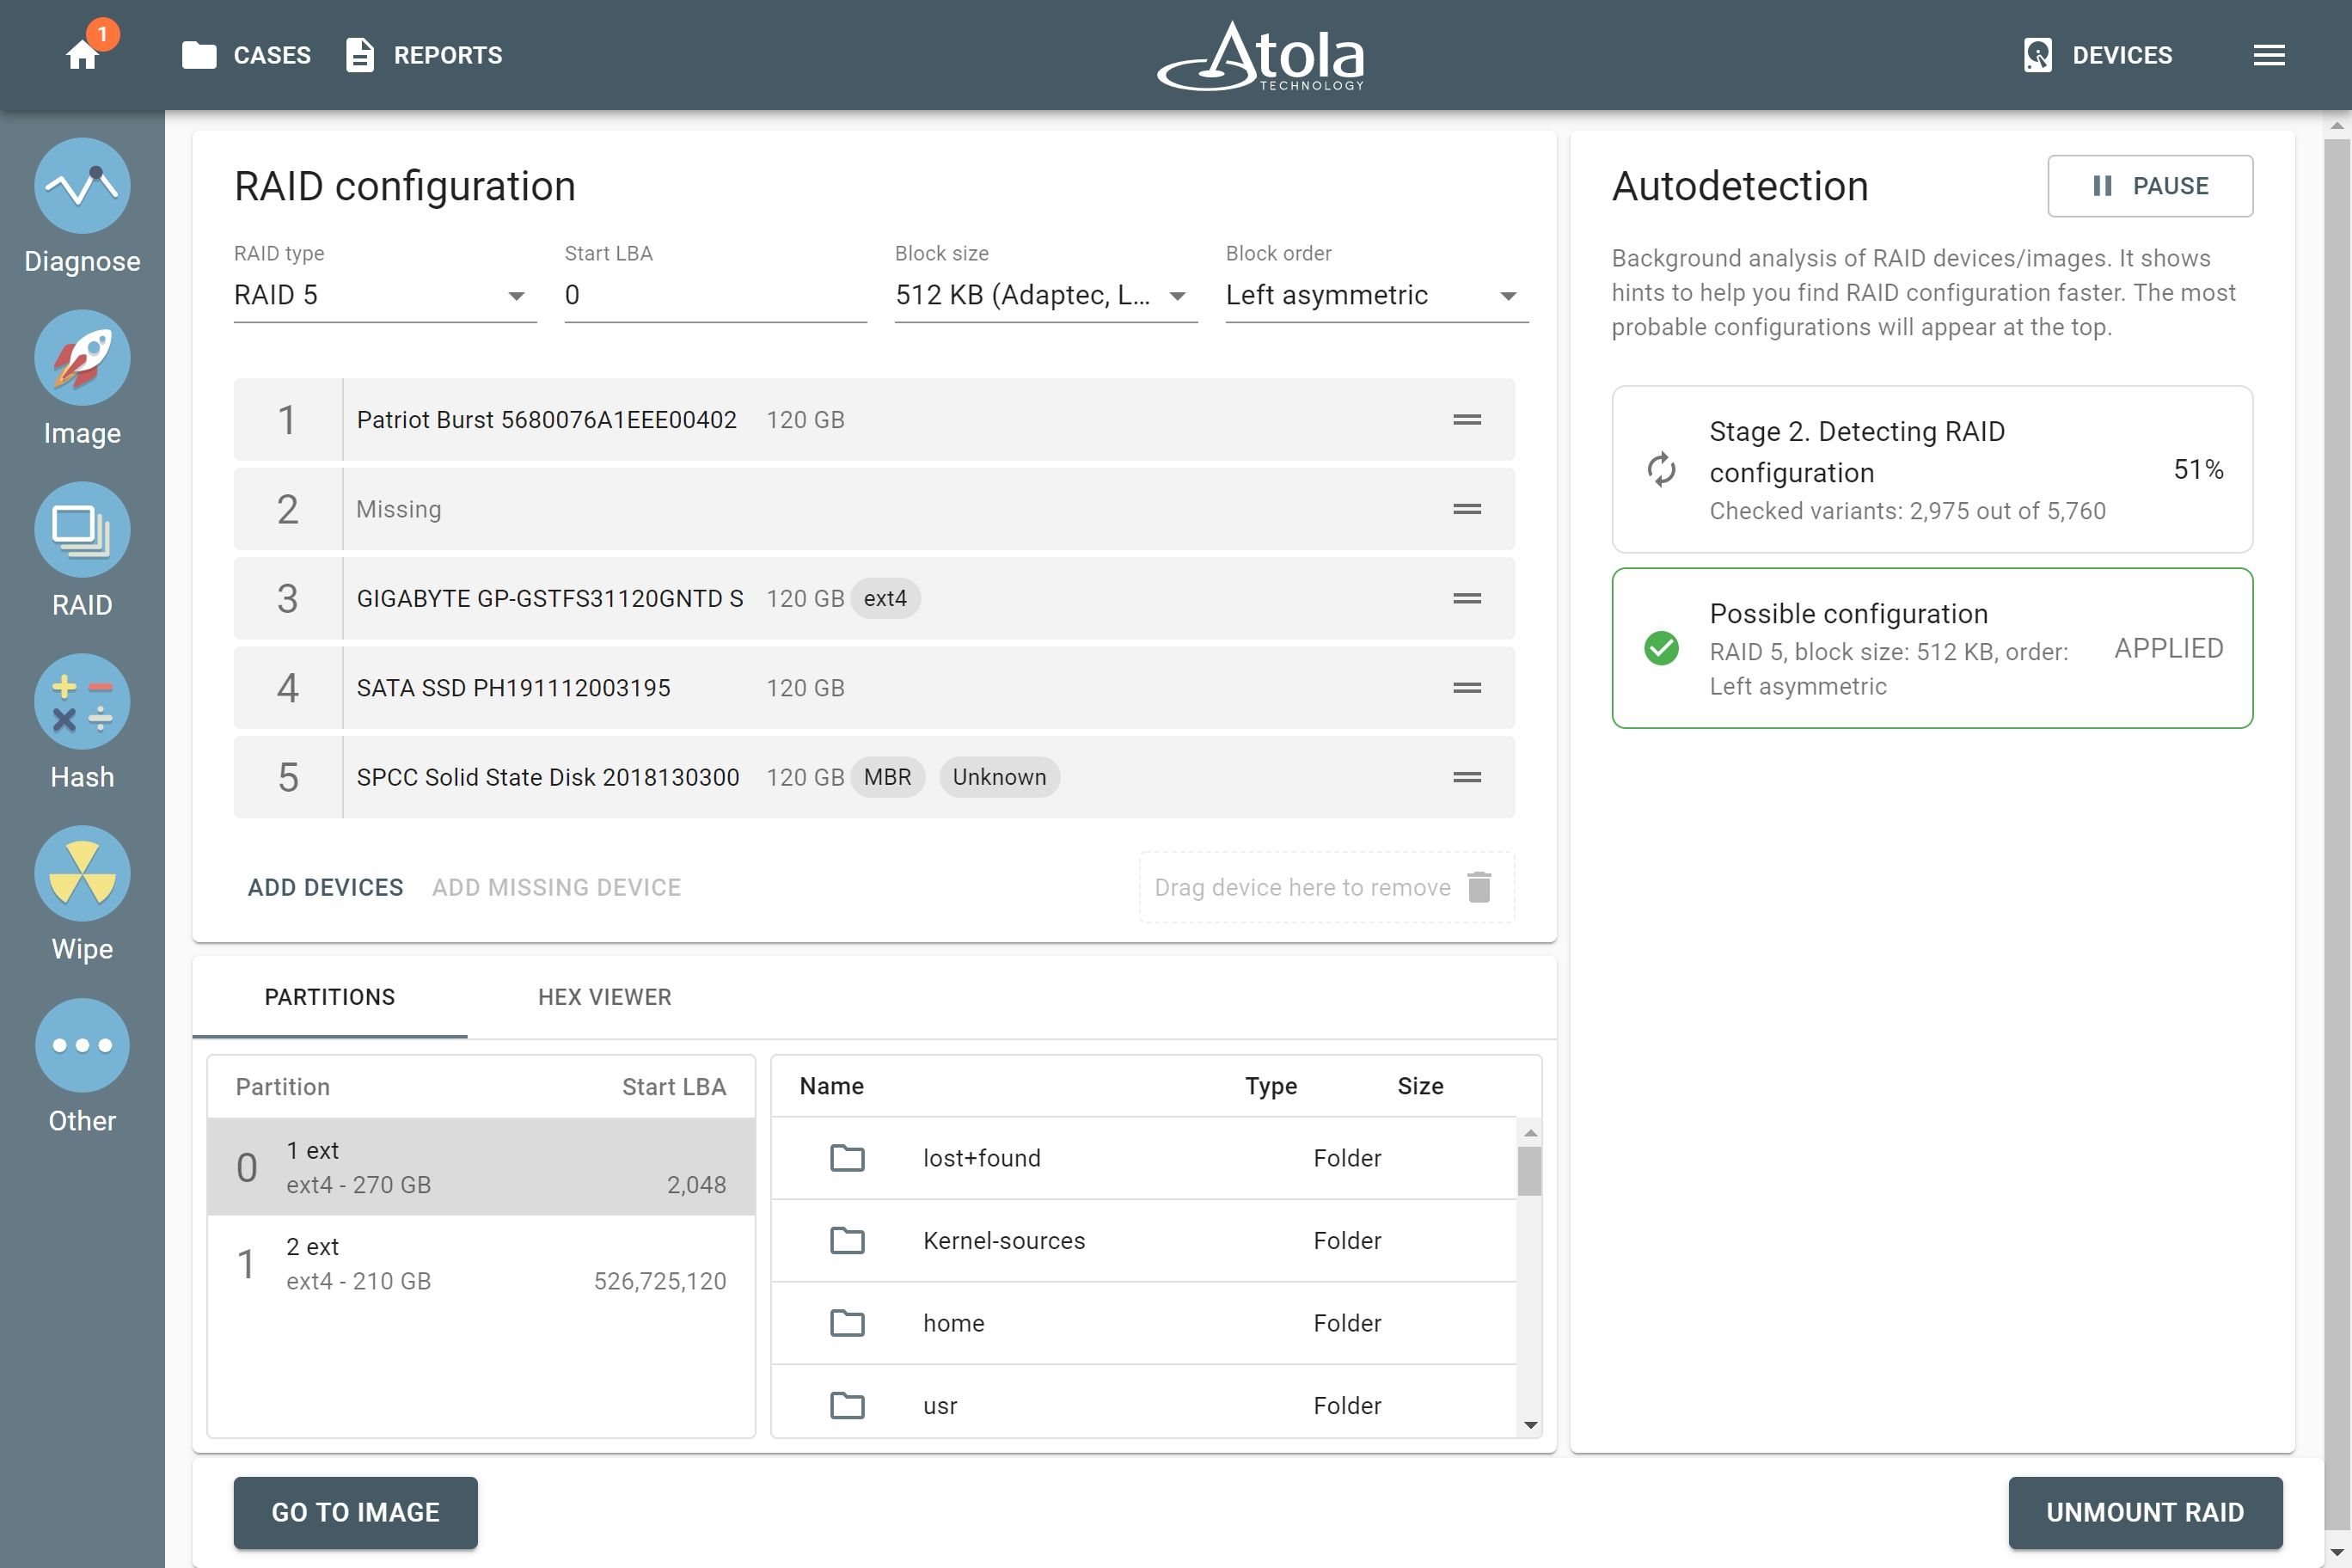
In the imaging report, you will see which of the devices of the given RAID array was missing. Other RAID parameters, such as type, block size and order, will be also clearly reflected in the report.
Imaging RAIDs with redundancy containing damaged drives
Atola TaskForce can detect the parameters of the RAID 5 array with two damaged drives and successfully image such RAIDs regardless of errors. After the RAID members are selected and the Continue button is pressed, TaskForce autodetection module starts running immediately.
Stage 1: When TaskForce reads data on the drives to identify RAID type and runs across an error, the system displays error tags next to the respective RAID member.
Stage 2: TaskForce identifies a suitable RAID configuration. Once TaskForce detects the configuration, click the Apply button. Despite read errors, Atola TaskForce can mount the partitions for preview by rebuilding the missing data using the data redundancy of the RAID. Later, during the imaging session, when coming across an error, it automatically reconstructs the missing data, using the parity blocks on other RAID members.
TaskForce’s RAID module is being enhanced and improved with every firmware update we release. We collect your feedback to understand your challenges better and create solutions that make your job fast and easy. Tell us what you need: [email protected]

- RAID imaging made easy with TaskForce - May 3, 2022
- Image. Anything. Fast.What makes TaskForce the ultimate forensic imager - February 9, 2022
- RAID configuration detection in Atola TaskForce - April 7, 2021
Olga Milishenko
Olga believes that marketing is about letting the target audience fall in love with your product. She takes pleasure in catching the coolest features of Atola imagers with her camera.